
Tag Archives for " website security "

Best Free SSL Certificate
You need a secure sockets layer (SSL) certificate to keep information on your website private.
It’s also going to let Google know that your site is safe and trustworthy.
This is really important. Some web hosting providers like Bluehost provide an SSL certificate for free when people sign up.
Disclosure: This content is reader-supported, which means if you click on some of our links that we may earn a commission.
If you are stuck getting this digital certificate yourself, though, I can show you how to get as many free SSL certificates as you need.
Don’t put this off.
You can get one in a couple of minutes.
Why?
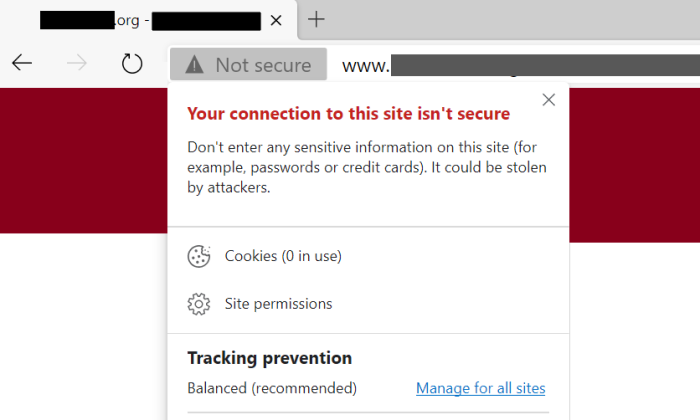
If you don’t have an SSL certificate, all the popular browsers like Chrome and Safari are going to warn users that your site is potentially unsafe:
I can’t think of a better way to scare people away.
Would you click through?
So, what about those free SSL certificates?
It’s way better to get one and let every potential visitor know that your site is safe and trustworthy.
Once you have an SSL certificate, people can access your site from any device and know that the information they share—like login credentials or credit card numbers, for example—remains private.
SSL is like sending a message in a sealed envelope instead of passing an open note.
Of course, it’s more technical than that, but the simple truth is this: If you own a website, you need an SSL certificate.
Instead of an aggressive warning, people will see a closed padlock logo next to your web address:
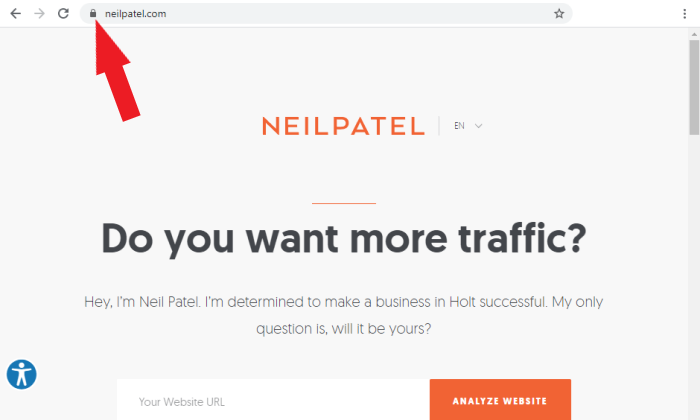
Ahhhhh. That’s much better.
Okay, let’s get you set up.
Here’s my list of the only four free SSL certificate options you need to check out.
After the reviews, there’s a brief buyer’s guide that highlights key considerations in making your decision.
Word to the wise: There are a lot more “free” SSL certificate options out there.
BUT they either are not free forever or have annoying limits for how many certificates you can get.
Don’t waste your time—these are the best free SSL certificates you can get.
Best Free SSL Certificate Providers
#1 – Bluehost Review — The Best Web Hosting with a Free SSL Certificate
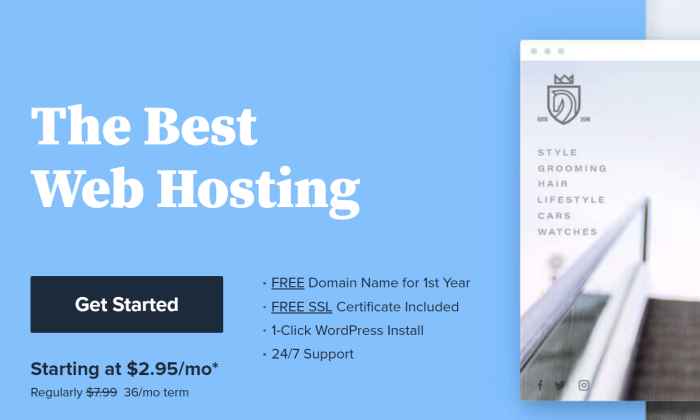
Pros:
- Free SSL certificate included with hosting
- Incredibly easy to enable and renew
- Protects unlimited subdomains free
Cons:
You still have to pay for hosting
Additional SSL Certificates are not free (but it may not matter)
Why You Prefer Bluehost?
Bluehost is one of the most affordable web hosting solutions out there.
It’s a well-known and widely trusted company that delivers a ton of value to customers.
For example, Bluehost includes a free SSL certificate when you sign up for any hosting plan.
You’ll also get a free domain name for the first year, which makes it a perfect all-in-one package for people who want to get their first site online.
Domains typically cost $10-15 per year, which helps keep costs low.
You still have to pay for hosting, but you have to do that one way or another. Why not go with the host that gives you a free SSL?
I recommend the shared hosting plans because they are the best price and make SSL security as simple as humanly possible.
You are limited to a single shared SSL certificate per hosting account, but that may be all you need.
That’s because the free SSL certificate through Bluehost covers all of your parked domains and subdomains. Whoa.
Wildcard SSL Certificate
Usually, you have to pay for a Wildcard SSL certificate to cover all your subdomains, like www.neilpatel.com, www.mail.neilpatel.com, and so on.
Wildcards can cost a pretty penny, but you don’t have to worry about it with Bluehost shared hosting.
It also covers parked domains, which are basically sites you own that point to your main site.
I could buy up www.neilpatelmarketing.com and point it to www.neilpatel.com, for example.
Maybe I want that for future development or to make sure no one else is using my name.
Whatever the reason, securing parked domains is no charge with Bluehost shared hosting.
With VPS and dedicated hosting, you get more control over how many SSL certificates you can use.
If you need it, get it, but the customizability comes with increased responsibility.
It’s a lot less hands-off than the shared plans.
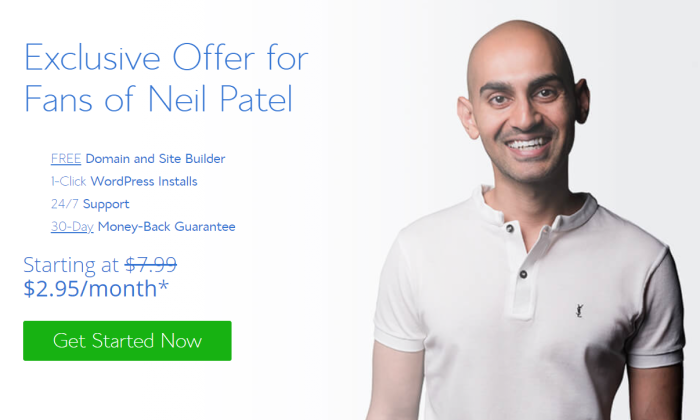
Plus, you can get an exclusive deal on Bluehost shared hosting because you are a reader of my blog:
In addition to their phenomenal prices, Bluehost makes it remarkably easy to install and renew SSL certificates on your site.
Bluehost uses Let’s Encrypt as the certificate authority, but almost all the technical legwork is off your plate.
Instead of having to set up the automated monitoring and renewal process on your server, you push a button.
It’s pretty slick.
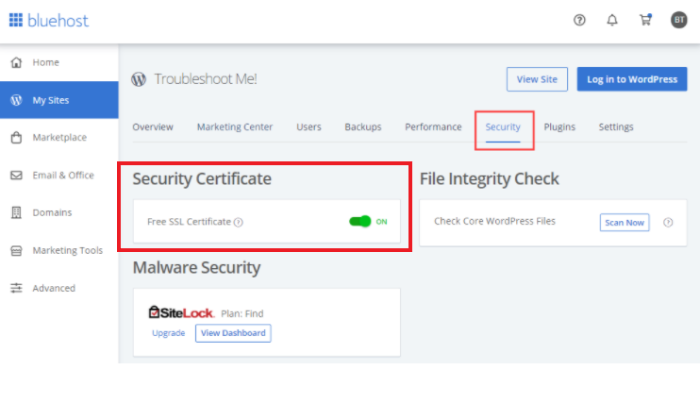
Below, you can see an example where the free SSL certificate has been enabled with one click for a WordPress site.
Simply turn it on and Bluehost does the rest.
How to Renew SSL Certificate?
No wonder Bluehost is one of the most popular ways for people with WordPress sites and blogs to keep their visitors’ personal information secure.
Renewing the certificate is just as easy.
Just make sure that AutoSSL is enabled. If you are on the shared hosting plan with the free SSL certificate enabled, AutoSSL is already running.
I highly recommend Bluehost if you don’t have a hosting provider.
It takes care of hosting, domain, and SSL in one fell swoop.
If you already have a web host, they should help you install SSL certificates, because it probably won’t be as easy as Bluehost.
And, if your hosting customer support isn’t helping, it’s time to jump ship. SSL encryption is a must for every website and there’s no point in sticking around if the service is lacking in something so essential.
Sign up with Bluehost today. Get a great deal and rest easy with their 30-day money-back guarantee.
#2 – Let’s Encrypt Review — The Best Source for Free SSL Certificates
Pros:
- Virtually unlimited free SSL certificates
- Free Wildcard and SAN certificates available
Cons:
- Some technical skills required for setup
- Recommended certificate renewal every 60 days
Why Do You Prefer Let’s Encrypt?
Let’s Encrypt is a well-known certificate authority operated by the nonprofit organization Internet Security Research Group.
Their mission is to “create a more secure and privacy-respecting Web.”
It accomplishes this goal by offering SSL certificates that are free to obtain, easy to renew, and simple to manage.
You can use them for any server that uses a domain name, such as a web server, FTP server, or mail server.
The rate limits for creating SSL certificates on Let’s Encrypt are quite high:
- 50 per registered domain per week
- 100 subdomains per certificate
That’s enough to issue certificates for 5,000 unique subdomains each week.
The vast majority of people will never hit this limit.
One of the major advantages of Let’s Encrypt over other free options is that you can create Wildcard and Subject Alternative Name (SAN) certificates.
That means the same Let’s Encrypt certificate can be used to secure multiple domains and subdomains.
For people with a lot of sites, the ability to generate SANs and Wildcards can make SSL certificate management much easier.
Instead of needing to install, monitor, and renew a separate certificate for each domain/subdomain, they can manage several that cover them all.
You might have seen Wildcard and SAN certificates going for hundreds and thousands of dollars.
Those ones in particular come with much more rigorous validation processes, where the certificate authority does a background check on your organization.
Let’s Encrypt only authenticates that you control the domain.
Plus, the spendy SSLs come as part of an online platform that makes certificate installation and management easier.
With Let’s Encrypt, you have to figure that process out on your own.
This can be challenging for people who aren’t techies, especially for Wildcards and SANs, but by no means impossible.
Thousands of users without a computer science degree have raved about Let’s Encrypt.
Yes, it takes some time to learn, but it doesn’t cost a dime.
There are lots of videos and documentation out there to help you with this.
Let’s Encrypt wants people to use SSL certificates, so the nonprofit has made it as easy as possible, even if it doesn’t feel like it at first.
Renewing certificates is much the same.
A little bit of learning with a big payoff.
Let’s Encrypt uses the Automatic Certificate Management Environment (ACME) protocol to make the process of protecting your servers much easier.
The purpose of ACME is to automate the process of renewing certificates without any human intervention.
Here’s how it works.
There are many ACME client options that will work better in the case of non-Windows servers.
If your web host supports Let’s Encrypt, getting the ACME software setup should be pretty straightforward.
Some web hosts, like Bluehost, partner with Let’s Encrypt to take the technical backend out of the equation.
Bluehost’s AutoSSL tool lets users simply enable SSL protection once and soon-to-expire certificates are automatically renewed with new Let’s Encrypt certificates.
If you want privacy and security for your website, but you don’t want to spend money, Let’s Encrypt is the first place you should look.
#3 – Cloudflare Review — The Best Free SSL Certificate Alternative
Pros:
- The easiest form of SSL security to implement
- Faster page load times
Cons:
- The free plan doesn’t encrypt data between your servers and Cloudflare
- Still advisable to get a traditional SSL certificate
Cloudflare is a content delivery network that helps people improve their website security and performance.
It’s not a certificate authority like Let’s Encrypt, so it doesn’t issue SSL certificates, but it can help you accomplish some of the same goals.
You can start using Cloudflare immediately, regardless of the platform you are on.
Simply sign up for a free account and change your domain nameservers to Cloudflare.
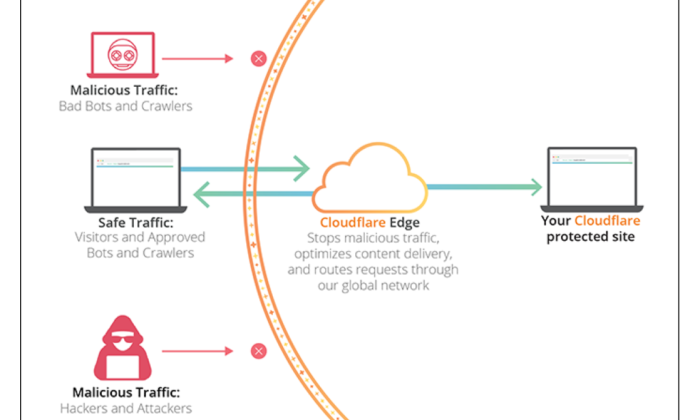
That way, all traffic to your website will be routed through Cloudflare, where malicious attacks are stopped in their tracks.
You don’t have to worry about SAN and Wildcard certificates, because you can cover as many domains and subdomains as you like via Cloudflare.
Basically, you let Cloudflare handle all the SSL certificates on their servers.
Instead of managing your own certificates, Cloudflare is like the bouncer to your nightclub.
No bad apples get in the door.
The upside to this is that you simply enable SSL with Cloudflare and you don’t have to worry about renewing certificates.
Here’s a breakdown that shows the difference between traditional SSL management and configuring it with Cloudflare:
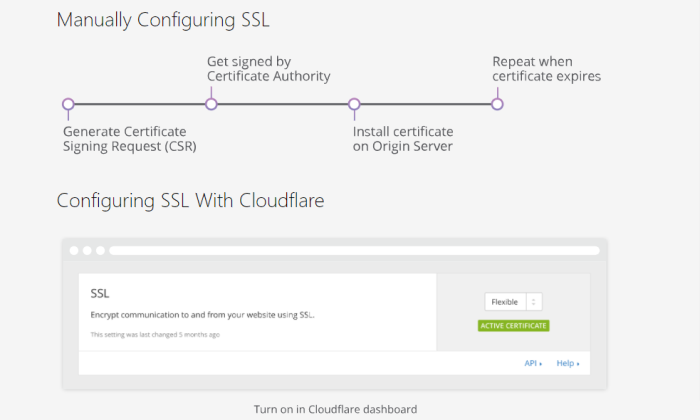
Simply by enabling Cloudflare, you can ensure that visitors to your site are never going to receive a warning from Google that your site is unsafe.
Is there a downside to letting Cloudflare take the reins on SSL security?
Well, if Cloudflare were ever compromised, you’d be in trouble, but the same can be said for Let’s Encrypt or any other service you trust.
I wouldn’t worry about that.
The real issue is that Cloudflare doesn’t protect the traffic between your servers and Cloudflare.
With their free version, you are only encrypting traffic between Cloudflare and the people trying to visit your site:
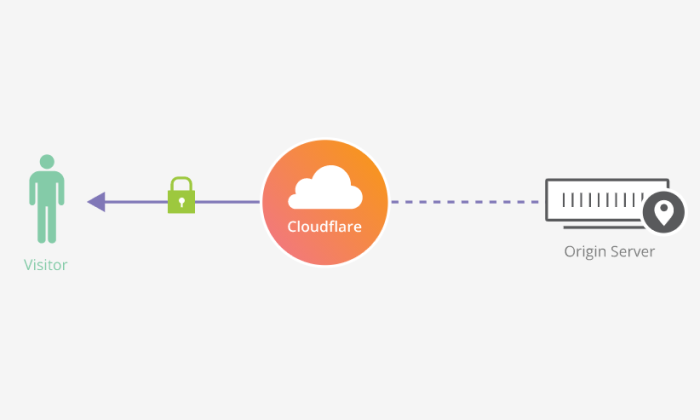
With Cloudflare’s paid SSL options, you can also encrypt the traffic flowing between your servers and Cloudflare.
If you want complete encryption, use Cloudflare along with a free SSL certificate from Buypass or Let’s Encrypt.
This way, you can still get full encryption without spending a dime.
So why not just go with one of the other free options if Cloudflare provides incomplete encryption?
Because Cloudflare will also improve your site’s performance.
It’s a content delivery network after all, so you are going to get faster page loads and better rankings in Google.
It’s also going to lower the risk of DDoS (distributed denial-of-service) attacks, which are very common.
Depending on your site, you might be fine letting Cloudflare handle all of the SSL security.
Others may want to use a free SSL certificate to protect their own servers in addition to Cloudflare.
At the end of the day, it’s going to increase your site’s performance and security with almost no work needed on your end.
Start using Cloudflare today to see what a difference it makes.
#4 – Buypass — The Best for Free 180-Day SSL Certificates
Pros:
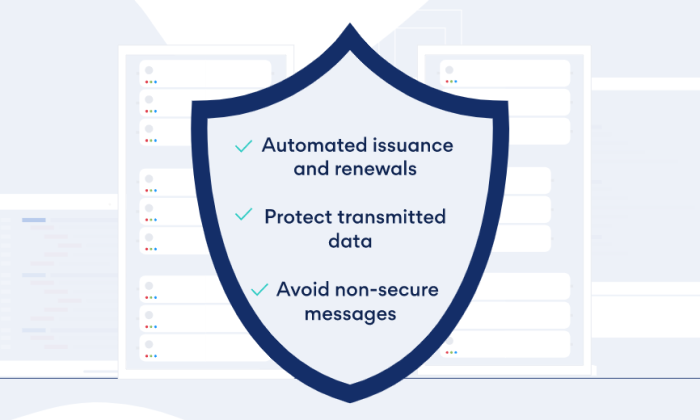
- SSL certificates are good for 180 days
- Secure multiple domains and subdomains with a single certificate
Cons:
- No Wildcard certificates
- Some technical skills required for setup
Buypass is a relative newcomer to the SSL certificate scene, but it has earned a good reputation for robust, dependable solutions.
Buypass is trusted by all major browsers.
It offers both free SSL certificates—known as Buypass Go SSL—and paid options for people who need to validate their organization’s legal business status.
The major perk to using Buypass is that their SSL certificates are good for 180 days, compared to the 90-day period for SSL from Let’s Encrypt.
So, you don’t have to worry about renewing certificates as often.
Like Let’s Encrypt, Buypass uses the ACME protocol to automate the renewal of certificates, which makes the process even easier.
This takes a little effort to set up, but once you have installed the ACME client on your server, the renewal process will be fully automated.
While Buypass will let you secure multiple domains and subdomains with a single SSL certificate, it doesn’t offer a true Wildcard that secures unlimited domains.
Let’s Encrypt still has the leg up there.
The rate limits for Buypass are not as generous as Let’s Encrypt, but they are still more than enough for most people. You can create up to 20 certificates per domain each week.
If the rate limit is not an issue and you don’t need Wildcard certificates, Buypass Go SSL is a great free forever option.
It more or less has the same features as Let’s Encrypt but with an SSL certificate that lasts twice as long.
Check out Buypass today and see why this up-and-coming certificate authority is growing in popularity.
What I Looked at to Find the Best Free SSL Certificate
I wanted to find free-forever SSL certificates.
Free trials are great, but you’re going to have to pay after you start to depend on their service, and sometimes quite a bit.
The options I chose aren’t going to raise your budget a single penny, ever.
So why does anyone pay for an SSL certificate?
The short answer is that only one type of SSL certificate is free and some companies need the other types.
My SSL certificate guide explains all three types:
- Domain validated (DV)
- Organization validated (OV)
- Extended Validated (EV)
If you need an OV or EV certificate, I’m sorry, but there is no way to get one for free.
There’s too much legwork involved in the real-world validation process.
In fact, if you see an OV or EV for free, it’s definitely a scam to avoid.
The good news is that a DV certificate is still going to protect your site and keep Google from warning people that your page is not secure.
When it comes to free forever SSL certificates, you still have a few good options.
Each company does things a little differently.
Here are the key criteria you should use to make your decision about which option is going to work best for your situation.
SSL Certificates Rate Limits
How many free SSL certificates do you need?
If you need one, or even just a few, you are going to be fine choosing any one of the options on this list.
On the other hand, if you need a lot, the rate limits matter.
Let’s Encrypt has the highest rate limits (50 certificates per domain per week), which means you can generate the most free SSL certificates with their platform.
Buypass gives you fewer (20 certificates per domain per week), though it is still quite a lot.
Another option for people who need to protect a lot of sites is Cloudflare.
Since it handles all of the SSL certificates, the rate limits aren’t really a factor.
Do note that this won’t protect traffic between your server and Cloudflare, so you may want to use a combination.
Free SAN and Wildcard SSL Certificates
Now you don’t need to get an individual SSL certificate for every domain and subdomain you have.
A DV certificate typically works for a single domain, but there are special kinds of SSL certificates that can do more.
Depending on the SSL certificate provider you choose, you may be able to get:
Wildcard:
These let you use a single SSL certificate to protect an unlimited amount of subdomains.
For example, I could use a wildcard certificate to protect both neilpatel.com, mail.neilpatel.com, support.neilpatel.com, and so on.
SAN:
Subject Alternative Name certificates let you use a single SSL certificate to protect multiple domain names.
For example, I could use an SAN certificate to protect neilpatel.com and npdigital.com.
These may also be called Unified Communications Certificates (UCC).
Let’s Encrypt issues both Wildcard and SAN certificates.
Buypass issues SSL certificates that can be used for multiple domains and subdomains, but not a true Wildcard.
If you only have one site to worry about, this isn’t such a big deal.
But people with many sites and subdomains can use Wildcard and SAN certificates to drastically cut down on the number of SSL certificates they use.
This makes managing and renewing certificates a lot easier.
With Cloudflare, you don’t have to worry about these distinctions once you are set up.
Compatible Hosting Providers
Some hosting providers have partnered with certificate authorities like Let’s Encrypt to make the process of installing an SSL certificate incredibly easy.
This is what Bluehost does and enabling your SSL certificate through them is simple as pie.
As soon as you enable SSL by turning it on with one click, the certificates will install and activate themselves.
If you are thinking about Let’s Encrypt or Buypass, make sure that the host supports ACME protocols.
Otherwise, you won’t be able to automate the process of renewing SSL certificates, which means you’ll be stuck doing everything manually.
Sometimes the technology doesn’t line up great. If you try to use Let’s Encrypt with GoDaddy shared hosting, for example, you will be on the hook for configuring everything.
Going with Cloudflare or jumping over to Bluehost could save a lot of time in this situation.
It’s really case-by-case, though, so it’s worth looking into which options are going to work well with your current provider.
I recommend reaching out to your provider directly, as the field is constantly changing.
What was true about compatibility last year may no longer be true, for good or for ill.
SSL Certificate Renewal
Here I’m looking at two things:
- How often do you have to renew the SSL certificate?
- How easy is managing the renewal process?
The vast majority of free SSL certificates need to be renewed every 90 days.
Let’s Encrypt are good for 90 days, but it’s recommended to renew every 60.
Buypass stands out from the crowd because of its free SSL certificate that’s good for 180 days.
This means people have to renew it twice a year, as opposed to four times.
If you don’t renew your certificate before it expires, it ceases to protect your site. Potential visitors will see the same type of security warning they would if you didn’t have an SSL certificate at all.
Now if you just have one site with one SSL certificate, renewing it every three months isn’t going to be a major hassle.
If you have a lot of sites, though, keeping track of renewals can get pretty complex.
Bluehost is nice because you can enable AutoSSL, which automates the process of identifying and replacing certificates that will expire soon.
Let’s Encrypt and Buypass let you use the ACME protocol to automate the renewal process.
This will take a little time to configure especially if the technical side of web hosting is not your forte.
That said, there are plenty of videos out there to help just about anyone get set up.
Cloudflare, on the other hand, takes the entire certificate renewal process off your plate.
Once you enable their service, you benefit from Cloudflare’s SSL certificate management.
As I noted earlier, if you use Cloudflare, it can still be a good idea to use a traditional SSL certificate to protect the unencrypted traffic going from your servers to Cloudflare.
Conclusion
If you have had to find free SSL certificates in the past, you may be wondering why ZeroSSL and SSLforFree aren’t on this list.
They used to be great sources for free SSLs, but both companies have been bought by new owners that are apparently not as generous.
Many people who use these options wind up on the hook for paying.
With the options I outlined above, you are not going to have to worry about that at all:
- Bluehost – Best web hosting with a free SSL certificate
- Let’s Encrypt – Best source for free SSL certificates
- Cloudflare – Best free SSL certificate alternative
- Buypass – Best for free 180-day SSL certificates
For most people, Let’s Encrypt is going to help them issue and renew as many SSL certificates as they need, including Wildcards and SAN certificates.
Buypass is a comparable option to Let’s Encrypt, but their SSL certificates only need to be renewed every 180 days, instead of every 90.
This can make certificate management a lot easier, even though Buypass doesn’t offer true Wildcards or SAN certificates.
Cloudflare is your SSL certificate alternative.
Your site will be safe for visitors, but you don’t have any of the headaches associated with managing certificates.
On top of that, you get a boost in site performance because of Cloudflare’s content delivery network.
That said, if you want complete encryption, it’s going to take a traditional SSL certificate in addition to Cloudflare.
At the end of the day, the best option for free SSL protection comes from using a mix of these options.
By enabling Cloudflare and one of the traditional SSL options, you can reap all the benefits of these free services, leaving no gaps in security.
Source: neilpatel.com

How to Make Your Site Secure: A Guide for Non-Technical Marketers
With technology quickly advancing, there is one distinct problem we are all facing: keeping our private lives private.
And while each of us can take steps in making our private data harder to steal (like enabling two-factor authentication when it is available, keeping our passwords secure, etc.), website owners, developers and marketers face a more challenging task.
We need to keep our site visitors and users safe.

You see, our users and visitors trust us.
When they visit our website, they may very well submit a form or install a script or software your site is inviting to install.
But what if your site was hacked and all of those invitations were not sent from you but from the hacker, and all that information is now owned by him?
What if your loyal customers will suffer identity theft simply because you failed to protect them and their information?
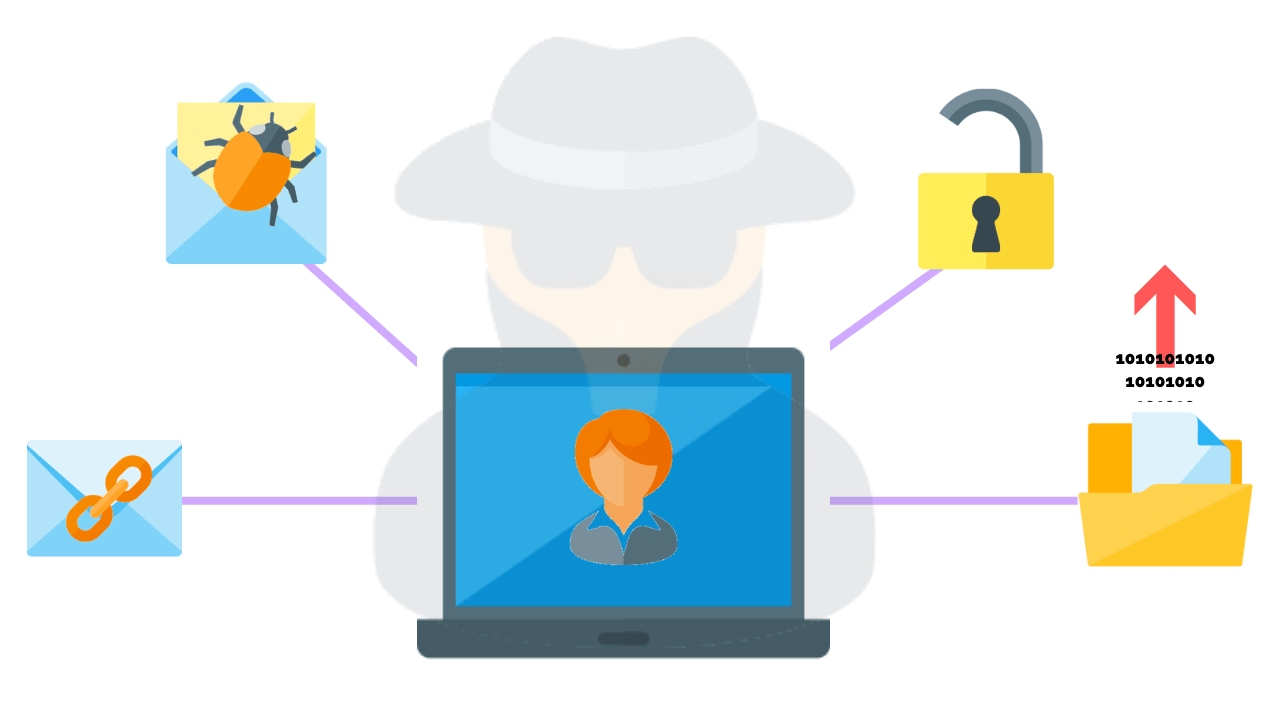
This is where a data breach is not just an inconvenience to you — it is a reputation crisis and possibly even a liability.
And cybercrime statistics are really scary:
- According to Aura, a person becomes a victim of identity theft every ten seconds
- Cybercrime increased by 600% due to the COVID-19 pandemic
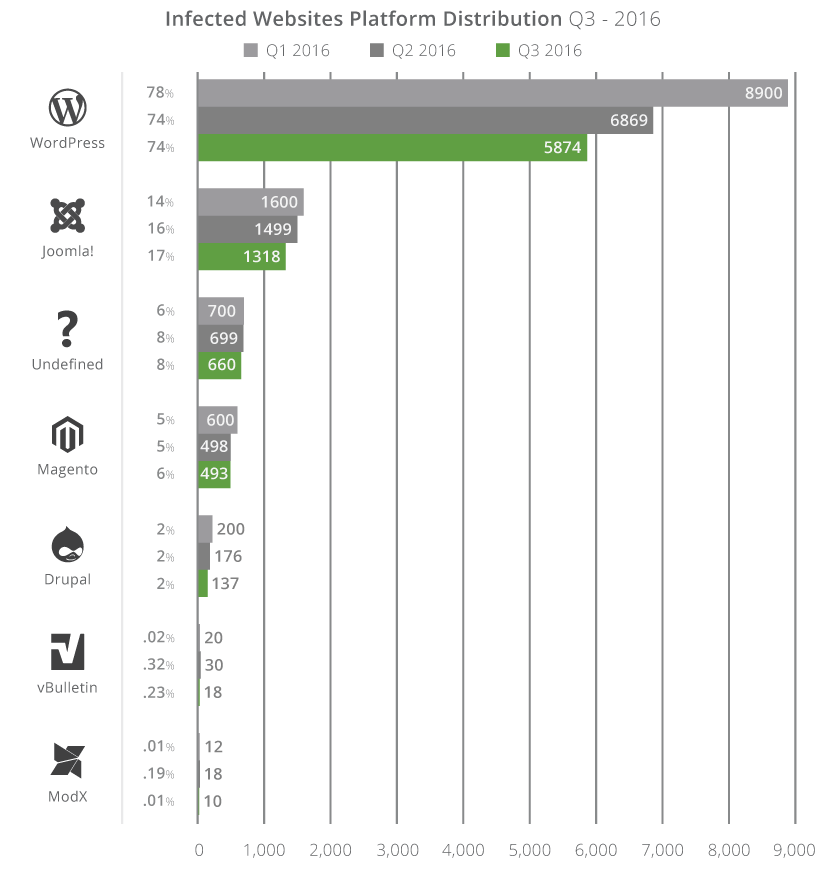
- In the search by Sucuri, out of 8000 infected websites, ¾ of those were run by WordPress.
- Every month, about 4,800 websites are compromised with form-jacking code.
If you are still not convinced, security is a ranking signal.
This is why Google forced most websites to switch to HTTPS protocols.
This has been a major crackdown by Google and its commitment to delivering its users to safe and reputable sources. Hypertext Transfer Protocol Secure (HTTPS) is absolutely essential in the modern-day and age, and Google is far more likely to connect its searchers to HTTPS sites rather than standard HTTP sites.
Source: Digital Eagles
Steps to Make Your Website Secure
Here are a few steps you need to take to make your site (as well as your users’ personal information) more secure:
1. Make sure your hosting service is secure.
Lots of malicious attacks happen through your hosting provider, so make sure your provider is taking all the necessary steps to keep your site secure.
Do your research.
Read your hosting provider’s reviews, search for something like [hosting-company security], [hosting-company hacked], [hosting-company security], etc.
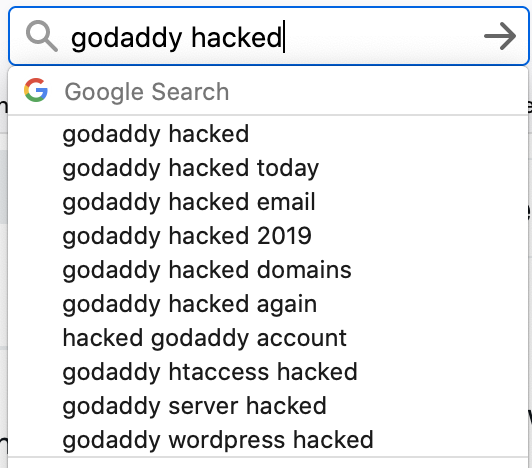
Search for your hosting provider with a query like [hosting-company security], [hosting-company hacked], [hosting-company security], etc.
Check Twitter for something like [hosting-company malware :(] or [hosting-company malware :(]. You might find out that customers are suffering from poor hosting security practices.

It is not just about the issue itself; most hosting companies have experienced at least one data breach at one time or another.
What’s more important is how they handled it.
- Did they reply to their customers?
- Did they act fast?
- Did they work with their customers on cleaning up their websites?
Check if the hosting company is responsive on Twitter and how willing they are to solve any issues.
2. Verify your site with Google Search Console.
If you need just another reason to verify your site with Google Search Console, here’s one: this is one of the fastest malware alert systems out there.
And it’s also completely free.
Google’s Search Console relies on the safe browsing API which alerts site users of possible malware attacks.
It is also used by most browsers (including, obviously, Google Chrome).
Thanks to the API, users are usually warned when they are trying to access an infected website.
Security issues Google reports to website owners.
They are categorized into three major groups:
- Malware and unwanted software: this is what can harm your site users by infecting their devices
- Hacked content: when third-party content (usual links) is added to your site
- Social engineering: this type prompts your site users to share their personal information.

Google also provides helpful instructions on how to fix each of the detected issues.
Again, the most valuable aspect of these reports is how fast they are in reporting problems.
Google will also report on your SSL (Secure Sockets Layer) and TLS (Transport Layer Security) issues, which signal possible security loopholes.
Apart from Google’s Search Console, many more security scanning tools allow you to find security loopholes in your setup and content management platforms.
3. Keep an eye on your bot traffic.
What is bot traffic?
Bot traffic is any non-human traffic to a website or app.
In many cases, bot traffic is not bad.
Bot traffic includes automatic crawlers (like Google’s crawler) and digital assistants (Siri, Alexa, etc.)
It’s a spike in bot traffic that can signal a problem.
This problem may be:
- Beginning of a DDoS attack (this is when a massive amount of traffic is being sent to kill your servers)
- Credential stuffing (when bots attempt to guess your backend login information)
- Data scraping (when your content is being automatically copied)
Finteza is a helpful tool that detects and alerts you of bot traffic spikes that may signal the beginning of a problem.

These reports are helpful because they give you more details to discuss with your developer and/or hosting provider.
Conclusion
Keeping your site secure is one of the most important fundamentals of your online presence.
Don’t ignore problems until it’s too late.
Use the easy steps above to prevent some issues and create processes to fix any security breaches fast and minimize the impact.
The post How to Make Your Site Secure: A Guide for Non-Technical Marketers appeared first on Content Marketing Consulting and Social Media Strategy.
Source: convinceandconvert.com

HTTP to HTTPS Migration Guide | Do SSL Certificates Affect SEO?
Not long ago, Google has released version 68 of the Chrome Web Browser. In this version, websites that don’t run on HTTPS will be marked as Not Secure. This might lead to the following question: does Google value websites with SSL certificates more? Will they rank better? Is it worth making the switch?
In this article (Updated 2020) you’ll find out whether SSL certificates matter for SEO or not.
You’ll also learn exactly how to migrate your website from HTTP to HTTPS without suffering any ranking drops.
Yes, you heard that right. If you’re not careful, you can mess up your search engine rankings!
Warning: Switching a website from HTTP to HTTPS the wrong way can heavily mess up your search rankings! There are many things that must be taken into consideration. A simple backup of the website will not help!
That’s because you’re playing with the URLs which Google has already indexed. Changing those without a proper 301 redirect from HTTP to HTTPS on the entire website will cause Google to think the old, indexed URLs have vanished.
The HTTP to HTTPS migration guide at the end of the article will help, but if you’re not sure what you’re doing, please contact an SEO professional who can assist you with the migration. We can not be held responsible if things go wrong!
- SSL Certificates, HTTPS & Their Importance
- How Does HTTPS Affect SEO?
- How to Switch from HTTP to HTTPS
SSL Certificates, HTTPS & Their Importance
I’ll try to keep it short. Cryptography isn’t something easy to digest, but without having a general idea of how it works and what problems it solves, we can’t really understand its importance.
If you have any specific questions, ask them in the comments section and I’ll do my best to reply.

What is HTTPS?
HTTP stands for ‘Hyper-Text Transfer Protocol’ (it’s actually Hypertext Transfer Protocol, but that should be only HTP, right?). What you need to know is that it’s a protocol that web servers, data centers, and browsers use to transfer information across the web.
The S at the ending of HTTPS just stands for Secure.
The security comes through the use of SSL (Secure Sockets Layer). Sometimes, it might also be referred to as TLS (Transport Layer Security). It’s a method of securing the data which needs to be transported.
The method through which the data are secured is called Cryptography. By encrypting a message, only the ones that know the decryption key will be able to read it.
For example, if we both decided upfront that A = 1, B = 2, C =3 and so on, I could send you the message 8 5 12 12 15 and you would read it as Hello. This is called symmetric cryptography.
The issue with symmetric cryptography is the fact that both parties must know the encryption/decryption key upfront in order to properly communicate, so at least one secret meeting must be arranged prior to messaging.
Pretty difficult to do when you want to chat with someone across the Globe.

So, to overcome this issue, we can use asymmetric cryptography. This type of cryptography uses 2 keys. A private one and a public one. They can both decipher each other.
This means that any message encrypted with the public key can be read using the private key and vice versa.
If I want to make sure nobody publishes information under my name, I can use asymmetric cryptography. I generate both a private key and a public key.
The public key I send out for everyone to know. If I publish something online and encrypt it with my private key, you could only decipher it with my public key.
This way people will know the work is original. If you want to send me a private message, then you would just have to encrypt it using the public key. Only I will be able to read it.
This comes in handy in these modern days when communication happens over very big distances. People can now share information securely without both parties needing to know each other’s keys.
What is SSL & What are SSL Certificates?
SSL stands for Secure Sockets Layer. Let’s say it’s related to the S in HTTPS. However, we usually hear about SSL in relation to Certificates. So what are SSL Certificates?
Well, SSL certificates are only used to confirm the identity of a website. These certificates are emitted and signed by certificate authorities with their private keys.
Before getting a certificate from them, you must somehow confirm your identity and prove you are the organization and website owner.
I could emit a public key out there saying that I’m Adrian, but how would you actually know it’s me? That’s why we have Secure Sockets Layer Certificates.
There are different types of SSL Certificates, but the most common ones are Domain Verified Certificates. These certificates can even be obtained for free these days (keep reading and I’ll tell you how).
The verification process is pretty simple and very similar to the Google Search Console one. You upload an HTML file to your server, proving you’re the entity.
Of course, when you want to prove you’re a person or an entire company, you need to provide some sort of proof. For this, there are other types of SSL certificates, such as Organization Validated (OV) or Extended Validation (EV) certificates.
They are more expensive and require further verification, such as company documents or IDs. The verification process might take a while. There are all sorts of SSL brands too, such as RapidSSL, Symantec, GeoTrust, or Comodo SSL Certificate.
Before the new Chrome updates (in which they stopped displaying HTTP and HTTPS as well as the WWW prefix), certificates with Extended Validation used to look like this:
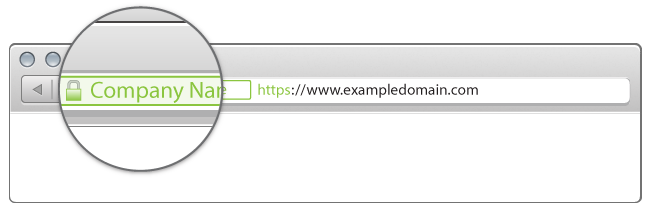
source: DigiCert
However, today you’ll have to click the lock icon to see if a website has a regular SSL Certificate or an entity validated one.
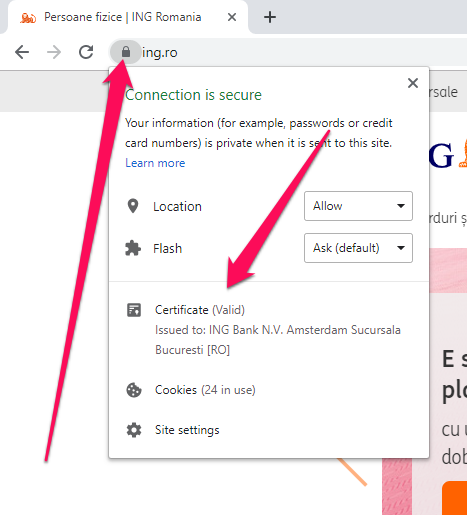
Considering the above mentioned, there isn’t much of a difference between free, regular SSL certificates and premium ones, at least not anymore. Very few users will check the certificate if any (as long as the lock is green).
However, if your business relies on security and trust, then you should consider purchasing a premium SSL Certificate. This will ensure no errors will happen.
Web Browsers come packed up with a bunch of public keys from certificate authorities.
They check if the certificates have been signed with the proper private keys, therefore confirming that their identity has been verified by a trusted authority and not by some random certificate generator.
If the certificate is expired or not valid, a red warning will show up.
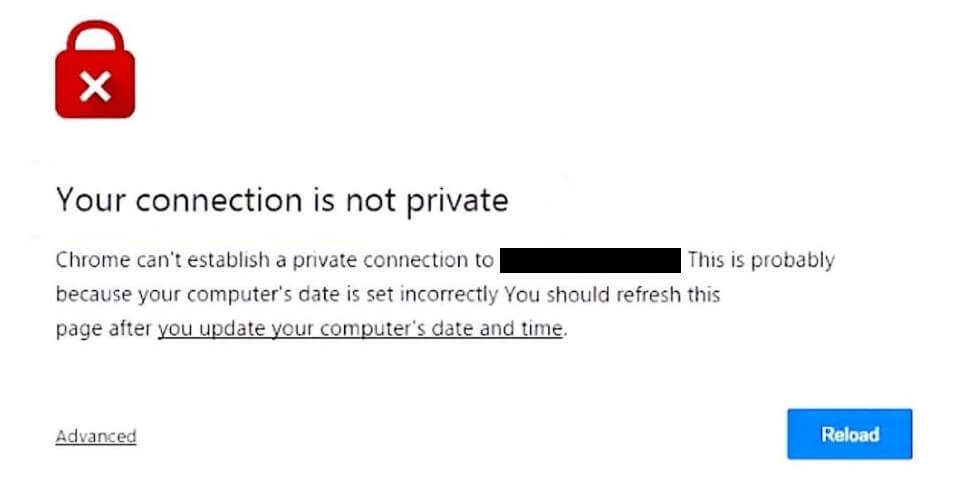
This will definitely turn the user down, so make sure that if you run through HTTPS, your certificate is valid and working properly!
It’s better to run through HTTP than to run through HTTPS with an expired SSL certificate!
After the identity of the website has been confirmed by the browser, the webserver and the client then establishes a secure communication channel.
Asymmetric cryptography is used to send a symmetric key that only the server and the client know.
Then, the communication channel is secure and any attempt to read the information which is passed between the server and client will require the decryption key.
So why is this so important? Why are people so crazy about HTTPS?
Well, when your users browse your website, they often send information, through contact forms for example. Without encryption, that information can be intercepted by what people call “Man in the middle.”
Although contact forms only contain names and e-mails, things get worse when we’re talking credit card information or bank accounts and passwords.
By using an SSL Certificate, webmasters can improve the security of their websites and better protect their users’ information.
How Does HTTPS Affect SEO?
Now that we better understand what HTTP is, we can take a glimpse at its importance. There are multiple ways in which SSL Certificates and HTTPS can impact search engine optimization and Google rankings.
Some of them are strictly algorithmic, while others can be less direct, but very meaningful as well. Let’s start with what we know for sure:
HTTPS as a ranking factor
First, you have to know that, theoretically, SSL Certificates do affect SEO. This is actually an official Google statement from 2014. They are considered a ranking factor, out wide in the open.
Why? Well, there are many reasons, but the main one is definitely security. If Google provides its users with better security, it provides better value and the users will be pleased. The fact that internet credit card fraud is on the rise definitely pushed Google into this direction.
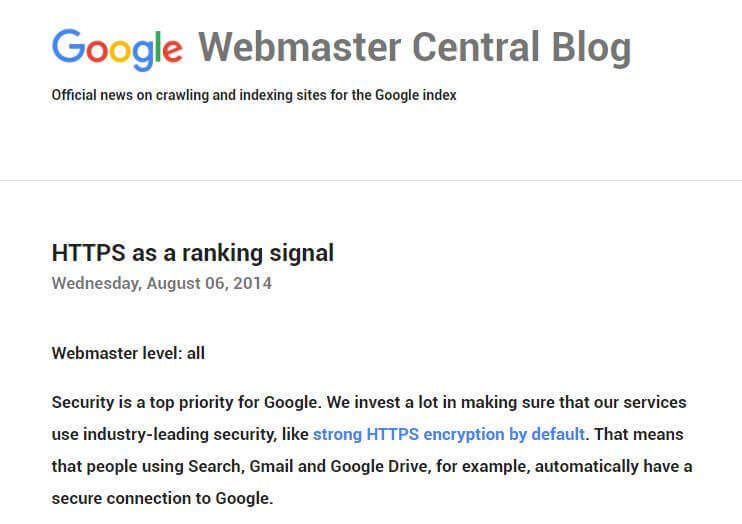
Google has tested its search results with HTTPS as a ranking signal and has seen positive feedback.
This could also mean that webmasters that take security seriously might generally present better websites. They care about the users.
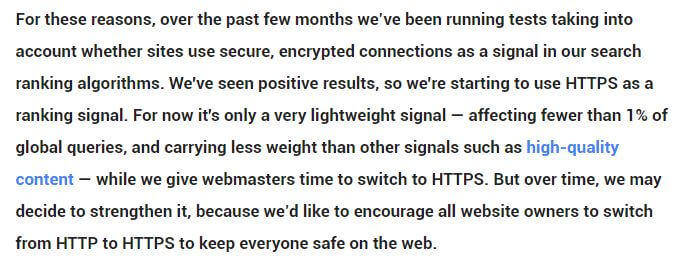
Although this impact is fairly small, affecting less than 1% of websites, many webmasters have adopted HTTPS.
Not long ago, less than 10% of websites were secured with an SSL certificate. Now, more than half of all websites are probably secure.
Why didn’t Google do this earlier? Well, to be honest, I think it’s because it would’ve been a little bit unfair. Back in the day, SSL Certificates were not so easy to obtain and some of them were quite expensive.
Today, however, almost anyone can secure their website with a free one. This means that money won’t really have a say in this.
Quick Tip: Basic SSL Certificates can be obtained for free. If you’re just starting out, don’t spend unnecessary money. Keep reading to find out how to get one!
This HTTPS SSL Certificates update is one of the weaker ranking signals in Google’s algorithm. Let’s say that… adding HTTPS won’t get you an SEO ranking boost, but not adding it might affect your Google rankings over time.
Why?
Well, it’s because internet users will trust it less and they will leave it quicker. Your conversions will drop.
These are all ranking signals that the site isn’t doing well, which Google translates into “I should rank this ‘unsecured site lower and reward a website with a secure connection instead.”
The truth is that a modern, dynamic website can’t work well without HTTPS.
User’s trust
Another way in which SSL Certificates could affect SEO is related to the user experience. Some internet users might have no clue what’s happening, but others prefer to browse websites that are secure.
This is where an Extended Validation SSL might come in handy. Here’s the difference between a regular, Domain Validated SSL Certificate and a more expensive Extended Validation SSL Certificate.

Regular Domain Validated SSL Certificate (easily obtained for free)

Extended Validation SSL Certificate (more expensive)
Starting with Chrome Version 68 (24th July 2018), the browser now shows the warning Not Secure when you access a website through HTTP.
Users will now definitely ask themselves more questions when seeing that message instead of just the Information icon.
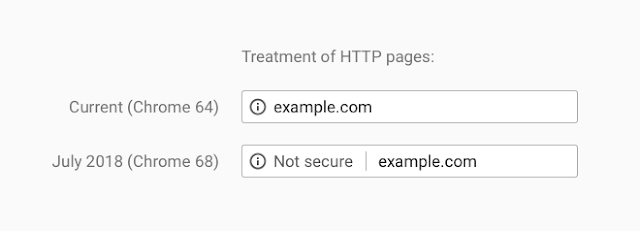
Screenshot from the Chromium Blog
Who knows, in the future you’ll probably going to see a red warning, just like the one with invalid SSL certificates. That day has not come yet, but it’s probably not far!
GDPR issues
It’s obvious that people are more and more interested in the safety and privacy of their personal information, especially when it comes to websites.
Just imagine a breach into Facebook’s servers! You would know EVERYTHING about EVERYONE. Now I know, Facebook is already selling that data to whoever pays good, and you’ve accepted all the terms at signup.
But when it comes to security, websites like Facebook are pretty solid.
Still, maybe a picture of what you’ve eaten this morning isn’t so concerning if it gets hijacked and stolen, but your credit card information when you’re making payments on ecommerce websites is!
As of May 25th 2018, GDPR has had a huge impact on websites. GDPR specifies that any personal data should be handled securely.
This forces webmasters that have even the smallest contact form to switch their website from HTTP to HTTPS to ensure the security of their users’ personal data.
So, not only can it benefit your SEO rankings if you switch to HTTPS, but it might also get you a fat fine if you don’t.
Although usually you will see some ranking boosts, if you mess up your redirects and don’t implement HTTPS correctly, your entire site can drop from the search engine results.
Make sure you know what you’re doing before you start.
Does HTTPS Affect Website Performance?
Ok, now we know how HTTPS affects websites from a search results perspective. But how does it affect a website technically? Will it affect its performance? Will the site be slower?
Well… theoretically… yes. You can expect a delay of about 0.1 seconds compared to regular, unsecured HTTP requests. However, it really depends on your server’s performance.
Most servers today are fast enough to handle SSL Certificates and HTTPS. You won’t notice the difference.
Using services such as CloudFlare (3rd Party SSL implementation) will probably result in a slower PageSpeed Insights score, but it can be fixed with plugins such as WP Rocket.
However, the small hit in loading time and virtual points generated by some tool is far from outweighing the benefits of having a secure site connection.
How to Switch from HTTP to HTTPS
Switching from HTTP to HTTPS can be a hassle, especially if you’re not running on a popular CMS, like WordPress. However, you can take a look at the following guide to make sure you don’t make some of the biggest mistakes.
Acquire & Install an SSL Certificate
The first step is to acquire an SSL Certificate and install it. You might already have one, even if your website isn’t already running on it.
Some hosting providers also offer free SSL Certificates. To find out, just go to https://yourdomain.com instead of the regular HTTP.
If you see a red warning, you probably don’t have one (or it has expired). Then, just click the Information icon:
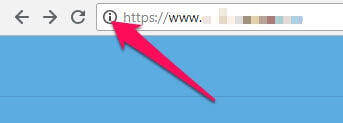
If the popup says Certificate: Valid then you have an SSL Certificate. Click it to see more details about it, such as for how long it is valid.
If you don’t see the word Certificate there, then you probably don’t have one.
You can get an SSL Certificate anywhere. Just search Google for SSL Certificate and you’ll find plenty of providers. Search for the best deal and also look at user reviews.
You should also be able to purchase certificates directly via the cPanel on your server, if you’re looking for an EV Certificate, for instance.
However, for most people, a Free SSL Certificate is most likely the best way to go. A really easy way to do that is by using CloudFlare.
Instead of using your server, CloudFlare uses its own servers to secure your connection.
To activate CloudFlare, you’ll have to create an account and register on their website. Setup is usually automatic, but they have step-by-step instructions as well.
After that, you’ll have to log in to your Domain Registrar and add CloudFlare’s nameservers instead of your server’s.
This way, the traffic will first pass through CloudFlare’s firewalls, which will secure the connection and will ensure hackers stay out.
One downside (at least for the free version) is that when their servers are under heavy load, your site might load slower. You can fix this with WP Rocket, though.
You have a special section for CloudFlare settings there. I’ve been using it on websites for years, and I can say the free version is awesome and the websites are fast.
If CloudFlare isn’t the thing for you, you can also try Comodo or Let’s Encrypt via Zero SSL. We’ll go with the Zero SSL example.
First, you’ll need a signing request from your server’s cPanel. If you don’t know how to get one, ask your hosting provider. You’ll find that under the SSL section.
Just add the details for your website and a request will be generated. You can download it as a file.
Then you have to upload it to Zero SSL. The website provides step-by-step instructions.
You’ll have to provide some sort of verification, most of the time by uploading a file on your web servers (just like with Google Analytics or Google Search Console).
They usually provide step-by-step guides on how to verify your identity. There’s more than one method, so pick the one that’s easiest for you.
Once you get the certificates, you’ll have to install them in your cPanel in the SSL Certificates section (Generate, view, upload, or delete SSL certificates). The process is pretty simple. Just scroll down and add the certificate.
After installing the certificate, you should be able to access your website via HTTPS.
Add HTTPS Version to Search Console
The next step is to go to your Google Search Console and add the HTTPS version of your website.
You can also set the preferred version, but I highly recommend that you let Google choose for now and only do this after you’ve successfully implemented the HTTPS.
You should also make sure that Google Analytics or any other web analytics software you’re using is also able to track HTTPS from now on.
Set up 301 redirects
Warning: This is the crucial step. If you don’t redirect properly, your SEO rankings will drop! Why? Because Google will have to deindex the old HTTP site and index the HTTPS one, without having any idea that they’re actually connected. Also, users that land on HTTP versions (from old backlinks for example) will never get to see the HTTPS version.
To redirect from HTTP to HTTPS, you can either use a plugin or do it via the server. If you’re running on Apache Web Server, you can set the redirects via the .htaccess file.
However, it’s a little technical and, depending on other functionalities, conflicts may occur.
If you’re running on WordPress, you’re lucky! You can use the Really Simple SSL plugin and it will do everything for you (set up 301s, change the main domain to HTTPS, and change all the links from the database to HTTPS).
Really Simple SSL WP Plugin
So make sure that all HTTP versions will properly redirect to their HTTPS counterparts. Take into account www, non-www, slashed vs non-slashed, and parameters.
Here you should also change the main URL of your website to HTTPS. This is usually done in some sort of configuration file.
In WordPress, it can be changed in the General Settings area. The Really Simple SSL plugin will do this for you, anyway.
Note that some platforms might not fix all the URLs. It is mandatory that each URL properly 301 redirects to its new HTTPS counterpart.
So
- http://www.domain.com
becomes
- https://www.domain.com
and
- http://www.domain.com/page-1
becomes
- https://www.domain.com/page-1.
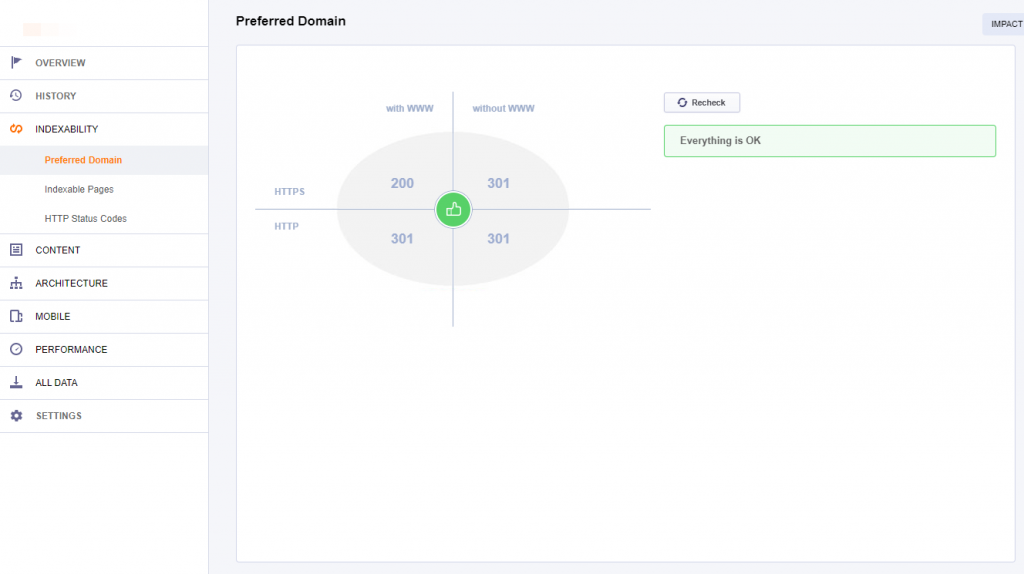
You should make sure that all other variants of your website redirect to a single one, with HTTPS, be it WWW or non-WWW. This is called a Preferred Domain Version.
It’s best if the redirects don’t happen in the chain.
So instead of having
http://domain.com > http://www.domain.com > https://www.domain.com
it should be
http://domain.com > https://www.domain.com
and
http://www.domain.com > https://www.domain.com.
You can check that quickly with the CognitiveSEO Site Audit. Go do Indexability, then Preferred Domain.
Change All Internal Links
Even if you change your main URL to HTTPS, some static content might stay unsecured. You have to make sure you fix this, otherwise, some issues may occur.
- Canonical Tags: Canonical tags are often forgotten. If you’re running through HTTPS and your canonical tag points to the HTTP version, Google will think that it has to index HTTP.
The problem is that if HTTP 301 redirects to HTTPS then Google will get into a loop and it won’t be very pleased.
To find out if your canonical tags are properly set up to HTTPS, press CTRL + U while on your website in Google Chrome to view the site’s source, then search for canonical with CTRL + F.
- Hreflang: Same thing as with canonical tags, the hreflang tags should point to the correct HTTPS counterpart, even though 301 redirects are in place. Make sure you check that in the source of the site.
- Internal links: If don’t change the links from HTTP to HTTPS, you’ll get a mixed content warning (we’ll discuss this in more detail below).
Most of the times, this won’t happen when you’re using a popular Content Management System, but it can often happen on custom platforms and the effects can be devastating. Make sure everything is in order.
Other things that should be taken into account are XML sitemaps, external tools and e-mail systems (that might’ve run through unsecured channels).
Fix Mixed Content Issues
Many times, after implementing SSL on your website, you will get an exclamation mark instead of a green lock, or might even get the red lock. This error is caused by Mixed Content.
Mixed content actually means that some resources on your website load through HTTPS, but others load through HTTP. When you click the lock icon in the browsers, you should see a message as follow:
Your connection to www.xyz.xyz is encrypted with 256-bit encryption. However, this page includes other resources which are not secure. These resources can be viewed by others while in transit, and can be modified by an attacker to change the behavior of the page.
If you have mixed content, the green lock and secure message won’t appear, even if you have a valid SSL certificate installed.
Update:
Starting from December 2019, Google will block mixed content pages, meaning they will show up as unsecured!
To fix this issue, you must identify the resources on your website that are loaded through HTTP and force them to load through HTTPS.

Evil SEO Cactus Mixing Some Content
There are multiple causes that can generate mixed content warnings:
Static links in pages:
Maybe you’ve written an article and linked to a page of yours through an absolute URL. Absolute URLs look like this http://www.cognitiveseo.com/pricing.php while relative ones are just /pricing.php. Relative URLs change automatically, but absolute ones don’t.
You might have also linked to an external site’s image. Since the resource loads through HTTP, it isn’t secured.
Unfortunately, these links won’t change unless you update them manually, as they might not be linked to the platform’s URL generation. In WordPress’ case, for example, they don’t change.
You can always try a plugin that fixes mixed content such as SSL Insecure Content Fixer. However, they do not always work.
Another good way of trying to fix everything quick is to download your Database and edit it with a tool such as Notepad++. Then you can find and replace every HTTP instance with HTTPS (start with your own domain first and then expand to external ones).
Warning: Make sure to have a backup of your original database, before any replacing is done.
Mixed content from CSS files:
Sometimes, web design elements such as CSS files can also contain static resources (images) that load through HTTP.
Those are a little harder to identify because they can’t be found within the source code of the page (unless the CSS is generated in-line).
Old themes often create this mixed content issue, due to the fact that once upon a time, using HTTP was fine.
A good way of identifying hidden mixed content is to use Google Chrome’s- Inspect Tool. Hit CTRL + Shift + I on your keyboard (or hit right Click > Inspect) while browsing a page with mixed content issues.
Then you have to go to the Network section. If you press F5, you’ll see all the resources loading.
There you can identify which resource is loaded through HTTP and causes an error. Under the Initiator column, you can find the file that is responsible, such as the CSS file.
Proceed to edit the CSS file from your server and replace HTTP with HTTPS. Note that if this fix isn’t patched into the Theme itself, updating your theme will overwrite the modified CSS file with the one with problems.
However, this method is time consuming and you won’t be able to analyze every page! You can use the CognitiveSEO Site Audit to speed up the process.
If you’re looking to quickly identify all the mixed content issues on your website you can always check out the CognitiveSEO Site Audit‘s Mixed Content section.
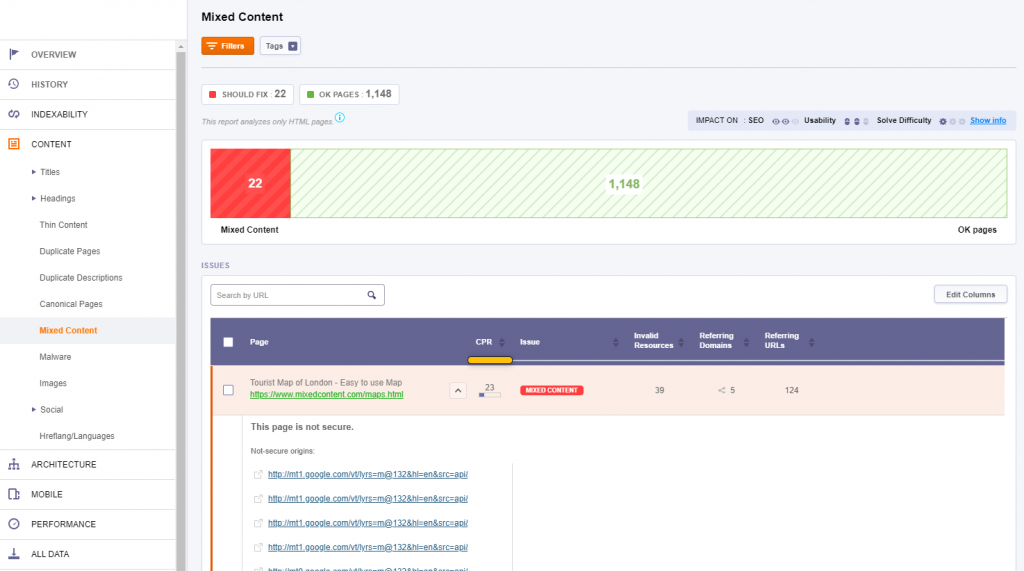
Once you fix things, make sure to recrawl the pages in the tool to see if you’ve missed anything.
Make Sure Everything Works Properly
Switching to HTTPS can often cause issues with plugins, APIs, and other functions within the website.
Make sure you browse your website properly for a couple of hours and test every segment of it.
Access every page to see if it loads and test if the contact forms, online orders and filtering/search features are working properly.
You can also now set HTTP as your preferred version in Google Search Console. WWW vs. non-WWW is irrelevant, but non-WWW tends to be shorter, so there will be more space for the URL when it shows up in Google.
However, if you’ve been running on WWW so far, it’s a good idea to keep the WWW even with HTTPS.
Resubmit Disavow File & Change Your Backlinks
Many forget that they have to resubmit the disavow files. If you have ever suffered from a negative SEO attack you must download the disavow file from the HTTP version in Google Search Console and upload it into the HTTPS version.
Although the 301 redirects are in place, it’s really important not to forget this step!
A final step would be to change as many of your old backlinks as possible from HTTP to HTTPS. Even with the 301 redirects in place, a small percentage of the link equity might be lost.
Start with your social media profiles and backlinks you know you can change for sure in very little time.
It’s not worth it to spend countless hours and e-mail everyone to switch your URL from HTTP to HTTPS, but if you have some way of managing it faster, it’s worth a shot.
Gather a list of your contacts on social media and blast them a message asking them to replace the HTTP backlinks with the new HTTPS ones.
Conclusion
Merging from HTTP to HTTPS can help you improve your search rankings.
We can’t really go as far as to say it boosts rankings, but even if it doesn’t have any effect on your website right away, you’ll definitely see an improvement over time thanks to a better user experience.
To be honest, the only downside of implementing HTTPS on your website is the fact that it’s a little bit of a tricky process.
However, once you get over it and implement it correctly, nothing bad can happen. Your site is safer, your information is safer and your user’s information is safer and that peace of mind is priceless.
What’s your experience with HTTPS and SSL Certificates? Have you encountered problems when merging your domain from one version to another?
Have your rankings increased/decreased?
Which SSL Certificate provider are you using?
I’m curious. Let’s talk about it in the comments section!
The post HTTP to HTTPS Migration Guide | Do SSL Certificates Affect SEO? appeared first on SEO Blog | cognitiveSEO Blog on SEO Tactics & Strategies.
Source: cognitiveseo.com