
Tag Archives for " social media ads "

What is the Difference Between B2B vs B2C for Paid Social Media?
While the terms B2B (business-to-business) and B2C (business-to-consumer) marketing may sound similar, they differ vastly in practice, especially when it comes to paid social media.
Areas like content, objectives, best practices, and which platforms to use can impact the most effective strategies in paid social media. This chart outlines a few of the main differences.
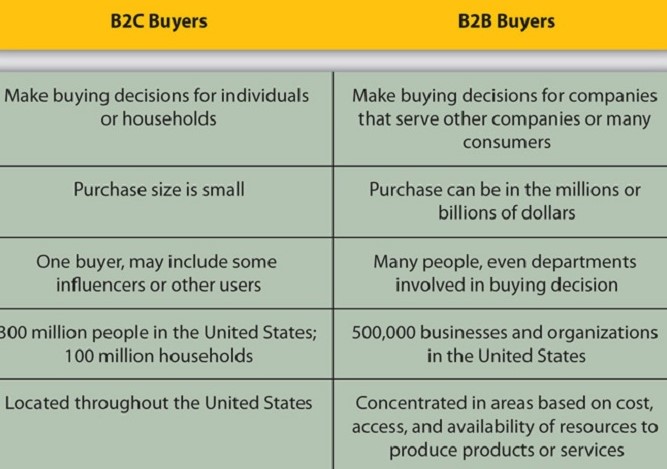
These differences are particularly evident in the approaches for paid social media strategies. Before we dig into the different strategies, let’s take a deeper look at the differences between B2B and B2C.
What is B2B Paid Social Media?
B2B buyers are typically large organizations (like enterprise companies, hospitals, or universities) that market their products or services to other businesses.
Those businesses typically need agreement from multiple stakeholders before making a purchase, which often extends the sales cycle length.
When conducting B2B marketing, the message should focus on logic and ROI, rather than emotional impact.
How can you help their organization achieve its goals? What is important to their organization’s mission?
When creating a B2B paid social marketing strategy, ensure your campaigns and accompanying materials highlight a solid return on investment (ROI) that underlines how your product or service helps them save time, money—or both.
What is B2C Paid Social Media?
Conversely, B2C marketing means you’re marketing directly to a consumer.
The focus should be on the benefits of the product—and how that product can benefit the consumer. However, the purchase decision is based much more on emotion than tangible ROI.
Buyers don’t want to put in extra work to understand the value of your product.
You must clearly indicate benefits in a concise way that uses an emotional pull.
B2C vs B2B also differs in length of the purchasing process, with consumers making purchases in minutes to days. In contrast, B2B consumers take much longer, with the decision process occasionally extending a year or more.
B2B vs. B2C Marketing on Social Platforms
In addition to the above differences, B2B vs B2C users tends to use different social platforms.
This distinction matters for marketers, as it guides where you should focus your time and resources to target these consumers.
If you’re attempting to sell to a consumer on a historically business-heavy platform (like LinkedIn), it is unlikely you’ll have much success.
B2B Social Platform Use
Historically, social media platforms don’t perform all that well for B2Bs. For example, trying to sell an enterprise software solution on Facebook might not get you very far.
Despite this precedent, there is an exception to every rule, and in this case, that exception is LinkedIn.
Since the platform’s start, marketers have been trying to take advantage of LinkedIn’s ability to connect with powerful decision-makers in a professional setting.
Now you can. Credited with 97 percent of a business’s social media leads, LinkedIn is the platform every B2B marketer should be using to reach their audience and drive leads.
This may sound easier said than done, but luckily, there are multiple strategies to turn LinkedIn into your own personal lead-generation machine.
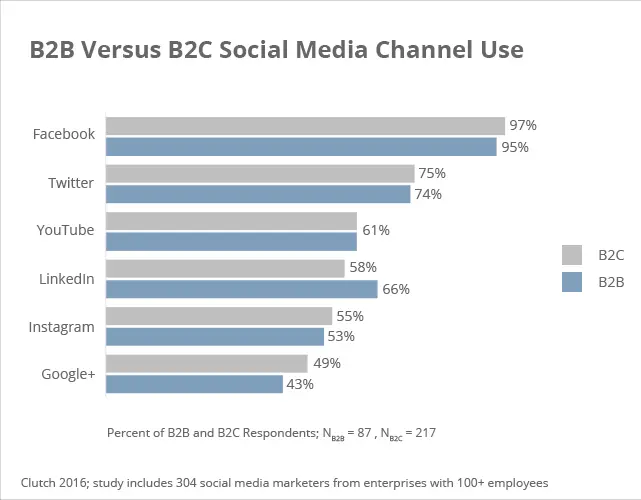
While LinkedIn is inarguably the most favored B2B platform, Twitter and Facebook earn second and third places in the hierarchy.
Twitter may not be your immediate go-to for B2B marketing, but the platform is filled with potential consumers ready to buy. In fact, 53 percent of Twitter users are likely to be the first to purchase new products.
Twitter can help B2B marketers:
- build brand awareness
- increase social monitoring
- assess competitor analytics
Collaboratively, these three benefits help increase your brand’s visibility, but also allow you to dive deep into competitors’ performance, assessing metrics like follower growth, impressions, and mentions to know where your competition stands.
While Facebook use is declining among younger users, many B2B decision-makers regularly use the social networking site.
A recent study reported that 74 percent of users use Facebook for professional purposes.
Facebook may help you gain access to new prospects who would never set a virtual foot in LinkedIn.
Want more evidence Facebook is advantageous for the B2B marketer?
With Facebook ads, you can:
- target your audience based on detailed preferences
- gather prospect information
- use lookalike audiences to target users similar to your best customers
- retarget users who have already interacted with your brand
Moral of the story: if you’re considering nixing Facebook from your B2B marketing strategy, don’t.
B2C Social Platform Use
While savvy marketers flock to LinkedIn, Facebook, and Twitter to reach B2B consumers, marketers targeting B2C consumers must adjust their targeted platforms accordingly.
Let’s look at a few of the most common platforms for B2C marketing.
Instagram was once dismissed as too juvenile to waste marketing spend on. Today, however, the platform is a marketer’s dream, offering countless opportunities to reach established and new consumers.
Given the B2C sales cycle’s brevity, Instagram is the perfect pair for business-to-consumer marketing.
For marketers looking to get quick returns on visually-appealing products, Instagram is the go-to social platform.
Visuals aside, Instagram is also highly-trafficked by active consumers.
In fact, Instagram’s business portal reports:
- 60 percent of people say they discover new products via Instagram.
- 200+ million Instagram users visit at least one business profile per day.
- 1/3 of the most-viewed Stories are from businesses.
Those statistics should have every marketer sprinting for their phone to start an Instagram campaign.
TikTok
TikTok might not seem like the ideal platform for your B2C marketing campaign, but many brands have found success on the interactive platform.
With the average user spending 52 minutes a day on the app, there are limitless opportunities for marketers to reach their desired audience.
Unlike other social platforms, TikTok offers marketers a variety of unique avenues for advertising, including:
- in-feed videos
- influencer package
- ssponsored AR content
As the fastest-growing social platform on the market, be sure to take advantage of the massive audience that is just a video away.
B2B vs. B2C: Content for Paid Social Media
After identifying the social platforms best-suited for your paid social campaign, it’s time to settle on what type of content to share.
B2B and B2C differ in this area as well, with B2Bs historically performing well with an informational approach, whereas B2Cs find success with a more approachable, fun tone.
B2B Social Marketing Content
As noted above, businesses buy for a clearly-defined reason—which is based on statistics, not emotion. To successfully market to B2Bs, provide content that focuses on ROI.
Here are a few types of content that tend to perform well in B2B paid social campaigns.
Informational Content
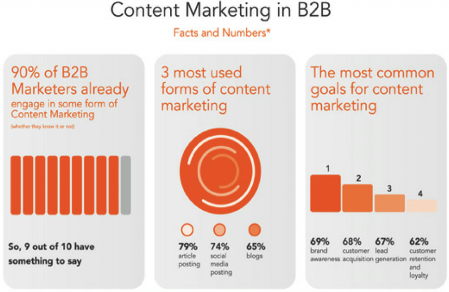
To demonstrate that ROI, consider building a library of consumable content that informs. A few mediums that traditionally perform well for B2Bs include:
- whitepapers
- infographics
- guides
- how-to content
By showing clear value in these pieces, you can scratch that ROI itch and begin the process of moving your B2B prospects through your marketing funnel.
Answer Industry Questions
Filling in industry content holes not only allows you to position yourself as an undeniable field expert, but you can also build content that satisfies specific long-tail search queries.
Targeting these queries drives qualified traffic to your site, ideally earning conversions.
B2C Social Marketing Content
While B2C’s counterpart craves ROI data, B2C consumers are more emotional buyers.
To take advantage of this motivator, use content that inspires, delights, or evokes another positive emotion.
Storytelling
Your aim is to delight and engages your B2C buyers.
Use narratives to hook and maintain consumer interest. Telling a story (either in a single iteration or across your campaign’s lifespan) can attract consumers, while also humanizing your brand.
Visual Content
Visual content grabs and holds attention much more effectively than text.
By incorporating visuals into your campaigns, you’re more likely to elicit an emotional reaction, resulting in a B2C consumer making a purchase or mentally bookmarking your product for future reference.
B2B vs. B2C: Objectives for Paid Social Media Campaigns
Given the differences in content, sales cycle, and preferred platform, it’s no surprise that B2B vs B2C also differs in objectives for paid social campaigns.
Understanding the different objectives provides the information you need to design successful social media campaigns.
B2B Objectives
The intent of most B2B marketing campaigns is not simply to make sales.
Rather, a B2B marketing campaign will be marked successful if it improves:
- brand growth
- brand awareness
- lead generation
- industry-expert status
Since the sales cycle for B2B consumers is so long, factors like brand growth and brand awareness are incredibly valuable, as they allow you to build connections with potential buyers.
B2C Objectives
While B2B marketers find success benchmarks in growth, B2C markets tend to value direct sales and interactive metrics that show content that is interesting to users. Popular goals for B2C social campaigns include:
- engagement
- likes
- follows
- going viral
For the B2C marketer, these interactions indicate consumers are attracted to the brand’s offering and willing to interact with the organization.
B2B vs. B2C: Best Practices for a Paid Social Strategy
Although a few best practices apply across the aisle when it comes to B2B vs B2C paid social marketing, a few are particularly relevant to each audience.
B2B Best Practices
To start deploying successful B2B campaigns, look to these four practices to guide you in your planning phase.
Utilize Multiple Channels
Multichannel campaigns increase ROI by 24 percent, with a 9.5 percent increase in revenue gained and a 7.5 percent decrease in cost per lead. That’s ROI you can’t easily ignore.
Identify Goals
Goals only work as hard as you do. You need to establish achievable benchmarks for each campaign, allowing you to note successes and adjust failures.
Measure Results
Without measuring results, how will you know if your campaign was a success?
By breaking down marketing metrics, you can gain specific insights into performance, identifying strengths, and recalibrating weaknesses.
Provide Quality Content
You’re only as good as your content. If you’re not creating quality pieces that provide your B2B consumers with clear, tangible ROI, then you’re not going to see results.
B2C Best Practices
Looking for a list of B2C best practices that can get your next campaign off the ground?
These three tips can help.
Track the Right Engagement Metrics
As marketers, B2C goals rely heavily on engagement, so tracking these metrics should top your list of must-dos.
- social platform engagement
- website traffic
- ROI
- quality of leads
- customer retention
- conversion rate
Test Your Ads
Testing your ads on social platforms is a great way to see which ads perform well with your intended audience.
This helps limit spend and increase audience engagement. A/B testing is an especially effective way to better understand which ads customers like.
Clearly Identify Your Audience
Without clearly outlining your target audience, you can’t market effectively on social media.
By identifying the who and the why you can target the audience most likely to engage with your content or purchase your product.

Go to Course
Conclusion
Whether you’re marketing a B2B or a B2C audience, it is crucial to recognize the differences between the two audiences so you can create a campaign that actually converts.
As you begin to build paid social campaigns, focus on identifying content that works best for your audience and use the platform where your audience is most active.
By giving your consumers what they want, when they want, where they want it, you achieve every marketer’s goal: increased visibility.
What is the biggest difference you’ve found between B2B and B2C audiences?
The post What is the Difference Between B2B vs B2C for Paid Social Media? appeared first on Neil Patel.
Source: neilpatel.com

How to Train Your Facebook Pixel
Facebook’s goal is to put your ad in front of users who will take you up on your call to action. To make this goal a reality, they created the Facebook pixel. It’s as futuristic tech as it sounds…

The pixel is a piece of code that goes on your website that reports back to Facebook whether or not someone performed the call to action on your website.
For example, if your call to action is to buy a tea bundle, the Facebook pixel code on your tea website is going to tell Facebook whether or not a user that saw your ad and clicked through to your website:
- Put the tea in their cart
- Bought the tea
- Didn’t do either of these
As a marketer—the pixel is badass. It can help you reach the users who are most likely to take your desired action, making your ad budget go way farther than it used to be able to.
For example, if they know that a user was just looking at different tea flavors on ANOTHER tea company’s website… they can show your ad to that user.
Pretty cool, huh?
But, here’s the problem.
The pixel needs you to help it out a bit.
While the pixel can pull from their *impossible to comprehend database*, that doesn’t mean they’re going to nail it the first time around.
That’s where training your pixel comes in.
Why You Need to Train Your Pixel
Facebook’s goal is to get you conversions and your goal is to help Facebook…get you conversions.
When you train your Facebook pixel, you run a campaign that isn’t necessarily optimized to make you money.
It’s optimized to train your pixel.
This is called the Learning Phase because like a post-graduation gap year you’re setting your pixel out into the world to go and learn new things.

It’s going to come back with a ton of new knowledge and it’s going to use its new knowledge to get you more conversions.
During this Learning Phase, your ad set is going to be seen by different people who are within the target audience you chose.
Facebook’s going to keep tabs on who performs actions and who doesn’t and then help you create a custom audience based on this initial target audience.
Start training your pixel:
Step: 1
Choose a low-tier objective like video views, website clicks (not asking to purchase), etc.
Step: 2
Create ONE ad set with a CTA for the low-tier objectiveChoose your target audience
Step: 3
Let the ad set run for approximately 50 conversions or at least one week
Step: 4
Do not change anything once you’ve published your ad set
It’s time to summon your inner patience, because as much as you want to tweak your copy or change your objective—you can’t.
This is like choosing to train your dog to “Lay Down” in the middle of teaching them how to “Sit” for the first time.
They’re going to be super confused, you’re not going to get the end result you wanted, and you’re going to have to start fresh another day. 
You can shut these ads off once you’ve reached about 50 conversions or you’ve hit 5–7 days.
Congrats, you trained your pixel!
While it’s not nearly as cute as your dog sitting when you ask them to, you’ll get that warm, fuzzy feeling when you start to get conversions and see real people wanting your products and services.
Now that you’ve trained your pixel, you’ll be able to use this as a custom audience for your future campaigns.
Just a quick note:
If you have a larger budget, you might be able to hit 50 conversions within a few days.
Since Facebook uses your budget to show your ad to more people, you’ll be able to get more eyes on your ad in less time.
If this is the case, you can shut off this ad set and start running your purchase conversion-optimized ads to this new custom audience.
If you have a smaller budget—no big deal.
Just wait for 50 conversions or 5-7 days (whichever comes first) and then start running your conversion-optimized ads to your new custom audience.
Create a Custom Audience Based on Your Trained Pixel
Let’s say your Learning Phase ad set had the conversion objective of video views.
You were able to get 50+ people to watch your video and now you’re ready to run your real ads to them.
When you choose your audience for these ads, you’ll have the option to choose custom audiences that weren’t available to you PRIOR to training your pixel.
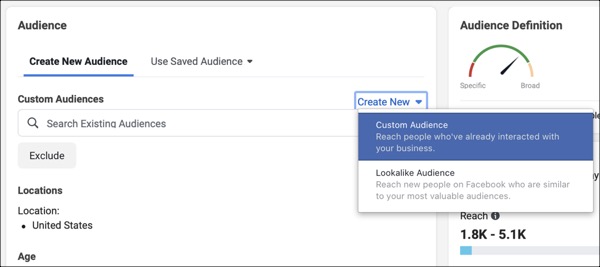
Step One:
Go to your Ad Set and click “Custom Audience”
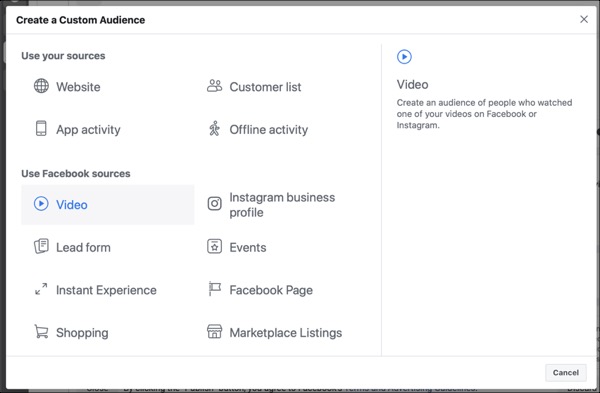
Step Two:
Choose “Video Views”
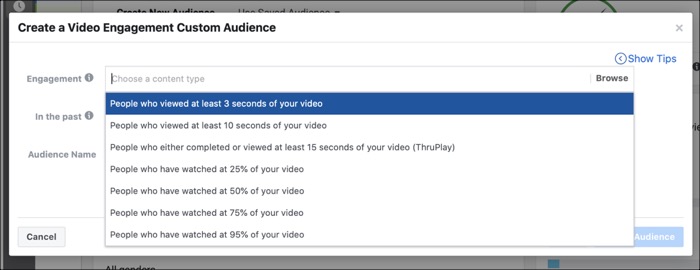
Step Three:
Choose the Video View durations (you can choose more than one)
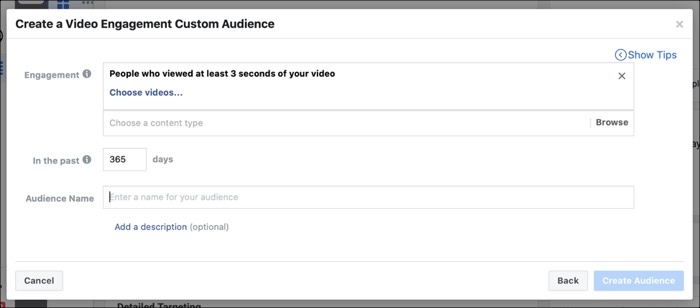
Step Four:
Choose the video viewers you want to show the ad set to based on how long ago they viewed your video
Step Five:
Name your custom audience
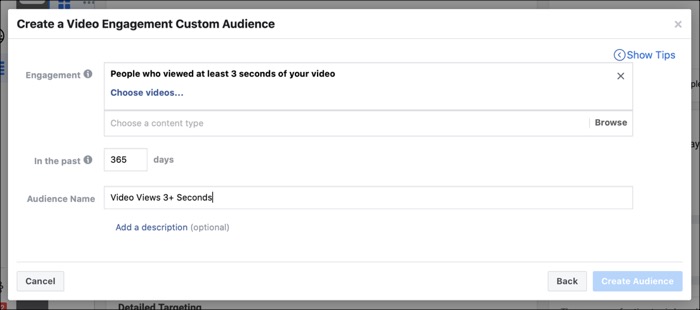
Now you’re advertising to a warm audience of people Facebook knows is interested in your product.
Instead of asking them to convert the first time they ever see your business, you’re asking them to convert once they’ve gotten a better chance to know you.
Marketing is like any relationship—you can’t just walk up to somebody in the produce aisle and ask them to marry you.
You both need to get to know each other first.
By training your Facebook pixel, you skip the produce aisle proposal and build a relationship first, ask them to marry you (aka buy your products) later.
And just like that, you’ve trained your pixel and now you can optimize your future ads based on everything your pixel now knows.
Technology is nuts…
Takeaways
- Training your Facebook pixel creates a custom audience of people most likely to convert for your future offers
- Train your pixel with a low-tier; ask objective like video views or reading a blog post on your website
- Don’t change anything about your ad set for one week or at least 50 conversions
- Create a custom audience based on the conversions

The post How to Train Your Facebook Pixel appeared first on DigitalMarketer.
Source: digitalmarketer.com

5 Steps To Create Your First Facebook Ad
With a little guidance, anyone can create their first Facebook ad.
Yes, we mean anyone.
New marketers or experienced marketers just dipping their toes into the Facebook world can find huge success on Facebook.
The key is to set up your first ad, hit publish, and immediately put your learning cap on. 
Every ad you create on Facebook will be a learning opportunity about what works best for your audience on Facebook and what you can do BETTER next time.
So let’s get you started on publishing your first Facebook ad so you can become a baller Facebook marketer. (We believe in you!)

5 Steps to Create Your First Facebook Ad
Here are the 5 steps to creating your first Facebook ad.
#1: Figure Out Your Offer and CTA
The first step in creating a Facebook ad is knowing what you’re advertising.
What’s your offer and how are you asking people to buy in?
Your offer can range from asking people to click-through to your website all the way to asking for them to take out their wallets and buy your stuff.
Here are a few examples of different types of offers:
- Lead magnet
- Discount code
- Buy one, get one
- Free trial
Figuring out your offer depends on the goal of your Facebook ad. Do you want it to drive more traffic to your website?

Would it be ideal if you grow your email list?
Is the main goal to get more sales?
For example, if you want to drive more traffic to your website, you’ll want to offer a lead magnet, discount code, or buy one, get one offer that motivates the person to see your ad to check out the details on your site.
If your goal is to grow your email list, you’ll want to offer a lead magnet that requires a person to put their email address into a form so you can send them the ebook, video, course, etc. (and then add them to your email funnel).
Or, if your goal is to get more sales, you want to offer a discount code or buy-one-get-one offer that makes the person click through your ad to your website so they can shop your products.
Here are two examples of DigitalMarketer offers from our Facebook ads.
The first offer has the goal of getting people to come to our website and read our article How to Find Writers For Your Blog,

Whoever reads this article is going to see 2 calls-to-action inside for our latest promo.
The promo inside of our blog posts generally asks for a reader’s email address to receive a lead magnet, subscribe to our DM Insider newsletter, and sometimes buy a low-tier offer (but this isn’t very often).
There are 3 main goals behind this Facebook ad:
- Show our content to a cold audience that wasn’t aware of the DigitalMarketer brand (Stage 1 of the Customer Value Journey)
- Get readers to turn into leads by signing up to receive the promo
- Pixel the people who clicked through to our website so we can target them with ads again
Here’s another ad that we’re running with the offer of a free trial of our Lab membership,
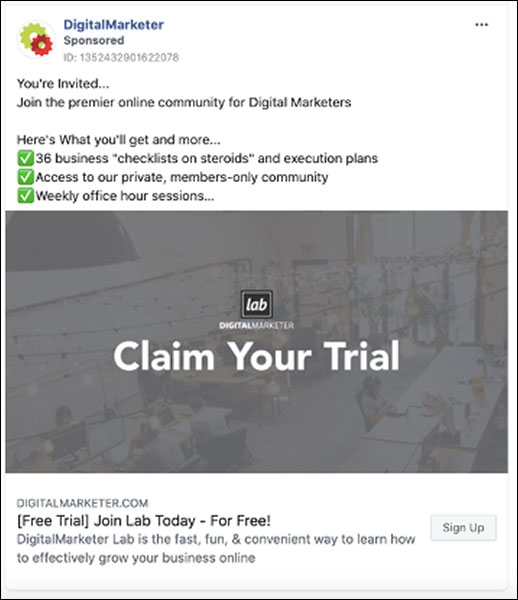
A person that clicks on this ad is going to be taken to our Claim Your Trial of Lab landing page, where they’ll read more information on our Lab membership.
There are 2 goals for this Facebook ad:
- Get Lab free trial subscriptions
- Pixel the people who visited this page (they’re now very warm leads)
Once you’ve looked at your goal and figured out what offer works well for it, you can figure out what your call-to-action is.
This will be pretty easy since you’re already going to know what action you need someone to take to achieve your goal.
For example,
- if we want somebody to read our article, our CTA is “Learn More”.
- If we want somebody to sign up for a free trial of Lab, our CTA is “Sign Up”.
- If we were asking somebody to buy a product, our CTA would be “Buy Now”.
Alright, now that we have our offer and CTA we can start working on the ad creative.
#2: Write Your Copy and Make Your Visuals
With your offer and CTA in hand, it’s time to pull together the copy and visuals that are going to help get your point across.
This is your ad creative and it’s a crucial, crucial, crucial part of your ad.
If your copy, visuals, or both are off—you’re not going to get the results you were looking for.
Before you start writing your copy and making your images or recording your video, figure out where you want this ad to be seen.
- Do you want it to be an ad in Facebook and Instagram feeds?
- Is it going to be an Instagram story?
Knowing how your ad is going to look is going to tell you what copy you need and how your visual should look.
Let’s start with creating A+ copy that makes your customer avatar think, “Hey…that’s exactly what I’m looking for.”
Here are a few copywriting strategies that are tried and proven:
The Power of One
This copywriting strategy uses a good idea, core emotion, captivating story, or inevitable response to grab someone’s attention.
Examples of these are:
- Good idea: How to Use Neuromarketing In Your Facebook Ads
- Core Emotion: A garbage truck worth of plastic is dumped in the ocean every minute.
- Captivating Story: A customer testimonial talking about the difference a product has made in their life, business, etc.
- Inevitable Response: You’ll Laugh When You Realize How Many Times You’ve Made This Copywriting Mistake
Benefits Over Features
Don’t use your ad space to talk about the features of your product.
These features are what make you excited, but not your customers.
Your customers get excited about the BENEFITS those features will have.
For example, a productivity management tool shouldn’t be highlighting its sleek, easy-to-use interface—that’s a feature.
They should be talking about how much time someone saves by using their tool, that’s a benefit.
Use FOMO, Urgency, and Scarcity
Copywriting uses these emotional triggers to show someone why they should be buying a product, signing up for a product, or opting in.
- FOMO makes people feel left out and like they want to hop on the wagon
- Urgency motivates someone to take the CTA as soon as possible
- Scarcity shows a lack of product, opportunity, etc. and creates a faster conversion
When you use these triggers, you want to make sure that you’re not spreading negative or fearful messages.
As a marketer, you have a responsibility to empower people—not scare them into taking the action you want.
For example, when we market our Lab membership we never say, “If you don’t join Lab, you’re going to be a terrible marketer.”
That’s spreading negativity and fearful messaging that somebody needs our product to be a great marketer.
That’s not what we’re about.
Instead, we’ll say, “Join thousands of other marketers who are learning the best marketing strategies available right now.”
This creates a FOMO of not being one of those thousands of marketers, without making somebody feel bad about themselves.
Now, let’s focus on your visuals, whether that’s a single image or video, a carousel, or a collection of images. Remember, your visual is going to have a copy included on it.
If you’re posting a product image, you can put the price of the product on the image.
For the most part, you can assume that people are going to see your image first, and read your copy after.
So you’ll want to put tons of attention on how your visual represents your offer and brand.
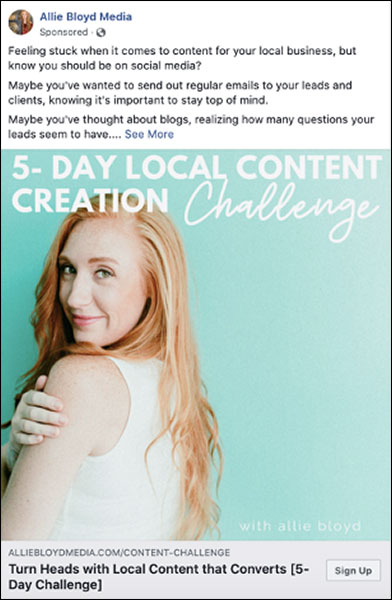
For example, take a look at the visual Allie Bloyd is using.
The first thing you notice is the text that reads, 5-Day Local Content Creation Challenge.
The second thing you notice is Allie herself.
This is a great example of using your ad visual to show your offer (in Allie’s case it’s the 5-Day Local Content Creation Challenge) and making it on brand.
For Allie, on-brand is bright colors and a bright image.
It’s also her!
Phew, now that we’ve worked through the creative process behind your Facebook ad, it’s time to dive into Facebook Ads Manager and publish it!
#3: Create a Campaign
The first part of creating an ad in Ads Manager is to create a campaign. In this part of your ad creation you’re going to be:
- Choosing your objective
- Deciding to run A/B tests
- Turning on or off campaign budget optimization (CBO)
Let’s quickly go through each of these.
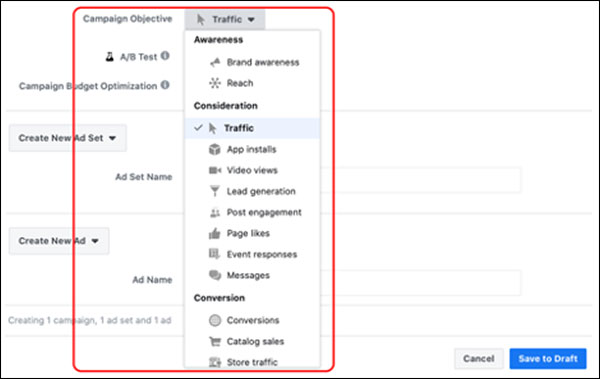
#1: Choosing your objective
This is going to go back to the goal that we talked about in Step #1.
What is the goal of your ad?
Depending on that goal, you’re going to choose your objective. By choosing the objective here, you’re telling Facebook that this is what a win looks like to you.
If you want people to click through to your website, by clicking on the “Traffic” objective you let Facebook know that this is the goal of your ad.
Here are all of your campaign objective options:
#2: A/B Tests
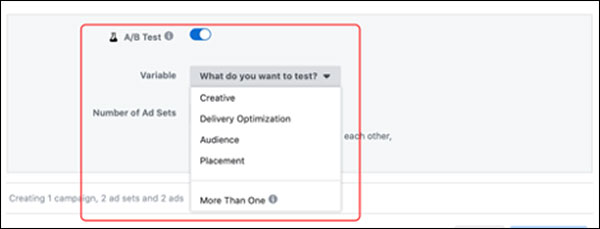
Turning on A/B tests just means that you’re going to publish more than one ad with the same objective.
Just like you run A/B tests in email funnels or on landing pages, you want to see which ad performs the best.
If you want to run A/B tests, just turn the toggle on and choose what your test variable is going to be.
#3: Campaign Budget Optimization
Campaign budget optimization (CBO) distributes your budget across all of the ad sets in your campaign.
Depending on what ad set performs best, it will put more of your budget towards the ads in that ad set.
You can turn this on if you’re going to have multiple ad sets with varying ad creatives.
Once you turn it on,
Facebook will ask you what your campaign budget is and then automatically move that budget around ad sets depending on their performance (based on your campaign objective).

And just like that, you have a campaign! 
#4: Create an Ad Set
You’ve made it to the second to last step of creating a Facebook ad!
Let’s take a big gulp of coffee together—mmm, magical bean juice.
With the caffeine coursing through our veins, we’re ready to make this ad set, the ad(s), and then hit PUBLISH!
Here’s what you’ll be doing when you create your ad set:
- Choosing your conversion event
- Choosing to turn on/off dynamic creation
- Choosing budget and schedule
- Choosing your audience
- Choosing your placements
- Optimizing and delivery
Let’s go through each option.
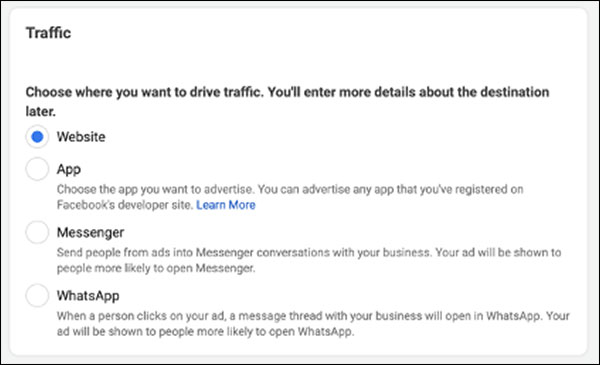
#1: Conversion Event
The conversion event that you’ll get to choose is going to be based on the campaign objective that you chose in step #3. For example, if you clicked on Traffic as your campaign objective, here’s what you’re going to see as your conversion event options.
#2: Dynamic Creative
Dynamic creative gives Facebook control over creating different variations of your ad using the copy and visuals that you upload for this ad set.
- If you turn dynamic creative on, Facebook will show variations of the ad and visuals that you supplied to your audience and then figure out what variation is the most successful at getting the campaign objective
- If you don’t turn dynamic creative on, then Facebook will use the ad copy and visuals that you upload for each ad
#3: Budget and Schedule
If you’ve been nervous that Facebook is going to send you a massive bill because you messed something up when you set up your campaign, here’s the part where you don’t have to worry anymore.
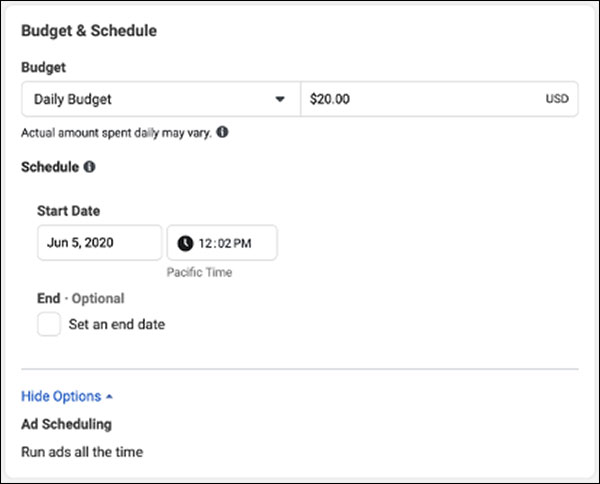
This is the part where you’ll set your daily budget for each ad set.
For example, you can say that you want to spend $20 per day.
If you have 2 ads in this ad set, you’ll be spending $10 per day on each ad UNLESS you chose campaign budget optimization.
In that case, Facebook will spend the budget on whichever ad is performing best.
You’ll also choose your schedule in this part of Ads Manager.
You can determine your start date and your end date (see below).
End dates are optional since you can choose to just keep your ad running indefinitely until it stops converting.
#4: Audience
Alright, time to decide who’s being invited to your Facebook party!
This is a really important part of creating your Facebook ad—if it’s not being shown to the right people then you’re not going to get the conversions you hoped for.
You’ll choose your audience based off of:
- Location
- Age
- Gender
- Interests
- Languages
- Connections
#5: Placements
Now, it’s time to choose where the ad is going to be seen.
This involves both the platform and where within the platform it’s seen.
For example, you can choose for your ad to only be shown on Instagram stories.
Or, you can have your ad be a feed post that shows up on Facebook and Instagram.
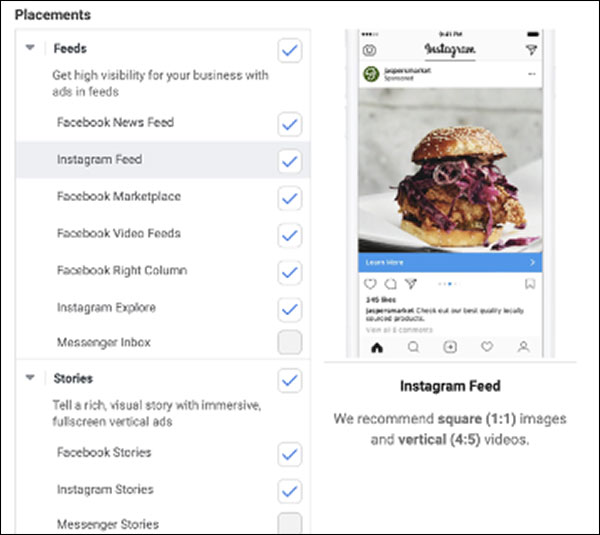
Facebook will ask you if you want Automatic Placements or Manual Placements.
Automatic placements will give Facebook the option to place your ad across any of the feeds, stories, apps and sites, etc.
Manual Placements gives you the option to choose what platform and where on the platform you want your ad placed.
Here are the first few options you’ll see if you choose Manual Placements:
#6: Optimization and Delivery
Within your ad set, you’ll optimize for an event. You can use this option to optimize for the goal that you chose in step #1 or for different events per ad set.
Here are the options you’ll see for the events you can optimize your ad set for:
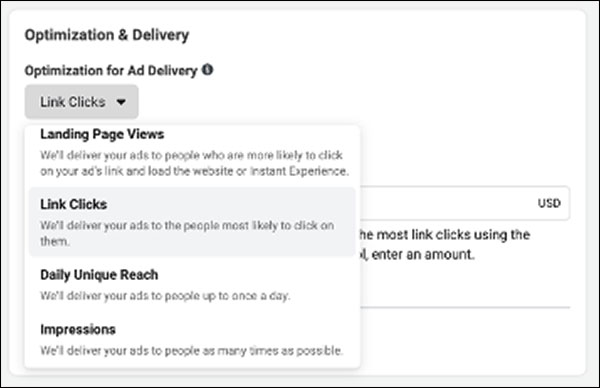
Depending on the optimization that you choose, you can set cost control or bid control that puts a budget on the event. This is optional.
And just like that—we have an ad set!!
That means there’s only one more thing to do… put ads in it 
#5: Create an Ad
The final step in creating your first Facebook ad is to…actually create the ad!
Now that we’ve done all the background work, it’s time to make the part of the ad that our audience is going to see.
Grab your copy and your visuals—it’s time to plug and play.
Here’s how you’re going to create your ad:
- Choose Identity
- Choose Ad Setup
- Create Ad Creative
- Set Up Tracking
- Publish
Again, let’s go through these in quick detail.
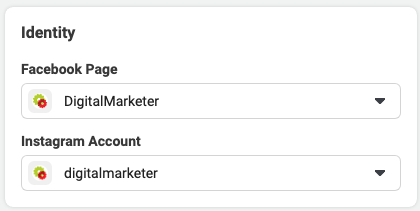
#1: Identity
Identity is the Facebook page, Instagram profile, or person that is going to publish the ad.
If you have a business Instagram account, this will be linked to your Facebook page.
#2: Ad Setup
In Ad Setup, you’ll choose between 2 options:
- Single image or video
- Carousel
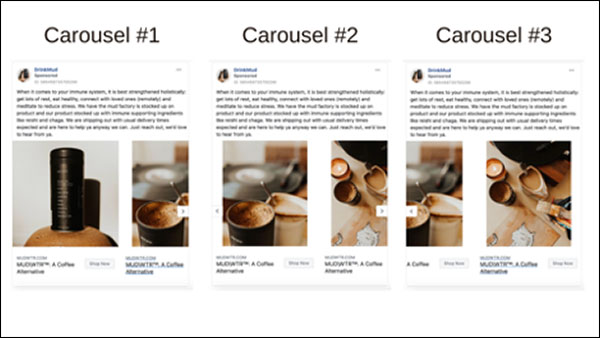
A carousel ad has several images or videos that someone can scroll through.
Here’s an example from DrinkMud.
#3: Ad Creative
This is where you’ll copy and paste your copy and upload your images or videos.
You’ll have options like Primary Text, Headline (optional), Description, Website URL, and Call to Action.
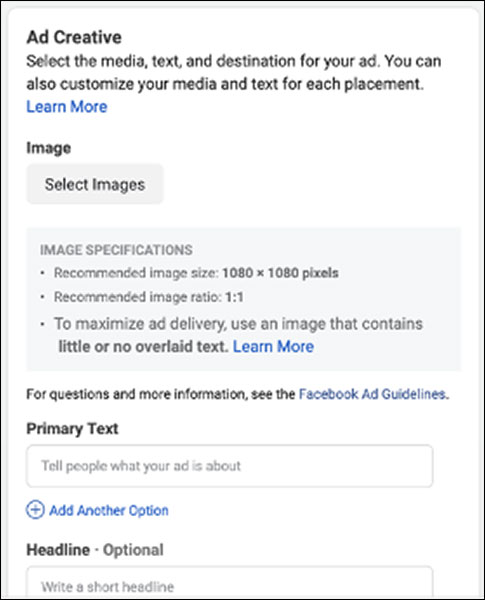
While you’re putting the above information in, you’ll see your ad start to come together on the right-hand side.
Take time to preview the ad in all of its placements to make sure that it looks good.
If it doesn’t, you can go back into your ad set (Step #4) and turn that placement off using Manual Placement.
#4: Tracking
We wouldn’t be marketers if we weren’t planning on tracking our ads’ success!
In the final step of setting up your Facebook ad, you’re going to choose where you want to track conversions.
All of the results from your ad are going to be saved in your Ads Manager so you can see the budget, results, reach, impressions, cost per result, the amount spent, frequency and unique clicks of your campaigns (depending on what information is relevant to your objective).
#5: PUBLISH!
Now, it’s time to hit the pretty green button in the right-hand corner and set your ad to live!
We don’t want to be totally anti-climactic here, but you will have to wait for Facebook to approve your ad before it’s officially live.
But, once they do, your ad will be live for the world to see.
This is the foundation of creating Facebook ads.
There are tons of strategies and tips around using Facebook ads that you can start to implement as you get more familiar with the platform and start to build your audience.
We just want you to remember one thing: even if your Facebook ad “fails” because it didn’t hit the campaign objective you were looking for… it’s not actually a failure.
You still learned something that brought you closer to getting the traffic and conversions you’re looking for.
Good luck out there!
We’ll see you on the feed 
The post 5 Steps To Create Your First Facebook Ad appeared first on DigitalMarketer.
Source: digitalmarketer.com

This Simple Facebook Ad Trick Gets More Leads & Customers In 5-10 Minutes Flat
Do you already have a couple of Facebook ad campaigns running?
Would you be interested in a tip that will help maximize your results?
(And not just on Facebook, but with any traffic network?)
Then you’re in luck.
Because in this post you’re going to learn a simple Facebook ad trick that will free the untapped profits that are hiding in your ad campaigns.
It’s easy to do, but don’t let that fool you—it’s a powerful tip to help convert more of those near-sales into new sales.
How It Works
Before we dive into the specifics, let me use a simple metaphor to help you understand how this tip works.
Think of your sales funnel as a series of steps. Together, they make a staircase.
In order to reach the top of the stairs (aka make a purchase), your customers have to take each step, one at a time, in the correct order.
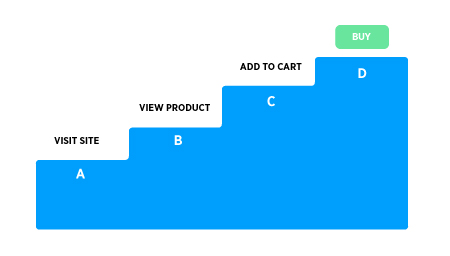
At each step in this process, you’re bound to lose people.
- Perhaps only 40% of the people who reach step A make it to step B.
- Maybe 60% of those people reach step C.
- And only 10% of those people reach step D. And so on.
If you’re a regular DigitalMarketer reader, you already know the way to squeeze more profit from this funnel (and get more leads, customers, and sales).
You just need to find the steps where most people are getting stuck and come up with solutions to help them get unstuck.
But that begs the question:
- How do you do that?
- How do you get back in front of those “stuck” people and get them moving through your sales funnel once again?
The answer, in a nutshell, is remarketing.
What Is Remarketing?
Just because someone didn’t take the next step in your sales funnel doesn’t mean they don’t WANT to.
If you’ve been following us long here on DigitalMarketer, you’ve probably heard quite a bit about remarketing.
But you may still have a few questions about how it works.
Basically, remarketing allows you to keep track of the people who visit your website.
Then it gives you the power to follow them around on the web and show them relevant ads and offers that have to do with what they viewed on your site.
Here’s an example of remarketing at work:
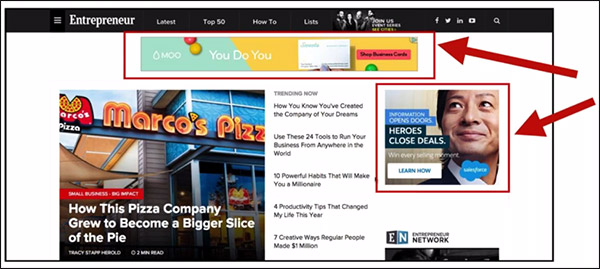
See those 2 ads highlighted in red?
The reason I’m seeing these 2 ads on Entrepreneur’s website is that I recently visited both of these websites.
As a result, they know there’s a good chance that I’m interested in their service and so they’re willing to pay to show these ads to me.
Now those ads are being shown on a 3rd-party website through an ad platform such as Google Adwords.
But you can also do remarketing on Facebook, Instagram—just about any traffic network out there.
Here’s an example of one of DigitalMarketer’s remarketing ads on Facebook:
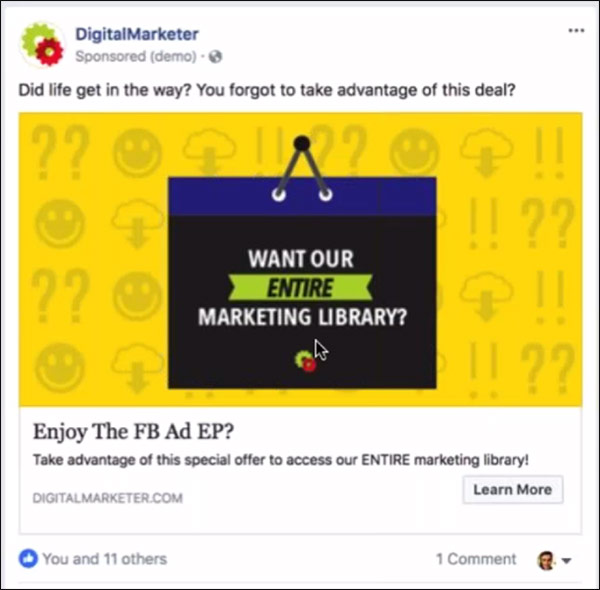
The awesome thing about using Facebook for your remarketing is that it’s relatively simple to set up.
There’s no extra software to install or learn.
If you have the Facebook pixel installed, then you already have everything you need to keep track of what people do on your website.
And once you know what people have done on your website, it’s not that hard to figure out what kind of relevant offer makes the most sense to promote to them.
Keep this in mind:
- Just because someone didn’t take the next step in your sales funnel doesn’t mean they don’t WANT to.
- Or that they wouldn’t take the next step if they had another opportunity.
There’s a good chance that life simply got in the way: they got busy, their phone ran out of battery, something distracted them.
And when that kind of thing happens, the best thing you can do to help move people along through your sales funnel is to give them a gentle reminder.
That’s exactly what remarketing does, and that’s why it’s such a powerful way to improve your advertising.
In fact, let’s talk about that for a second.
Just how important is remarketing, anyway?
Why Remarketing is More Important Than Ever
In the early days of digital marketing, there was no such thing as remarketing.
But today it’s a vital part of any successful ad campaign.
And it’s only becoming more and more important over time.
Why? Because traffic campaigns are getting crowded.
And all that competition is leading to increased prices.
Over the past 2 years, the average cost per customer rose by roughly 40% at DigitalMarketer.
All as a result of increased traffic costs (primarily on Facebook).
Yes, you read that right—40%.
That’s a big increase.
A 40% increase in the cost of customer acquisition could mean the difference between a company that’s profitable and one that’s not.
Fortunately, there are ways to offset these rising costs.
And remarketing is one of those ways.
Through the strategic use of remarketing, we’ve been able to increase our conversion rates by 2-4% overall on any given page.
So a page that converts at 8% without remarketing can convert at 10-12% with it.
That’s huge!
And remarketing is especially powerful on Facebook.
Historically, the cost for remarketing ads on FB is way cheaper than the cost for clicks to cold traffic.
Cheaper clicks + warm traffic = high ROI campaigns and more customers flowing into your business.
I would go so far as to say that remarketing is the best way to quickly get a measurable improvement on your conversion rates and your overall advertising performance.
But…
(And that’s a big… well… let’s just say Sir Mix-a-Lot would like that “but.”)
Remarketing is like a can of worms.
Once you open it up, you realize that you can use remarketing just about anywhere!
And in order to enjoy the benefits of remarketing, you have to be able to figure out WHERE to remarket for the best results.
So how do you do that?
How can you figure out—quickly, simply, and easily—where to focus your remarketing efforts?
That’s what you’re about to learn in the rest of this post.
How to Find The Best Place To Do Remarketing
When deciding where to do remarketing, it all comes down to one thing:
Opportunity.
When deciding where to do remarketing, it all comes down to one thing: Opportunity.
You want to focus your remarketing on the steps in your sales funnel with the most opportunity.
If 300 people are stuck on step C in your funnel, and 2,000 are stuck on step D, doesn’t it stand to reason that step D has more potential than step C?
Because more opportunity = more leads, sales, and revenue.
And when it comes to measuring this opportunity, there are 2 ways you can do it:
1. Measuring Opportunity with Google Analytics
One way to measure potential is by using Google Analytics (GA). Google Analytics is really powerful.
You can use it to do super deep dives and get really detailed in your analysis.
But the downside to GA is that it’s slower, manual, and requires more math.
It also requires quite a bit of learning if you’re not already an advanced user.
So yes, GA is a great tool.
But for most people reading this, it’s probably not the best way to get started.
Instead, I recommend…
2. Measuring Opportunity with Traffic Platforms
What you can do instead is measure opportunity using the remarketing lists that are already built into your favorite traffic platforms.
That’s what I’m going to show you how to do in this blog post.
Your traffic platform’s remarketing lists are flexible and auto-updating.
They’re a great way to get quick insights to help you make smart marketing decisions.
I’m going to show you how to do this using Facebook remarketing audiences, but don’t think you have to use Facebook for this.
You can take the same principles you’re about to learn and apply them to Adwords or any other traffic platform you want.
(NOTE: Want to make creating Facebook ads way easier?
Download the FREE Ultimate Facebook Ad Template Library so you can just copy and paste these 7 proven Facebook ad campaigns to create low-cost, high-converting ads on demand.
Learn more here!)

The “Secret Sauce” to This Method
OK, if you’ve been following along then you know that you’re about to learn how to find the best place in your sales funnels to do remarketing.
And you’re going to learn how to do it quickly and easily using your ad network’s built-in remarketing lists.
But in order to make this method work, there are 2 things you’re going to want to do.
These 2 things are the secret sauces that make this method really work.
Exclusion Model
In order for these remarketing lists to work, you need 2 pieces of information for each step of the funnel:
- The URL of the last page in your funnel that the person reached
- The URL of the next page in the funnel (the page they didn’t reach)
For example, say you’re creating a list of people who reached your order form but didn’t complete their purchase.
In that case, you know that they reached the page yourwebsite.com/order-form. You also know that they did NOT reach the page yourwebsite.com/order-confirmation.
So in the language of your ad network, you want to INCLUDE people who reached yourwebsite.com/order-form.
And you want to EXCLUDE people who reached yourwebsite.com/order-confirmation.
This way you’ll be targeting everyone who reached the order form but failed to complete their order.
Make sense?
Here’s an example of what this looks like on Facebook:
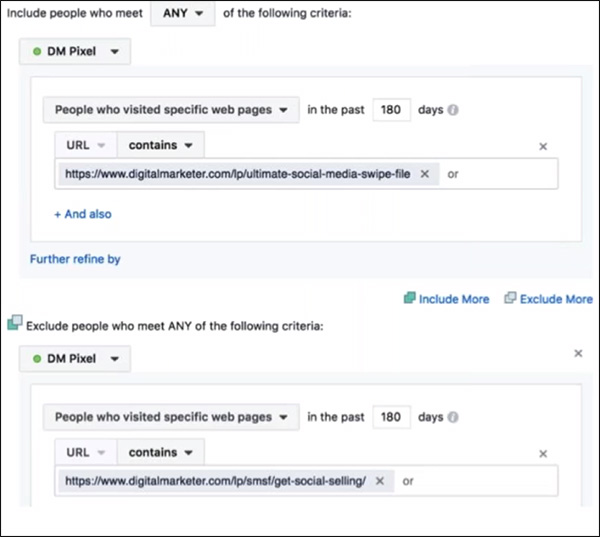
Pretty much everybody understands the “Include” half of this equation.
But it’s a common mistake for people to forget the “Exclude” part of it.
Remember that you need both parts if you want to narrow down your funnel opportunity on a step-by-step basis.
Naming Conventions
When creating these audiences, you’ll have an easier time if you use a consistent naming convention.
The naming system I like to use is:
Media – [Funnel Name] – [Stage Letter] – [Stage Description]
When you follow a consistent naming convention like this, it becomes super easy to sort and filter. That way, you can quickly see all the funnels steps you want at a glance.
For example, here are all the stages for our “FB Ad Templates” funnel:
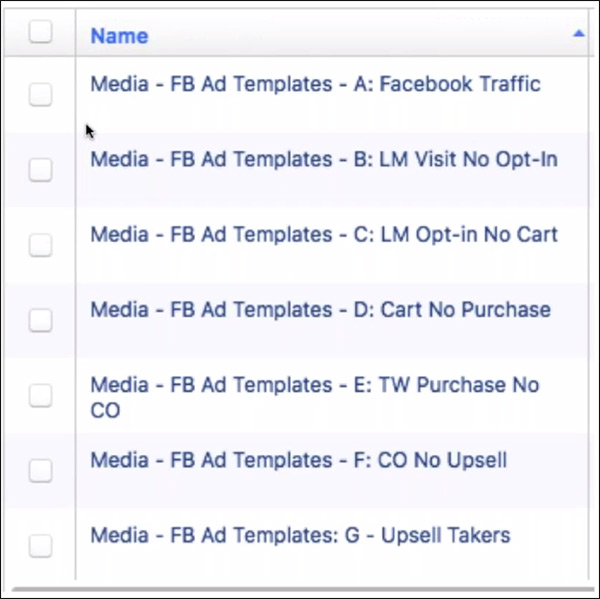
Having all this information right there in the name of the audience also makes it easy to filter them so I see only the audiences I want.
For example, if I want to compare all of our paid traffic campaigns, I just filter for the word “Media.”
If I want to look at one specific funnel, I filter for the name of the funnel (like “FB Ad Templates”).
I can also compare similar stages across funnels.
For example, if I want to compare all of our audiences of people who reached the shopping cart but didn’t make a purchase, I filter for “Cart No Purchase.”
So when you put this all together, you get a screen that looks like this:
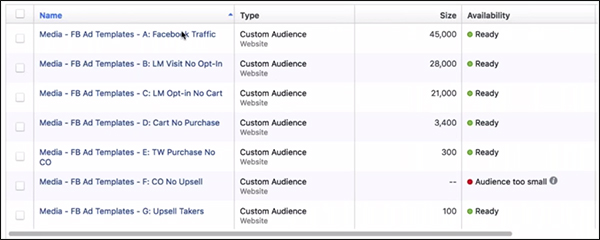
Take a look at that for a moment and just think how useful it is.
You can see at a glance how many people are stuck at each stage in the funnel.
Want some immediate revenue?
Well, there are 3,400 people who abandoned their shopping carts.
Remarketing to those people is going to generate some instant sales.
Or maybe you need more leads?
You can see right away that 28,000 people reached the Lead Magnet page but didn’t opt-in Remarketing to those people will give us an influx of new leads.
And because I use the same naming convention for all of our funnels, I can do something like this:
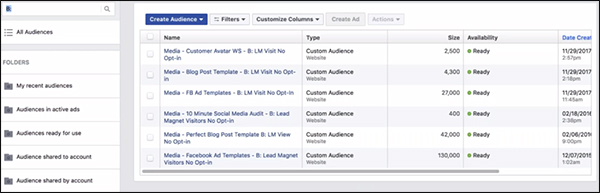
Here you see all the people who are stuck at step B in one of our funnels.
This view makes it really easy to compare the traffic potential in each of our funnels side-by-side.
Step-by-Step Example
Let me walk you through a quick step-by-step example from one of our funnels at DigitalMarketer. This might be a good time to follow along with one of your own funnels.
First, write down all the URLs of each page in the funnel:
Opt-In Page: https://digitalmarketer.com/lp/ultimate-social-media-swipe-file/
Sales Page: https://digitalmarketer.com/lp/smsf/get-social-selling/
Shopping Cart: https://digitalmarketer.com/secure/ssep/social-selling-special/
Upsell 1: https://digitalmarketer.com/secure/ssep/social-selling-special/oto1
Upsell 2: https://digitalmarketer.com/secure/ssep/social-selling-special/oto2
Order Confirmation Page: https://digitalmarketer.com/secure/ssep/social-selling-special/thank-you
Next, you want to create a Facebook audience for the people who got stuck at each step of the funnel.
To do that, the audience should include everyone who reached a certain URL:
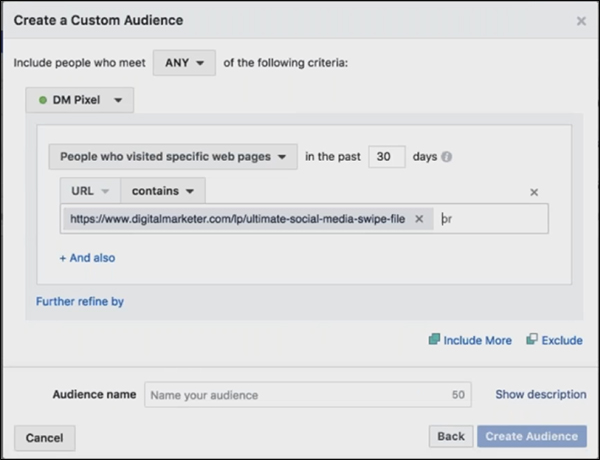
Then, exclude everyone who reached the URL of the next stage of the funnel:
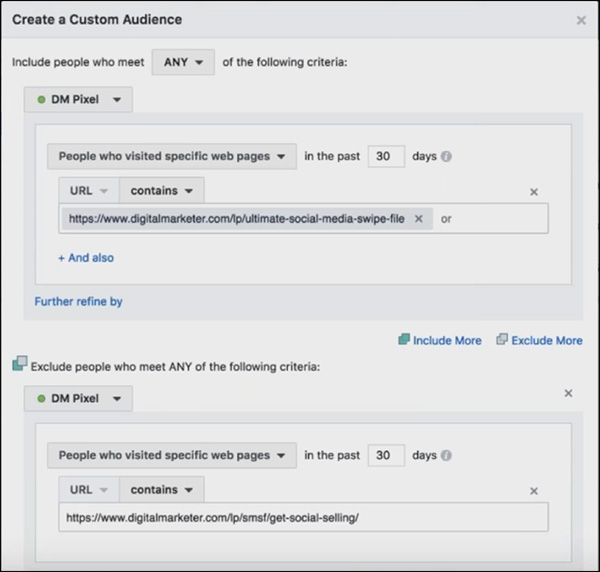
Make sense?
If we target everyone who reached the opt-in page, but who didn’t reach the sales page, then we’ll see how many people got “stuck” on that step of the funnel.
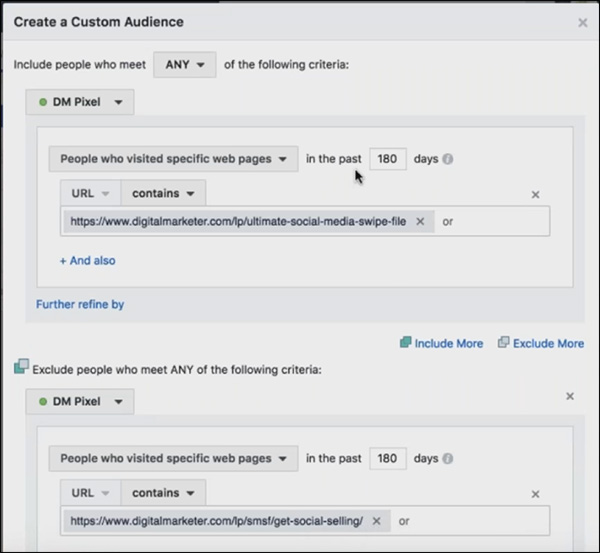
Next, I prefer to set the date ranges for 180 days, so we have more data to work with:
And finally, use the naming convention you learned (or come up with your own) to make it easy to compare different funnel steps:

When you complete the process, you’ll end up with something like this.
It’s a list of funnel steps that show exactly how many people got stuck at each step in your funnel:
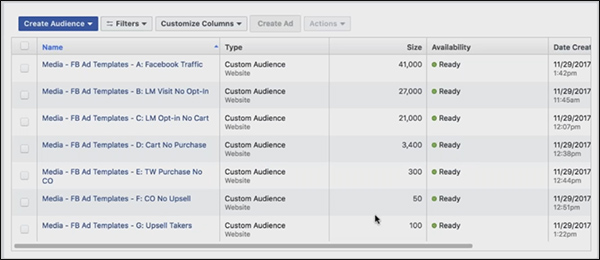
The awesome thing about this view is that all you need to interpret it is a little common sense.
You don’t need any sort of special tool or calculator to understand what’s going on here.
Another useful trick is to put this data in a spreadsheet, so you can compare the performance of several different funnels at once.
Here I’ve added the data for 3 of our funnels, so you can see exactly how many people made it to each step in each of them side-by-side:
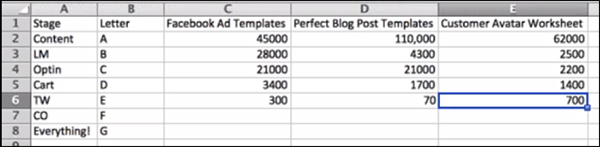
What sort of actionable information can you take away from this quick and easy chart?
First of all, take a look at the “Perfect Blog Post Templates” funnel.
In row 3 (step B) you see that only 4,300 people saw the opt-in page and didn’t opt-in.
But in the next step, we had 21,000 people who opted in but then didn’t add the product to their cart.
So the Lead Magnet section of this funnel is working great.
But the sales page might need a little work.
And if we were going to run a remarketing campaign for this funnel, we wouldn’t run it to opt-in page visitors.
Instead, we’d run it for people who viewed the sales page.
OK, now I want you to give it a try.
Take a look at the spreadsheet above and answer this question:
- If we wanted more immediate sales, where should we run a remarketing campaign?
- Which funnel, and which step in that funnel?
(I’ll give you a minute to think.)
(Hey, no peeking!)
OK, hopefully, you took a minute to think about that.
If we wanted more immediate sales, the best place to retarget is shopping cart abandoners (step D).
So scanning that row, you can quickly see that the Facebook Ad Templates funnel has twice as many cart abandoners as the other funnels.
So that’s where I would start with a shopping cart remarketing campaign.
(NOTE: Want to make creating Facebook ads way easier? Download the FREE Ultimate Facebook Ad Template Library so you can just copy and paste these 7 proven Facebook ad campaigns to create low-cost, high-converting ads on demand. Learn more here!)
4 Advanced Tips + A Disclaimer
You now have a simple process you can use to analyze traffic volume and potential in your sales funnels using Facebook remarketing lists.
But we’re not done yet.
Because with this strategy in place, there are some even more advanced things you can do to help really skyrocket your paid traffic results.
First, however, there’s 1 disclaimer I should make.
Disclaimer: Only Use This for Funnels You Trust
I want to mention a caveat to keep in mind.
You should only use this process on funnels you trust. Funnels that work. That convert well.
You should only use this process on funnels you trust. Funnels that work. That convert well.
That you’re comfortable sending paid traffic to.
Think about it for a second.
Let’s say you run traffic to a funnel that is losing you money.
Maybe the opt-in page and sales page convert really poorly.
If you send a lot of traffic through this funnel, it might show up as a high-opportunity place to do some remarketing.
But there’s nothing to be gained from sending traffic to a funnel that doesn’t convert.
That’s just throwing good money after bad.
So keep that in mind when going through this process.
If your funnel isn’t converting well enough to turn a profit, spend more time optimizing it before you start remarketing heavily.
Facebook Ad Advanced Tips:
Facebook Ad Advanced Tip 1: Choosing New Primary Traffic Campaigns
So far, you’ve learned how to use this process to improve the performance of your existing traffic campaigns. But you can also use it to help discover new traffic campaigns that you should be running.
It works along the same lines—by finding content on your website with high opportunity.
Here’s how it works.
First, come up with a list of keywords that come up a lot in your content.
For example, some of our frequent keywords at DigitalMarketer include “Facebook,” “social,” “Adwords,” etc.
Then create a Facebook audience for each of those keywords.
And make sure to exclude anybody who has already opted in for any Lead Magnets relevant to those keywords.
For example, at DigitalMarketer we have a Lead Magnet called “The Customer Avatar Worksheet.”
It’s a downloadable worksheet that you can use to help define your customer avatar and fine-tune your advertising for the right kinds of people.
But how well are we doing with this Lead Magnet?
Are we doing a good job of getting people who are interested in this topic to opt-in for the worksheet?
Or do we need to create a new ad campaign targeting these people?
To find out, we would create a custom audience like this:
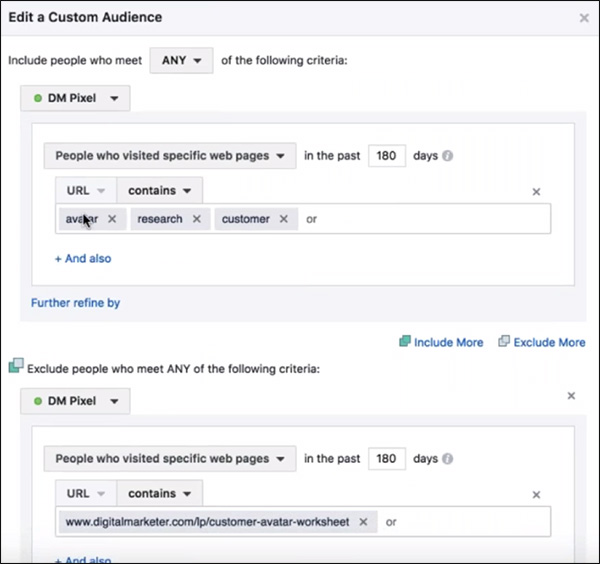
This creates a list of everyone who has read a blog post with the words avatar, research, or customer, but did not sign up for the Customer Avatar Worksheet.
And we can use the size of that audience to judge how much opportunity there is around this topic. If the audience is really small, then we know it’s not worth going after these people right now.
But if it’s a big audience, then maybe it’s time to start targeting it with a new traffic campaign.
Facebook Ad Advanced Tip 2: Tracking the Health of Your Offers/Web Pages
So far, I have been using the longest possible date range (180 days).
This is helpful because it gives you the biggest possible audience size.
Generally speaking, larger audiences will help make trends more visible.
But if you shrink down the date range to something much more recent, say the past 10 days, you can use it as a sort of health check.
Those recent audiences will let you know anytime something breaks.

For instance, let’s say you notice that nobody has made it past your opt-in page over the past week.
That’s probably a good indication that something is broken on your site.
This can help you stay on top of technical problems, so you don’t lose business to 404 pages and other website errors.
Facebook Ad Advanced Tip 3: Finding New Hooks for Lead Magnets
You can also use this process to keep your finger on the pulse of what your website visitors are interested in.
And by doing that, you can measure when it’s time to create a new Lead Magnet to bring more leads & prospects into your sales funnels.
For example, at this writing, we do not yet have a Lead Magnet that’s geared toward helping people to create a Facebook Messenger chatbot.
However, we know that this is a topic that’s growing in popularity.
So sooner or later we may want to create one.
One way we can keep our finger on that pulse and measure the popularity of chatbots is by creating a Facebook list of anyone who visited a blog page containing relevant keywords like “chatbot” and “Messenger.”
Here’s what that might look like inside Facebook:
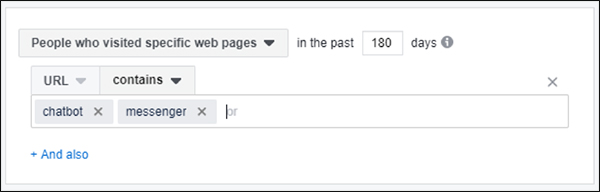
Do this for all the main keywords that come up regularly in your content, and just keep track of the volume.
When you notice any of these audiences start to grow in size, you’ll know it’s time to create a new Lead Magnet on that topic.
Facebook Ad Advanced Tip 4: Track Other Traffic Sources in Facebook
Earlier in this post, I mentioned that increasing ad costs are becoming a big problem for many advertisers.
This has been especially true on Facebook, where more and more companies start advertising every day.
More competition = higher prices.
Luckily, this is an area where remarketing can help cut your costs.
Because as I mentioned, retargeting ads on Facebook are historically much cheaper than front-end ads.
So what a lot of marketers are doing is using cheaper traffic networks to drive cold traffic at a lower cost.
(Networks like YouTube, Google Display Network, Bing, and so on.)
Then they use Facebook to remarket to those people once they’ve entered your funnel.
This way you avoid the high cost of running front-end ads on Facebook.
And as a result, you can save significantly on your ad spend without sacrificing performance.
A Great Reference for Developing Remarketing Copy & Hooks
In this post, I’ve shared a process you can use to find the funnel steps with the most opportunity for remarketing.
But simply knowing WHERE to remarket is only half the battle.
The next step is actually digging in and creating a high-converting remarketing campaign, complete with eye-catching images, benefit-rich copy, and a compelling call-to-action.
That’s beyond the scope of this blog post, but if you’re interested in a program that helps you do exactly that, I recommend checking out The Boomerang Traffic Plan Execution Plan (EP).
In a lot of ways, this blog post is kind of a primer for that EP.
You now know how to find the parts of your business that have the most potential for remarketing.
And with the Boomerang Traffic EP, you’ll get everything else you need to finish putting together an effective remarketing campaign that brings promising leads back to your website, so they can complete their purchase.
You’ll discover tricks for coming up with good ad creative, get access to copy templates, learn the exact bidding strategy that will maximize your leads while lowering your costs, and much more.
How to Put This Facebook Remarketing Tip into Action
Now that you have a step-by-step process to find the highest opportunity spots for remarketing in your sales funnel, how should you get started?
Here’s what I recommend.
Start with your biggest funnel.
The one that drives the most of new sales and customers to your business.
And go through the process you just learned, finding the step in that funnel with the biggest opportunity.
And remarket to the people who are getting stuck at that step.
That’s the way to make sure you’re getting the absolute best bang for your remarketing buck.
Then continue to repeat the process for additional funnel steps whenever you can.
The process doesn’t take much time, so if you find yourself with an extra 15 minutes, go through it again.
Each time you’ll find the next-highest opportunity for remarketing.
Easy, right? Just take it one step at a time, and watch those sales funnels start doing their job and funneling more and more new customers into your business.
(NOTE: Want to make creating Facebook ads way easier? Download the FREE Ultimate Facebook Ad Template Library so you can just copy and paste these 7 proven Facebook ad campaigns to create low-cost, high-converting ads on demand. Learn more here!)
The post This Simple Facebook Ad Trick Gets More Leads & Customers In 5-10 Minutes Flat appeared first on DigitalMarketer.
Source: digitalmarketer.com