
Tag Archives for " image "

7 Tips for Image Optimization
Are you looking to gain an edge in SEO? If your image optimization isn’t up to snuff, you could be missing out on traffic, user engagement, and sales.
Google looks at more than 200 factors when deciding which website to rank for a specific search query. While having a well-optimized image won’t help sub-par content rank number one, it can help you stand out from other sites that don’t optimize their images.
The good news? Image optimization isn’t particularly complicated. Just a few changes to your current image process could help your site gain more traffic and leads, resulting in more sales.
Why Is Image Optimization Important?
Well-optimized images get better visibility in Google, which brings in more traffic. That’s the number one reason sites need to optimize their images, but there are many other benefits as well:
- Improve the user experience: Well-optimized images that display correctly improve UX by making your site easier to navigate. Large images, for example, can take up the entire screen or cover other elements on the page.
- Faster site speed: When it comes to SEO, speed matters. Images that are large or formatted incorrectly can slow down your site, killing your ranking and annoying site visitors.
- Makes your site more accessible: Some optimization steps, like adding alt tags, can make your site easier to navigate for those using screen readers. Web accessibility is not only good for site visitors; it’s good for SEO, too.
While image optimization might feel like another step in a never-ending quest to improve SEO, it can have a significant impact on ranking and UX.
How do you make sure images aren’t holding your site back?
7 Image Optimization Tips for Your Website
Technical SEO can get pretty complicated, especially if you aren’t familiar with the latest Google algorithm updates and what they mean. The good news is image optimization isn’t as complicated as other aspects of SEO—and it doesn’t seem to change quite as often.
Ready to make sure your images help your SEO? Here’s what you need to know.
1. Choose the Right Image File Type
Using the wrong image file type can cause your images to be displayed incorrectly, look blurry, even impact whether users can see your images. But there’s a ton of different formats for images—vectors, JPEGs, raster, PNG, GIFs.

Which image type is best for SEO? Generally, you’ll want to use either JPEGs or PNGs.
JPEG, aka Joint Photographics Expert Group, is a popular image file type. They can be displayed by just about any type of device and can show millions of colors, so they preserve the coloring of your images well.
JPEGs do use lossy compression, resulting in some lost data during compression, so they’re not ideal for professional photography. However, they work fine for featured images in blog posts, and similar images.
Another popular type of image is PNG, which can also be displayed on any type of device. These use lossless compression, which means they don’t lose data during the compression process. They also support elements like transparent backgrounds. However, the file sizes tend to be much larger.
These are the most popular images for web publications. Here’s when I recommend using them:
Use JPEGs for blog post images, screenshots, etc. The smaller size will protect site speed, and most images will be clear enough. If the quality isn’t good enough and your site speed is good, feel free to switch to PNG format.
Use PNGs for icons, logos, and images where someone might zoom in. PNGs are larger but slightly higher-quality images. When image quality matters, use a PNG file.
I strongly recommend against using other image formats on your site, especially GIFs. I love a good GIF, but they really do slow your site down.
2. Compress Your Images
Image compression takes large image files and makes them smaller so they’re easier to load on the internet or store on your device. Image compression strikes the perfect balance between size and image quality when done well.
The two types of image compression are lossy and lossless compression. Lossy compression, which JPEGs use, essentially throws out some of the data while lossless preserves all the data. (PNGs use lossless, as I mentioned above.)
Therefore, the type of compression you use depends on the image type you select.
Here’s an example of compressed images:
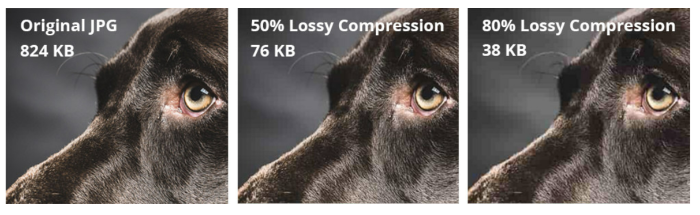
The image to the far left is 824KB, which is quite large. The middle image looks virtually identical (there’s a little graininess in the background if you look carefully) but is far smaller at 76KB. The third one is even smaller, but image quality is definitely impacted.
Aim to strike the right balance between size and quality.
When deciding how much to compress your images, think about your user. In most cases, they are unlikely to care whether an image on a blog post is a tiny bit less crisp. However, if you are sending a client a new logo, that’s a different story.
The point is, use the compression type based on the file format you use and select the file format based on how the image will be used.
Now, how do you compress images? There are several tools.
I like resizing.app, it’s a free Chrome extension that lets you convert file formats, crop, and resize images in just one click. Other photo compression tools include Photoshop and PicResize.
3. Add Description Alt Text
Alt text (aka, alternative text) is a written description of an image that describes what it is and what purpose it serves. Screen readers use this data to describe images to their users, and Google uses it to determine whether an image is relevant to a search query.
If you use WordPress, adding alt text is very simple. Just highlight the block with an image and add the alt text to the provided box, like this:
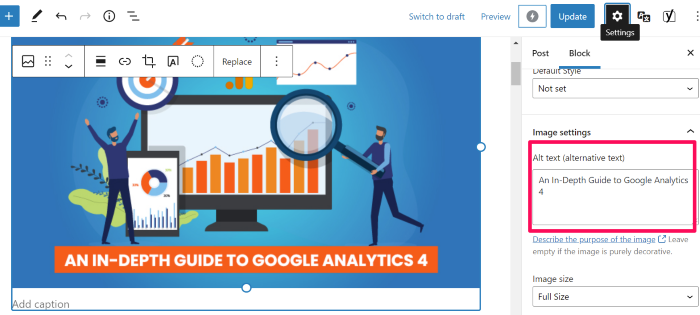
In Google Docs, right-click on images, then click Alt text, and a box will appear that allows you to add the alt text.
What do you write as your alt text? While it’s up to you, here’s the formula I use:
“Main keyword – description of image”
For the image above from WordPress, I used “image optimization guide alt text in the WordPress example.” This format makes sure screen readers know what the image is and tells Google the image is relevant for image optimization search queries.
Pro tip—if you want to see how your competitors use alt tags, navigate to their site, right-click and select “Inspect.” You’ll see the alt tags in the code of their site.
4. Write High-Quality Image Names and Descriptions
Image title provides users (and search engines) with a little more context about your images. While they don’t impact ranking directly (according to Google’s John Mu), they do provide a bit more context, and they show up in your site code.

I recommend using a short phrase that describes the image, along with the key term the post targets—similar to your alt text.
This can also make your images easier to find in Google image search since Google generates a title and snippet for images. If you include a title, they’ll take that into consideration.
5. Ensure Images Are Mobile-Friendly
If you’ve used the correct file type and compressed your images, they should be pretty mobile-friendly. However, sometimes things don’t always display the way we expect.
More than half of all internet traffic comes from a mobile device, so you want to ensure images don’t mess up the mobile experience.

For that reason, I recommend viewing your site from several different mobile devices to ensure images look their best. Remember, tablets, iPhones, and Android devices may all display your images a little differently.
I also recommend using Google’s mobile-friendly test to make sure your images aren’t slowing down site speed on mobile.
6. Use Schema Markup
Schema markup, also called structured data, is a type of code that helps search engines better understand your data.
Imagine you want to collect recipes to make a book of family recipes. Rather than having everyone send in their favorite recipe—which might use different measurements, different title formats, etc.—you send out a form and ask your family to input their recipe.
Now, all the recipes are in the same format and you can easily view the ingredients, measurements, and cooking steps.
Essentially, that’s what schema makeup does. It formats your data so Google can understand if it’s a list, a recipe, an image, and so forth. Here’s what it looks like:
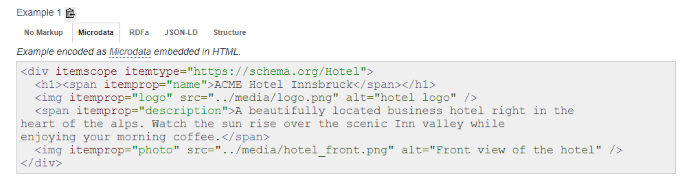
Schema.org lists three types of image schemas, including:
layoutImage (pending implementation)logophoto
This is a more technical change, so don’t stress if this feels like too much. Schema.org lists the coding you can use to add structured data to images here.
If you need more help, feel free to reach out to my team; we can help you get this set up.
7. Optimize Image File Names
According to Google, it uses the URL path and the file name to understand your images better. This means you should organize your image URLs logically and include key terms in the file name.
This can help you stay organized and help Google understand your images: a double win.
File names don’t have to be complicated. I usually use the alt text as the file name, which makes it easier to upload posts to WordPress.
I recommend using the keyword in the file name and describing the image.
Frequently Asked Questions About Image Optimization
What does image optimization mean?
Image optimization means making sure both Google and users can easily understand and view the images on a website. Examples include compressing images so they load faster and adding alt text so Google can better understand what the image is about.
Why is image optimization important?
While image optimization isn’t the most important SEO tactic out there, it can help you stand out in the competitive online world. You’ll still need high-quality content and to follow other SEO best practices, but image optimization is another way to increase your Google ranking.
What is the best image format for SEO?
There’s no specific format that is better for SEO. In general, you want images as small as possible while preserving as much data as possible. I recommend PNG if it doesn’t slow your site down too much.
How does image SEO work?
Image SEO works by making your images easier for Google to understand and making them as useful as possible to your site visitors. For example, adding alt text helps Google understand what your image is about and makes it easier for screen reader users to navigate your site.
Conclusion: Image Optimization
Google gives us a lot of information about how to optimize our sites and our images. It’s easy to get overwhelmed by all the small details.
The tips above will help you make the most of your images; however, I recommend focusing on making sure your images bring value to users. Don’t cram images in just to meet a quota, and don’t add images that don’t make sense for your content.
Have you optimized images on your website? How did it impact your traffic?
Source: neilpatel.com

5 Ways to Boost Your Visual Marketing Results
Without high-quality visual content, there is no brand presence on some of the most powerful platforms, including Instagram and Pinterest. While you can promote links and text on those networks, non-visual content is likely to go unnoticed.

Marketers have long been talking about the power of visual content, both for attracting attention and for engaging your audience.
Yet, with the emergence of visual-only social media networks — like Instagram and Pinterest — visual marketing stopped being a nice-to-have and became a must-have.
Without high-quality visual content, there is no brand presence on some of the most powerful platforms, including Instagram and Pinterest. While you can promote links and text on those networks, non-visual content is likely to go unnoticed.
While the video is important, simply publishing videos is not going to be enough. Every other brand is doing that, and the consumer’s eye is pretty used to bright, flashy images by this point.
What you need is to stand out — which is getting more and more challenging in our era of the visual web.
Effective Visual Marketing Strategy:
So what can you do to embrace a more effective visual marketing strategy?
It’s all about ingenuity and experimentation, but here are a few ideas to get you started:
1. Turn your social media images into artwork
Make your social media images impossible to miss: it is as simple as that.
Well, it does sound simple, and it will obviously boost your content performance – but how exactly can we do that?
Luckily, there are tools for that, so it’s also quite doable.
Quickart by Lightricks is my most recent discovery and it was an instant hook. The app allows you to apply artistic patterns, filters, and effects to create memorable visual content that is impossible to miss:

Image source: theverge.com
My favorite thing about this specific app is that it is insanely easy to use. You don’t spend hours figuring out any super-advanced photo-editing instruments, like layers or mask tools, but the result is always unique and creative. Also, it is free.
2. Brand your images well
People are highly visual. Our brain relies on images and visualizations, which makes visual marketing so effective.
Our brain processes visuals 60,000 times faster than text and retains 80 percent of what we see versus just 20 percent of what we read.

Source: Scientific Reasons Visuals Increase Engagement
When we think, we tend to picture things. Our brain easily brings up colors and shapes, rather than text or numbers. We visualize associations and connections among different concepts and entities.
Through the creation of visual connotations, images make any information more memorable, and this is where the real power of visual marketing lies…
Visual content makes your brand more memorable and recognizable, which, in the long run, brings better click-through and higher conversions.
Branding your visuals is an important step – but one not to be taken lightly.
You do want people to recognize your brand just through your assets – and yet you cannot make your images all about you, as your audience will quickly lose interest.
That said:
- Use the recognizable color palette
- Place your brand in an interesting and creative context
- Make sure that each individual asset contributes to one unified narrative you want your brand to be associated with.
If you are looking for some examples of effective – yet not overwhelming or boring – branding, check out the Instagram account of Boxed Water.
They turn each picture into a story that tells the same narrative: “Life is good and nature is awesome so long as you save this planet”.
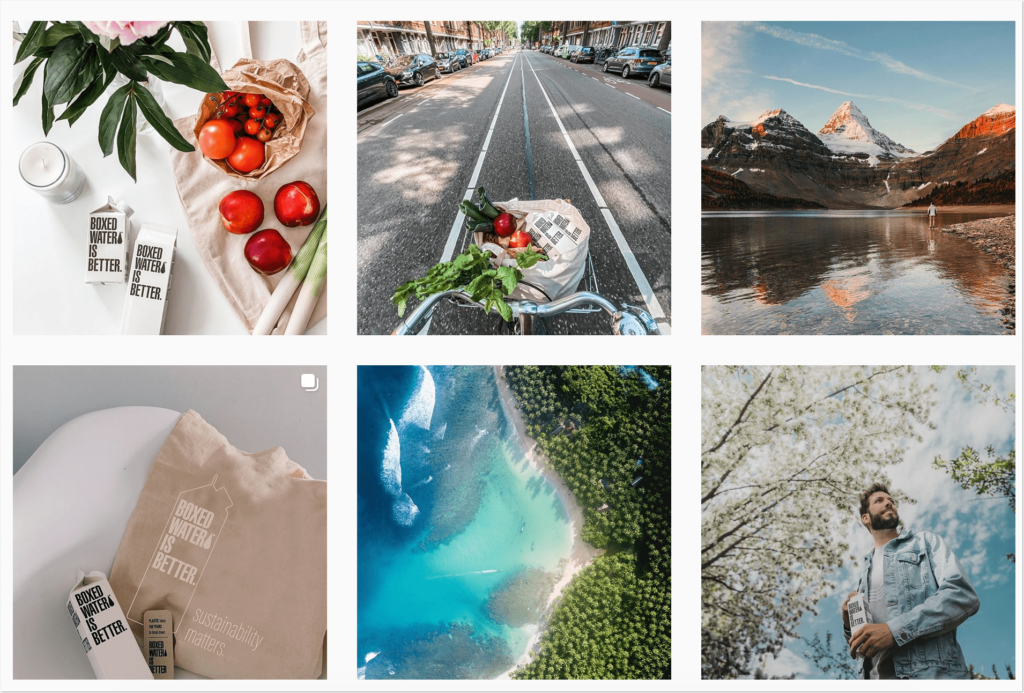
Visual Content Example from Boxed Water
However, avoid:
- Creating self-centered images
- Using too much of your logo (watermarks? Not a good idea for Instagram content, for example)
3. Repurpose your images everywhere
With your branding being consistent from asset to asset, bring your strategy to the next level: Attach all your channels with each individual asset.
This is a great way to create that “My brand is everywhere” illusion which ensures your audience remembers you well: Your customer sees your image on Facebook, clicks your link, sees the same (or similar) image on your site, and finally sees it again when searching Google (and that’s where they can no longer resist).
To build this #beeverywhere strategy, carefully use consistent images and visual elements everywhere.
For example, Leadpages features matching visual elements (visual identities) on their Instagram feed and their site:
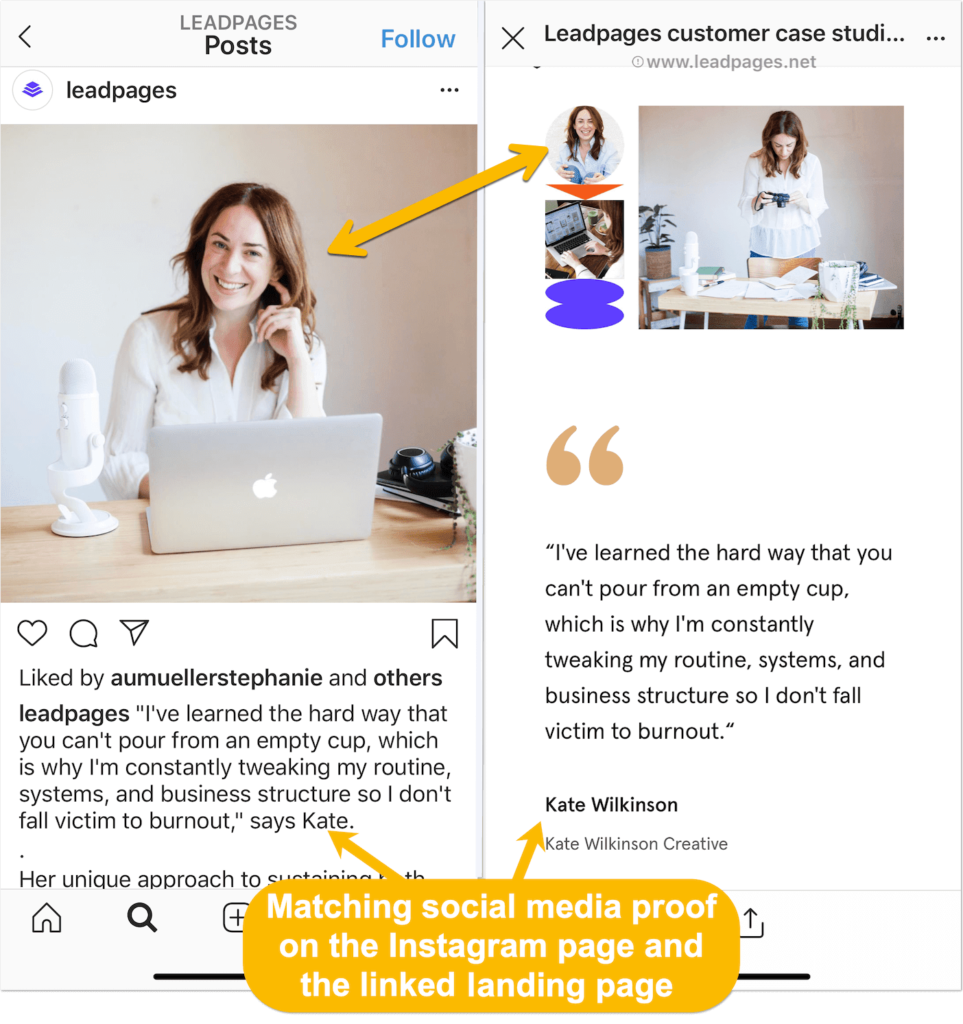
Leadpages features matching visual elements (visual identities) on their Instagram feed and their site.
And UPRIGHT uses the same visual elements in both their Instagram ad and the linked landing page:

This way, by using non-intrusive visual branding, both the brands instill confidence in their users landing on their site and create some sort of brand cross-channel recognizability.
To take this idea even further, searching Google for something relevant, we should be seeing the matching image or element which would instantly catch our attention and prevent me from going elsewhere:
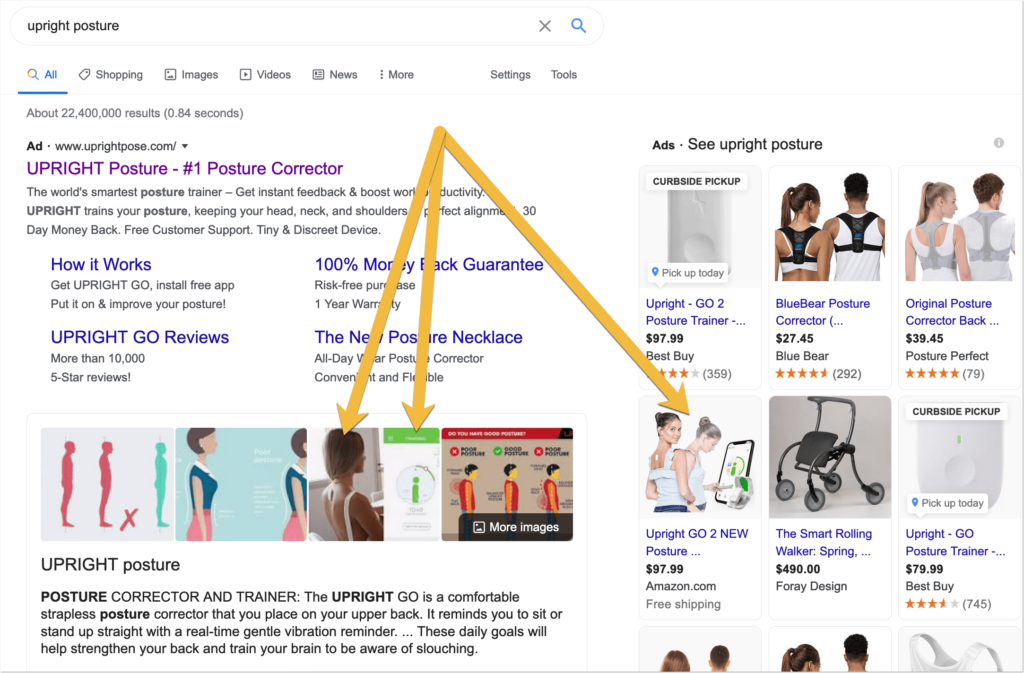
How can this cross-channel recognizability be achieved?
By using a consistent repurposing strategy, including:
- Reusing social media images on your site
- Using the same image (in different dimensions) across multiple channels
- Applying fundamental image SEO practices when publishing those visuals on your site and social media channels (this includes using optimized alt text, a variety of hashtags, and description (or immediate context).
There are lots of tools helping bloggers do this right.
This is where I always use Text Optimizer because the tool allows you to broaden the list of keywords your image is going to show up for.
The tool uses semantic analysis to identify related concepts and entities for you to use in the image description/caption, tags/hashtags, etc. when publishing each image anywhere.
For example, here are semantically-related concepts for [skyscraper]:
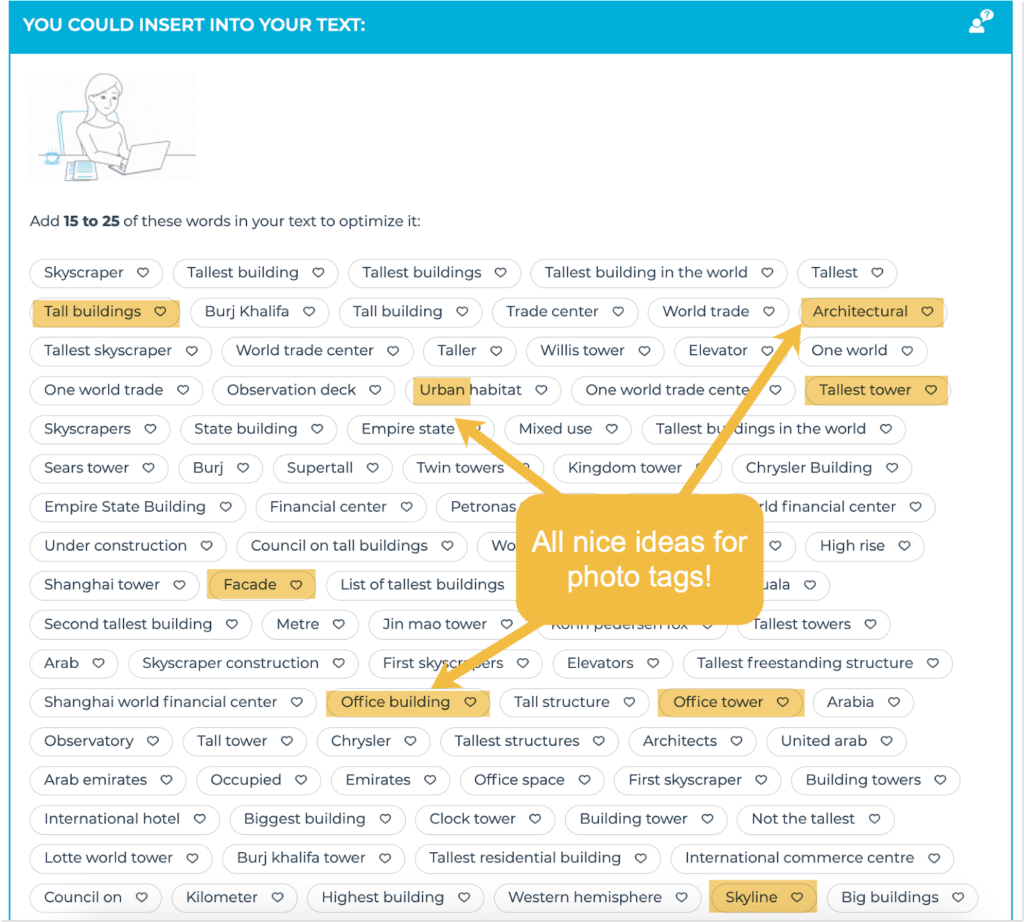
The tool also pushes you to diversify your tactics and avoid keyword stuffing by suggesting you use related and synonymous words in your copy.
Bonus: Embrace visual advertising
You do need all the above steps to do this one right: You need to create effective visuals, brand them in a non-intrusive way, market them across multiple channels, and then start investing in visual advertising.
Luckly, you have quite a few options, including:
- Instagram ads
- Pinterest ads
- Facebook ads
- TikTok ads
There are also emerging, more innovative options like Unsplash advertising that focuses on shifting brand perception and building brand associations rather than clicks and views.
Conclusion
Visual marketing can boost the performance of many – if not all – other promotional tactics you are currently implementing, including content marketing, traffic generation, SEO (or rather on-SERP marketing), etc.
The best part about visual marketing – in my opinion – is that you are never actually done. You always have to be innovating, trying new tools, discovering new tactics in order to stay ahead – or at least abreast of your niche.
The post 5 Ways to Boost Your Visual Marketing Results appeared first on Content Marketing Consulting and Social Media Strategy.
Source: convinceandconvert.com

What is Alt Text
Yes. In fact, image optimization can make a huge difference in whether your post is ranking at the top of the SERPs. But how do you optimize an image? Hint: it’s not color correction or cropping. It’s your alt text.

Images: they give a post visual context, they break up the large blocks of text, they make a post look way better, they…
…Add to the SEO and ranking of a post?
Yes. In fact, image optimization can make a huge difference in whether your post is ranking at the top of the SERPs.
But how do you optimize an image? Hint: it’s not color correction or cropping. It’s your alt text.
What is Alt Text?
Alt text (also known as “alt attribute” or “alt description”) is a short description that you apply to images on your website within the HTML of the page, describing what the image is.
For those of you who use WordPress, you can find it here on the right side of the screen when you insert an image.
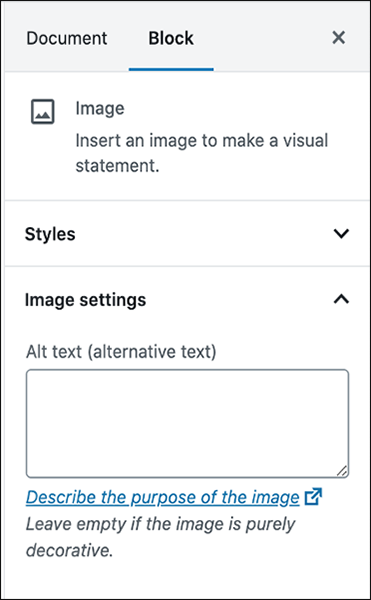
Alt-text is not immediately visible and often goes unnoticed by the average visitor to your website (it’s usually only seen when you hover your mouse over the image), but don’t think that means it’s not important.
Values of Alt Text
Between being a good SEO practice and making your website more accessible, there’s a lot of value to including good alt text.
Alt Text for SEO
Alt Text is incredibly valuable for SEO purposes for one big reason—without Alt Text, your images have no effect on your SEO ranking.
Having a well-crafted alt text makes sure your images are properly accounted for in Google’s crawl and prominently placed in search engine results.
Google’s bots are very effective in crawling text, identifying keywords, and heading organization, but they can’t recognize and understand visual elements.

This is why you need to have text associated with the picture, ideally written in a descriptive, relevant way so they actually contribute to your ranking.
And depending on the context of what your webpage is intended for, images can be even more important than your text.
If you’re creating a sales page or a landing page for a clothing company, or a restaurant or food service, or if you’re writing an article that’s completely based on infographics, for example.
In all of these cases, a large percentage of your webpage will probably be made up of images as opposed to text because they are the main thing that you want your visitors to see.
So, especially in those cases, you definitely don’t want your informative, visually appealing webpage that you put a lot of effort into, to get next to no traffic.
A picture says 1000 words, but it doesn’t matter if no one sees it.
Alt Text for Accessibility

Alt text also makes your webpage accessible to anyone and everyone who may visit it.
And, it’s by far one of the easiest accessibility principles to adhere to.
Although many people will hardly ever see alt text, your blind, and visually impaired audience rely on it to have a cohesive and comprehensive understanding of what they interact with on your site.
Remember how Google is bad at crawling images?
So are many of the “text to talk” programs used by visually impaired people.
So when they come across an image on a site, there is no context for what is contained in the image without an alt text description.
And again, if a major part of your article or webpage is images and other visual elements, then you need to make sure that everyone can interact with it.
If you fail to include the proper alt text, you’re leaving out an entire chunk of your potential customers.
That’s doing them and yourself a disservice.
Alt Text as a Fail-Safe

There’s one other way that alt text will help you out: technical failure.
It happens to everyone and every, and it is going to happen to you sooner or later.
Whether it be on the user’s end—like a connection issue, loading issue, or some other problem with their computer or phone—or on your end in the form of a coding error or backend glitch, it’s entirely possible that your images on your website won’t correctly populate for every single person that visits your website.
When images don’t populate, the alt text that you assign to the images will pop up in their place.
It allows your visitors to still get an idea of the point you’re trying to get across, especially if your images are an essential part of your audience understanding what you have to say.
Something will go wrong eventually, and your alt text is your fail-safe in place when it does.
Best Alt Text Practices
1. Use alt text for every image

Just because one image on your website has alt text doesn’t mean you can be done.
You should really make sure every image on a webpage has at least some sort of alt text description, even if it’s just a few words.
2. Make your alt text descriptive
You typically have around 100 characters to work with when creating alt text for an image, and you most certainly don’t have to use every single one. But the more descriptive, the better. Let’s use a stock image as an example:
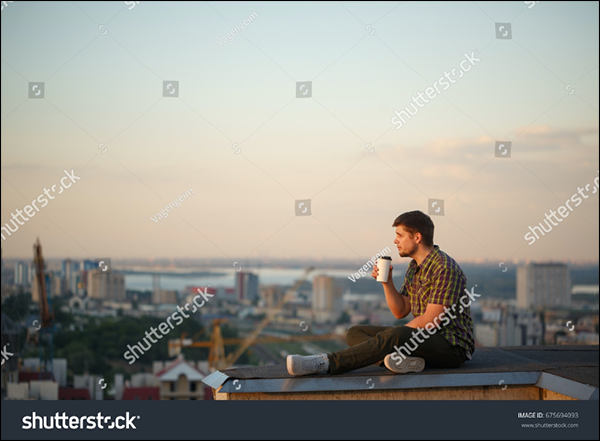
You could just describe this picture as “man drinking coffee” and that would be technically correct.
There is a man drinking coffee, but is all that is worth noting about this to where someone could get an idea of what’s happening without even seeing it?
You could easily say “a man drinking coffee from a roof, looking out at a city at sunset,” and that would be well under 100 characters.
Adding that extra bit of description in there is worth it, and it really doesn’t add much more work.
3. Only describe the image
Don’t try to add unnecessary fluff into your alt text. You should be contextualizing the picture with the rest of the article within the body copy; there’s no need to do it in the alt text.
Make your descriptions descriptive, but also keep them simple.
There’s no need to make it overly intricate. It will only inhibit everyone’s understanding, especially in the case that you can’t see the picture at all.
4. Use your keywords in your alt text

This is the best way that your images can help your ranking.
Including your keyword in your alt text shows the Google crawlers that yes, this post is really super helpful and informative.
Does that mean you should try to fill your Alt Text with your keyword as much as possible?
No.
But should you at least try to include it here and there?
Absolutely.
(Remember, if your keyword doesn’t fit into your article at least 5–7 times and in a few images, it’s probably not a good keyword to target.)
Now that you know what alt text is, you can integrate it you’re your web design and marketing, and you’re going to have a leg up on your competition!
The post What is Alt Text appeared first on DigitalMarketer.
Source: digitalmarketer.com

Everything You Need to Know About Inserting and Editing Images in WordPress
Do you feel confident using images in your blog posts? While there’s no absolute rule that bloggers need to include images, most bloggers will include at least one eye-catching image in each post (normally at or very near the start).

However, it’s easy to make mistakes with images. We’ve already covered how to obtain images legally so you don’t accidentally infringe on someone’s copyright.
But in today’s post, I want to go through the process of uploading and inserting images.
Whether you’ve just started blogging or you’ve been blogging for years, I hope you’ll learn something new from today’s post.
We’re going to start off with the basics, and move on to some more advanced tips and tricks.
Here are the ten things we’re going to cover:
- How to download an image from the web
- How to upload an image to your blog
- How to insert an image into your post
- How to align your image within your post
- How to resize your image
- How to turn your image into a link
- How to add alt text to your image
- How to edit your image in WordPress itself
- How to keep your image file sizes low
- How to optimize images for retina screens
10 Things to Know About Inserting and Editing Images in WordPress
#1: How to Download an Image from the Web
Brand new bloggers might feel a bit stuck at the first hurdle: downloading their chosen image.
Once you’ve found an image you can legally use, you’ll need to download it to your computer.
(While it’s technically possible to insert it in your post using its existing URL on the web, this “hotlinking” is a bad idea. Many sites don’t like it, as it puts extra strain on their servers. And if the image file is removed from its current location, it’ll disappear from your post too.)
To download an image, right-click on it. You should see an option such as “Save image as…”. (It may be worded slightly differently depending on your browser.)

Click on “Save image as…”, and then select the folder on your computer where you want to save it.
On sites that act as a library of images (such as Pixabay and Flickr), you’ll normally be able to choose from different sizes for the image. Here’s how it looks on Pixabay.

The numbers on the left are the dimensions of each image in pixels (width by height). The numbers on the right are the size of each image file in kB/MB. As you can see, larger images equal much larger files.
It’s up to you what size you choose. (We’ll cover this in more detail in sections #9 and #10 on this list.) Note that on Pixabay you need to create a (free) account to download the largest images.
#2: How to Upload an Image to Your Blog
After you’ve selected and downloaded an image, you need to upload it to your blog.
On WordPress, log in to your dashboard, open up your chosen post (or start a new one), and click the “Add Media” button.

Then click the “Upload Files” tab. You can either drag and drop your chosen file to upload it to your blog, or click the “Select Files” button to browse through your computer folders for it.
(Note that whichever you choose, the original file will remain on your computer. Only a copy of it is uploaded.)
If you want to, you can upload several images at once.
#3: How to Insert an Image
First, position your cursor where you want to put the image within your post. (Click at the start or end of a line of text, or click on a blank line.)
Your uploaded images are available in your media library. Click “Add Media” then the “Media Library” tab (if it’s not already selected for you) and you’ll see them.

To insert an image, click on it and you’ll see this panel on the right-hand side of your screen.

You can set the alignment of the image, add a link, and choose the size you want it to be displayed. We’ll be covering all of these later on in this post. (You can edit your image to change any of these details after inserting it.)
Click “Insert into post” to place the image in your post where your cursor is.
#4: How to Align Your Image Within Your Post
If you inserted your image without changing the alignment setting, it may not appear exactly the way you wanted.
Perhaps you intended to have it above your text, centered, or at the start of your post. But instead, it’s right-aligned alongside the text.

(Dummy text generated by fillerama on “Doctor Who” mode.)
To re-align your image, click on it and then click the “align center” button on the mini-menu that pops up.

(You can also click the little pencil button to edit the image, where you can select the alignment, size, and more.)
Your image should now be aligned correctly in your post.
#5: How to Resize Your Image
If your image is too big, you can resize it by clicking on it and then clicking on the edit button in the mini-menu.
You’ll see details about the image. Click the dropdown menu next to “Size” and you’ll see a range of options.

If one of the listed sizes works for you, select it. If not, click “Custom Size” and enter a width or height for your image in pixels.
Whichever you choose, the other dimension will be adjusted automatically.

Click the “Update” button at the bottom of the screen, and you’ll be returned to your post with the image updated to your chosen size.
Note that this process doesn’t change the size of your original uploaded image, so the file size will remain the same. (We’ll cover more on this later in this post.)
#6: How to Turn Your Image into a Link
At some point, you’ll almost certainly want to create an image that readers can click on to go to a different page.
For instance, you might want to create:
- A “start here” page showing the featured image from several posts, with each image linking to the appropriate post
- A page of book reviews, with the cover image for each book linking to the book on Amazon
- A custom “buy” button for your products, with each one linking to a PayPal or shopping cart page
To add a link to your image, click on the image and then click the little “edit” button that appears to get the Image Details screen.
Click the “Link To” dropdown and select “Custom URL”. You can then enter whatever URL you want the image to link to.

Make sure you click the “Update” button to save your changes to the image.
An even quicker way to add a link to an image is to copy your link, then click on the image and paste the link (press Ctrl+V on a PC or Command+V on a Mac). This will automatically add the link to the image.
#7: How to Add Alt Text to Your Image
Alt (alternative) text is normally used for accessibility. It provides a short description of your image that can be read to people using screen-reading software.
(It will also appear on the screen as text if the image fails to load.)
Note that this is different from a caption. If you enter a caption, it’ll be displayed immediately beneath the image in your post.
You can add alt text to your image when you’re editing it. Simply fill in the Alternative Text field with whatever text you want.

#8: How to Edit Your Image in WordPress Itself
It’s normally best to edit images before you upload them using software such as Photoshop (or if you want a free alternative, Gimp or Paint.NET).
But sometimes you might want to make adjustments to your original image within WordPress. You can do this by clicking the “Edit Original” button in the Image Details panel.
You’ll then see this screen.

You can then resize the image. (You can only scale down, not up.)
Note: it’s best to do this before making any other edits.
You can also rotate the image, or flip it from top to bottom or left to right, using the buttons immediately above it.
You can crop the image by clicking on it and dragging it to select your chosen area. Here’s the original image flipped left to right, with an area selected so it can be cropped.

To crop the image, you then need to click the “crop” button on the top left above the image.
Once you’re happy with your changes to your image, click “Save” beneath it, then “Update” on the next screen. You should now see your new image in the post itself.
If anything goes wrong, you can restore your original image using the “Restore Original Image” option.

#9: How to Keep Your Image File Sizes Low
The larger your image files, the longer they’ll take to load on your web page. And this can potentially affect your site’s performance. If your site is really slow to load, readers may simply give up and go elsewhere.
There are several ways you can keep file sizes down, including:
- Using .jpg images where possible. They’re compressed, so they aren’t as high quality as other file types. But for images in regular blog posts, they’ll probably look fine. Note that if you have transparent (or partially transparent) images, though, you can’t save them in .jpg format.
- Resizing your image before uploading it to WordPress. If you’ve taken a photo on your camera and it’s 4000px wide, don’t upload it unedited to your blog. Yes, you can scale it down in your post (see #5), but the image will still take a long time to load. Instead, use image-editing software to resize the photo before you upload it into your media library.
- Using the WordPress plugin Smush to resize and optimize images you’ve already uploaded in the past. This could make your site significantly faster.
- Using the TinyPNG service and/or Compress JPEG and PNG images plugin to reduce the size of your .png images. (If you have partially transparent images, they’re probably .png files. You should also use .png for any files with graphics in them.)
#10: How to Optimise Images for Retina Screens
The newest Apple products have Retina displays, which have a higher pixel-per-inch density than regular screens.
Retina has four times more pixels than standard screens. If you have a 400 x 300 image (120,000 pixels), you’d need to use an 800 x 600 alternative (480,000 pixels) to render it well on a high-density display.
This means that if you want a 500px by 330px image for your post, it would be best to upload it as a 1000px by 660px image. That way, it can be displayed crisply on the retina screen.
Your theme might automatically size and display the image correctly for each user (based on their device) if you simply insert it into the post at the larger size.
If it doesn’t, you can use the WP Retina 2x plugin (which is explained in detail by Barn2 Media) to create and show the retina images as appropriate.
I know there’s been a lot to take in with this post. Don’t worry: you don’t have to master everything at once.
If you’re new to blogging, you might simply want to get confident with the basics of downloading and uploading images to your blog, then inserting them into your post at the appropriate point.
But if you’ve been blogging for quite a while, you’ve hopefully picked up a new tip or trick today as well. How will you put it into practice this week?
The post Everything You Need to Know About Inserting and Editing Images in WordPress appeared first on ProBlogger.


Source: feeds.feedblitz.com

How to Find Images for Your Blog That Won’t Get You Sued
At some point (probably soon after you launch your blog) you’ll want to start using images.
You probably already have some of your own images you can use: a photo of yourself for your About page, or a photo of your workspace, home, garden, or whatever’s relevant for your blog.
But when it comes to your regular blog posts, your first instinct might be to head to Google and search for whatever you need: “happy people”, “woman writing”, “fresh salad”, etc.
But looking for images through Google can be a huge and very expensive mistake.
Images, just like blog posts, are automatically copyrighted to the person who created them. You wouldn’t want someone to take your blog post and use it on their site, would you?
Well, photographers and artists feel the same way about their work.
While it’s unlikely you’d get sued for inadvertently using someone else’s art without permission, you could upset someone and look unprofessional.
But bloggers have been threatened with legal action (and pressured into paying huge fines) for using copyrighted images.

In The $7,500 Blogging Mistake That Every Blogger Needs to Avoid!, Chrystie from Living for Naptime details her experience with being asked for $7,500 in ‘damages’ by a scammy photographer for using a single green bell pepper photograph.
Big companies can also pursue bloggers for minor, unintentional infractions. Getty Images has gathered a bit of a reputation for this. And a lot of blog posts out there explain how to respond to Getty Images if they contact you demanding money.
(Settlement Demand Letter from Getty Images and Tips for Responding to a Getty Images Extortion Letter are good places to start if you’ve run up against Getty Images yourself.)
You might think that if you’ve seen an image being used on someone else’s blog then you’re safe. But that’s not necessarily the case. They might be using it illegally without realising.
The good news is there are plenty of ways to safely use other people’s images on your blog that are completely legal.
Copyright and Creative Commons (Briefly) Explained
Before we take a look at specific image sources, I want to briefly talk you through a couple of important terms: ‘copyright’ and ‘creative commons’.
Note that I am not a lawyer, and this is a quick rather than exhaustive explanation.
‘Copyright’ indicates that a person holds the right to control where an image, blog post, etc. is published.
They can give you permission to use their photo (e.g. if you email them to ask), but you can’t (legally) use it without their permission.
‘Creative Commons’ is a special type of licensing system for images, blog posts, and other creative works. If an image is licensed under Creative Commons, you may be able to use it safely on your blog.
However, there are several different types of Creative Commons licenses, so make sure you follow the terms of the specific license for your chosen image.
For instance, an image might be licensed under Creative Commons for “non-commercial use”. This means you shouldn’t use it on a blog that runs ads, sells products, or otherwise brings in money.
And you definitely shouldn’t use it as, say, the cover image for an ebook.
Images can also be licensed under Creative Commons to require attribution. This means you must name and link to the photographer or artist from your blog post.
If you prefer not to do this, you’ll need to source images that don’t require attribution.
Note: licensing an image under Creative Commons doesn’t mean the photographer/artist has given up their copyright. For instance, you can’t take their image and claim that you made it yourself.
You can find out all about Creative Commons on the Creative Commons website.

This might all sound very daunting, and I hope I haven’t put you off ever using images on your blog again The good news is there are plenty of ways to find images that you can safely use.
And I’m going to share some of the best ones with you now.
Option #1: Use Stock Photographs You Pay For
There are plenty of stock photo sites out there that sell images, normally for a fairly small fee.
If you want high-quality images for your site this is a good option, although it may be unrealistic to pay for an image every time you write a blog post.
Stock photos can be a good option for products/services you offer. Even if you don’t want to use them regularly, you might want to dip into stock libraries occasionally.
Just check the terms and conditions carefully to make sure you’re allowed to use them in this way.

Some large, reputable stock photo sites include:
- iStockPhoto
- Fotolia (now Adobe Stock)
- Shutterstock
- Shutterpoint
- Dreamstime
As well as letting you buy individual images, most stock photo sites let you buy a subscription plan. If you want a lot of stock photos (e.g. you want to use one in every post you write), this may be better value.
Stock images are normally available in a variety of sizes, with the smallest size being the cheapest. If you want a 500px wide image for a blog post, the smallest size will often be all you need.
Option #2: Use Free Images that are Creative Commons Licensed for Commercial Use
While you could use non-commercial licensed Creative Commons images if you’re blogging as a hobby, it’s safest to use only images that have been licensed for commercial use.
This way, if you monetize your blog in the future you won’t have to worry about whether it’s still okay to use all of your images.
Free images vary in quality, and you may find your search doesn’t bring up many options. And some of the better free images may have already appeared on a lot of other blogs in your niche.
So you might need to dig around a bit to find ones you’re happy to use for your posts.
But since you’re not paying anything, you can always switch an image for a new one if you find something better in the future.

We’ve covered lots of great places to find free images for your blog here on ProBlogger before, so I’ll share just three good options here:
Pexels – All images on the site are licensed for commercial use and don’t need attribution.
Flickr – Some images are copyrighted, while others are licensed under various Creative Commons licenses. You can use the Advanced search to find commercial-use images.
Unsplash – As with Pexels, all images are licensed for commercial use and don’t need attribution.
Option #3: Creating Your Own Images
Finally, you could create your own images for your blog. That might mean taking photos, sketching cartoons, creating digital art, or whatever you enjoy.
Using your own images can make your blog feel especially real and authentic to readers. In some types of blogging – e.g. if you’re a craft blogger – it’s expected that you’ll use your own images of your projects.

Taking Photos for Your Blog
You don’t need to be super professional, but try to make it the best you can. If you have a DSLR camera, learn how to use it properly. Who knows? You might discover an entirely new hobby to blogging!
ProBlogger’s sister site, Digital Photography School, has plenty of resources to help you. A good place to begin is on the Start Here page.
Using Screenshots on Your Blog
Another type of image you can create is a screenshot. These can be very helpful when giving a tutorial about how to do something online.
If you’re using screenshots of web pages that are publicly available, the copyright holder (i.e. the website owner) probably wouldn’t object. But it never hurts to check with them.
If you want to use screenshots in a paid-for product (such as an ebook) or something people have to sign up for (such as a free email course), always check with the copyright holder first.
I know there’s a lot to take in here, especially if you’ve been using Google to find images in the past.
If you’re worried the images you’ve already used might be infringing someone’s copyright, it would be worth going through your posts and searching for each one in Google Images. (Click the camera icon next to the search bar to upload the image.)

Once you’ve found the image, track down the original source (e.g. a stock photography site or the photographer’s own website) and check whether the image is licensed under Creative Commons.
If it isn’t, or you can’t be sure of the original source, take it down immediately and replace it with an image you can legally use.
How do you source great images for your blog? Or do you prefer to create your own? Share your tips with us in the comments.

Source: feeds.feedblitz.com