
Tag Archives for " Image Optimization "

7 Tips for Image Optimization
Are you looking to gain an edge in SEO? If your image optimization isn’t up to snuff, you could be missing out on traffic, user engagement, and sales.
Google looks at more than 200 factors when deciding which website to rank for a specific search query. While having a well-optimized image won’t help sub-par content rank number one, it can help you stand out from other sites that don’t optimize their images.
The good news? Image optimization isn’t particularly complicated. Just a few changes to your current image process could help your site gain more traffic and leads, resulting in more sales.
Why Is Image Optimization Important?
Well-optimized images get better visibility in Google, which brings in more traffic. That’s the number one reason sites need to optimize their images, but there are many other benefits as well:
- Improve the user experience: Well-optimized images that display correctly improve UX by making your site easier to navigate. Large images, for example, can take up the entire screen or cover other elements on the page.
- Faster site speed: When it comes to SEO, speed matters. Images that are large or formatted incorrectly can slow down your site, killing your ranking and annoying site visitors.
- Makes your site more accessible: Some optimization steps, like adding alt tags, can make your site easier to navigate for those using screen readers. Web accessibility is not only good for site visitors; it’s good for SEO, too.
While image optimization might feel like another step in a never-ending quest to improve SEO, it can have a significant impact on ranking and UX.
How do you make sure images aren’t holding your site back?
7 Image Optimization Tips for Your Website
Technical SEO can get pretty complicated, especially if you aren’t familiar with the latest Google algorithm updates and what they mean. The good news is image optimization isn’t as complicated as other aspects of SEO—and it doesn’t seem to change quite as often.
Ready to make sure your images help your SEO? Here’s what you need to know.
1. Choose the Right Image File Type
Using the wrong image file type can cause your images to be displayed incorrectly, look blurry, even impact whether users can see your images. But there’s a ton of different formats for images—vectors, JPEGs, raster, PNG, GIFs.

Which image type is best for SEO? Generally, you’ll want to use either JPEGs or PNGs.
JPEG, aka Joint Photographics Expert Group, is a popular image file type. They can be displayed by just about any type of device and can show millions of colors, so they preserve the coloring of your images well.
JPEGs do use lossy compression, resulting in some lost data during compression, so they’re not ideal for professional photography. However, they work fine for featured images in blog posts, and similar images.
Another popular type of image is PNG, which can also be displayed on any type of device. These use lossless compression, which means they don’t lose data during the compression process. They also support elements like transparent backgrounds. However, the file sizes tend to be much larger.
These are the most popular images for web publications. Here’s when I recommend using them:
Use JPEGs for blog post images, screenshots, etc. The smaller size will protect site speed, and most images will be clear enough. If the quality isn’t good enough and your site speed is good, feel free to switch to PNG format.
Use PNGs for icons, logos, and images where someone might zoom in. PNGs are larger but slightly higher-quality images. When image quality matters, use a PNG file.
I strongly recommend against using other image formats on your site, especially GIFs. I love a good GIF, but they really do slow your site down.
2. Compress Your Images
Image compression takes large image files and makes them smaller so they’re easier to load on the internet or store on your device. Image compression strikes the perfect balance between size and image quality when done well.
The two types of image compression are lossy and lossless compression. Lossy compression, which JPEGs use, essentially throws out some of the data while lossless preserves all the data. (PNGs use lossless, as I mentioned above.)
Therefore, the type of compression you use depends on the image type you select.
Here’s an example of compressed images:
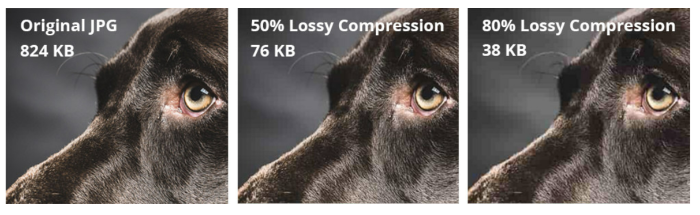
The image to the far left is 824KB, which is quite large. The middle image looks virtually identical (there’s a little graininess in the background if you look carefully) but is far smaller at 76KB. The third one is even smaller, but image quality is definitely impacted.
Aim to strike the right balance between size and quality.
When deciding how much to compress your images, think about your user. In most cases, they are unlikely to care whether an image on a blog post is a tiny bit less crisp. However, if you are sending a client a new logo, that’s a different story.
The point is, use the compression type based on the file format you use and select the file format based on how the image will be used.
Now, how do you compress images? There are several tools.
I like resizing.app, it’s a free Chrome extension that lets you convert file formats, crop, and resize images in just one click. Other photo compression tools include Photoshop and PicResize.
3. Add Description Alt Text
Alt text (aka, alternative text) is a written description of an image that describes what it is and what purpose it serves. Screen readers use this data to describe images to their users, and Google uses it to determine whether an image is relevant to a search query.
If you use WordPress, adding alt text is very simple. Just highlight the block with an image and add the alt text to the provided box, like this:
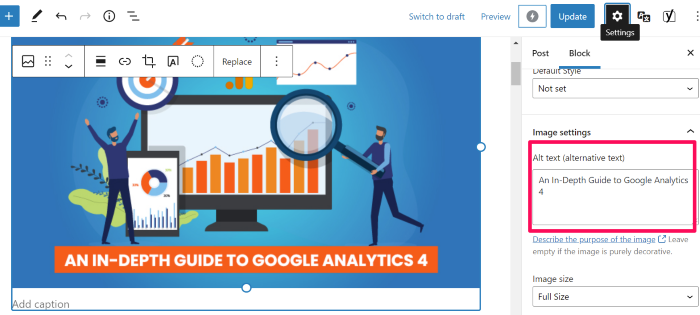
In Google Docs, right-click on images, then click Alt text, and a box will appear that allows you to add the alt text.
What do you write as your alt text? While it’s up to you, here’s the formula I use:
“Main keyword – description of image”
For the image above from WordPress, I used “image optimization guide alt text in the WordPress example.” This format makes sure screen readers know what the image is and tells Google the image is relevant for image optimization search queries.
Pro tip—if you want to see how your competitors use alt tags, navigate to their site, right-click and select “Inspect.” You’ll see the alt tags in the code of their site.
4. Write High-Quality Image Names and Descriptions
Image title provides users (and search engines) with a little more context about your images. While they don’t impact ranking directly (according to Google’s John Mu), they do provide a bit more context, and they show up in your site code.

I recommend using a short phrase that describes the image, along with the key term the post targets—similar to your alt text.
This can also make your images easier to find in Google image search since Google generates a title and snippet for images. If you include a title, they’ll take that into consideration.
5. Ensure Images Are Mobile-Friendly
If you’ve used the correct file type and compressed your images, they should be pretty mobile-friendly. However, sometimes things don’t always display the way we expect.
More than half of all internet traffic comes from a mobile device, so you want to ensure images don’t mess up the mobile experience.

For that reason, I recommend viewing your site from several different mobile devices to ensure images look their best. Remember, tablets, iPhones, and Android devices may all display your images a little differently.
I also recommend using Google’s mobile-friendly test to make sure your images aren’t slowing down site speed on mobile.
6. Use Schema Markup
Schema markup, also called structured data, is a type of code that helps search engines better understand your data.
Imagine you want to collect recipes to make a book of family recipes. Rather than having everyone send in their favorite recipe—which might use different measurements, different title formats, etc.—you send out a form and ask your family to input their recipe.
Now, all the recipes are in the same format and you can easily view the ingredients, measurements, and cooking steps.
Essentially, that’s what schema makeup does. It formats your data so Google can understand if it’s a list, a recipe, an image, and so forth. Here’s what it looks like:
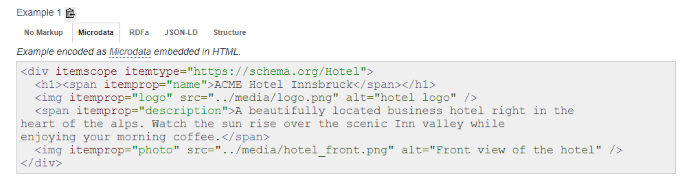
Schema.org lists three types of image schemas, including:
layoutImage (pending implementation)logophoto
This is a more technical change, so don’t stress if this feels like too much. Schema.org lists the coding you can use to add structured data to images here.
If you need more help, feel free to reach out to my team; we can help you get this set up.
7. Optimize Image File Names
According to Google, it uses the URL path and the file name to understand your images better. This means you should organize your image URLs logically and include key terms in the file name.
This can help you stay organized and help Google understand your images: a double win.
File names don’t have to be complicated. I usually use the alt text as the file name, which makes it easier to upload posts to WordPress.
I recommend using the keyword in the file name and describing the image.
Frequently Asked Questions About Image Optimization
What does image optimization mean?
Image optimization means making sure both Google and users can easily understand and view the images on a website. Examples include compressing images so they load faster and adding alt text so Google can better understand what the image is about.
Why is image optimization important?
While image optimization isn’t the most important SEO tactic out there, it can help you stand out in the competitive online world. You’ll still need high-quality content and to follow other SEO best practices, but image optimization is another way to increase your Google ranking.
What is the best image format for SEO?
There’s no specific format that is better for SEO. In general, you want images as small as possible while preserving as much data as possible. I recommend PNG if it doesn’t slow your site down too much.
How does image SEO work?
Image SEO works by making your images easier for Google to understand and making them as useful as possible to your site visitors. For example, adding alt text helps Google understand what your image is about and makes it easier for screen reader users to navigate your site.
Conclusion: Image Optimization
Google gives us a lot of information about how to optimize our sites and our images. It’s easy to get overwhelmed by all the small details.
The tips above will help you make the most of your images; however, I recommend focusing on making sure your images bring value to users. Don’t cram images in just to meet a quota, and don’t add images that don’t make sense for your content.
Have you optimized images on your website? How did it impact your traffic?
Source: neilpatel.com

Image Compression Techniques That Will Help You Rank Higher
Whenever we talk about SEO and the idea of optimization, some of the first things that come to our minds are content, backlinks, or keywords. This is not wrong, but it isn’t exhausting the possibilities of SEO either. Especially since there are plenty of factors that weigh in a page rank that are not purely backlink or content-driven.
So it should not have come as too much of a surprise when Google announced that page load speed is a ranking factor for both desktop and mobile searches.
Of course, one factor out of more than 200, but one that is still worth considering.

1. Website Speed as a Ranking factor
Site speed, according to Google, “reflects how quickly a website responds to web requests” and for all intents and purposes serves both the user and the site owner.
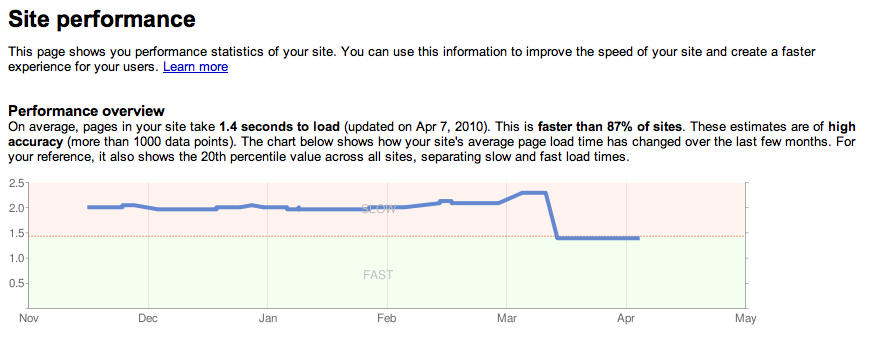
Users get an enhanced experience, site owners are more likely to get reduced operation costs, and… well, more users, who stay on the website longer.
Google thinks the same, as indicated by the very fact that it provides us with tools to check up on our site speed and suggests solutions for sluggish pages.
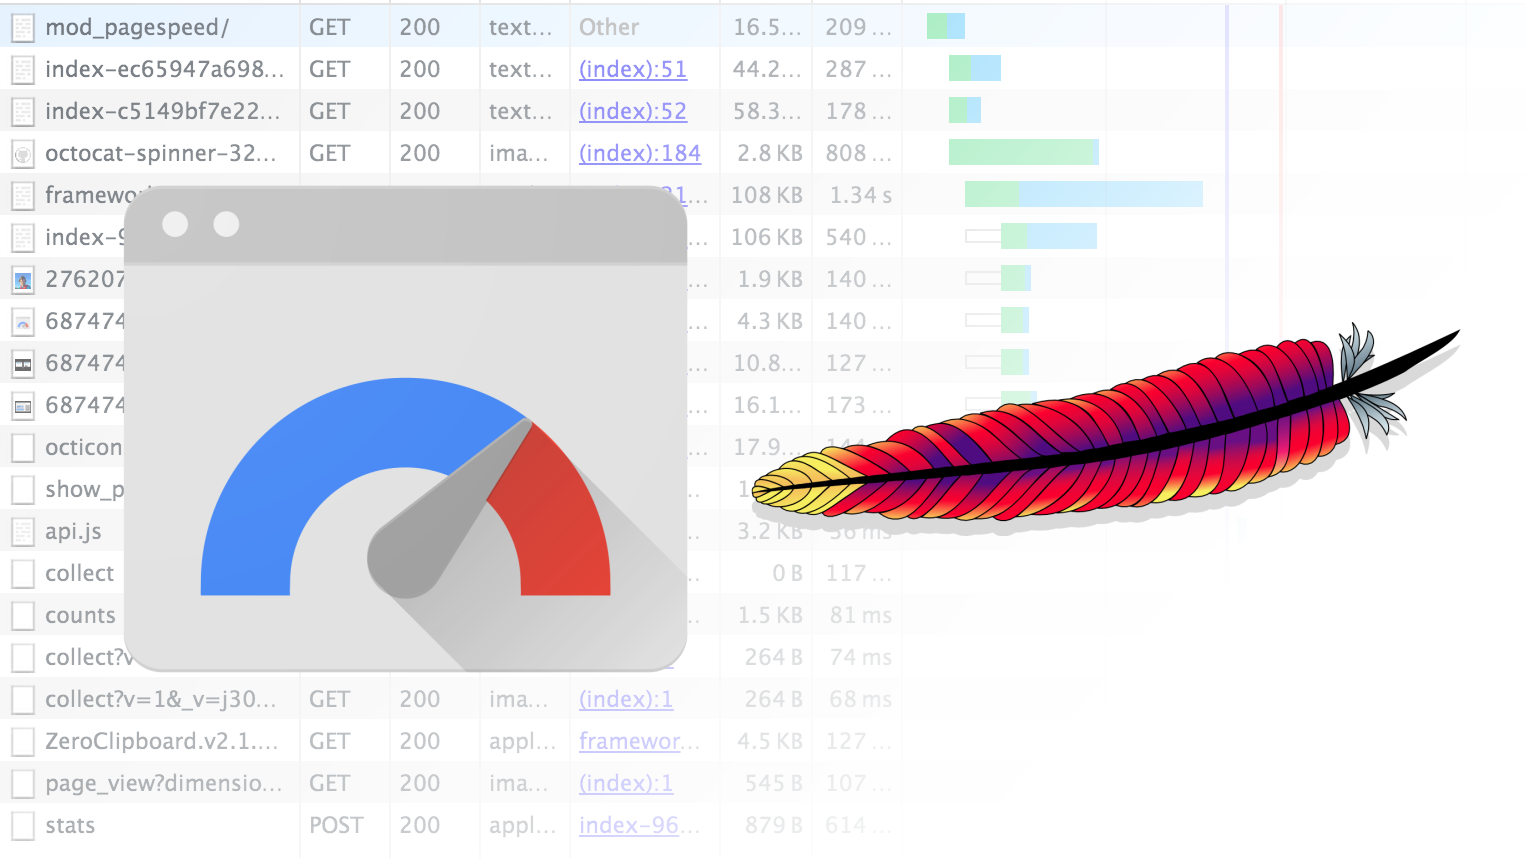
There is the PageSpeed module in the Google Developers section and a Page Speed Insights for making a speed audit for every website.
Even Yahoo has a developer module for page speed improvement, called Yslow.
The slew of freely available tools is certainly meant to wear off some of the concerns that only big sites can benefit from this change. I
n fact, chances are smaller sites have the upper hand here in terms of flexibility and adjusting.
Some questions and concerns remain though, the most important being:
What is and how exactly does Google measure “site speed?”
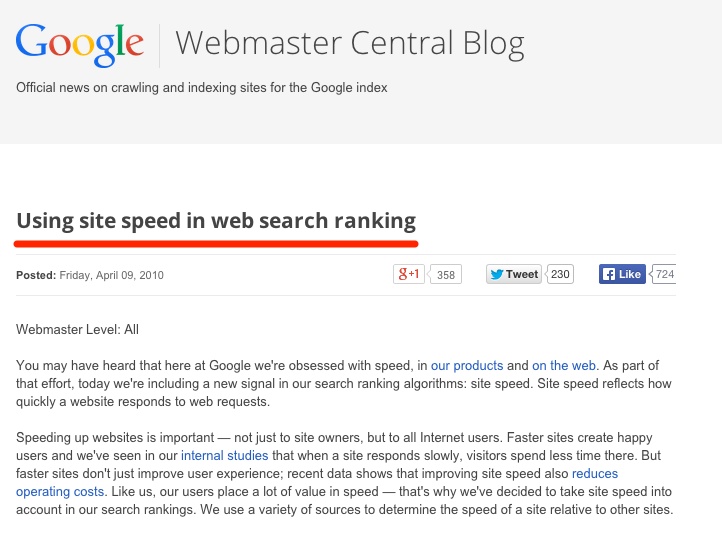
For instance, the difference between “document complete” and “fully rendered” time when loading a page was mentioned.
The former means that while not all the elements on a page are showing, you can start clicking and navigating.
The latter means that everything is clearly visible on the page, even background stuff like ads and images.
Even though it is difficult to pinpoint specifically and with certainty which aspect of speed directly helps your rankings, working on your site loading speed, in general, is bound, at the very least, to enhance your users’ experience.
So, for instance, having a “document complete” time that is faster than the “fully rendered time” could help.
2. Reducing the Image File Size Using the Lossy and Lossless Compression Techniques
Images can play a major role in the difference between “document complete” and “fully rendered site” loading times, especially for mobile sites.
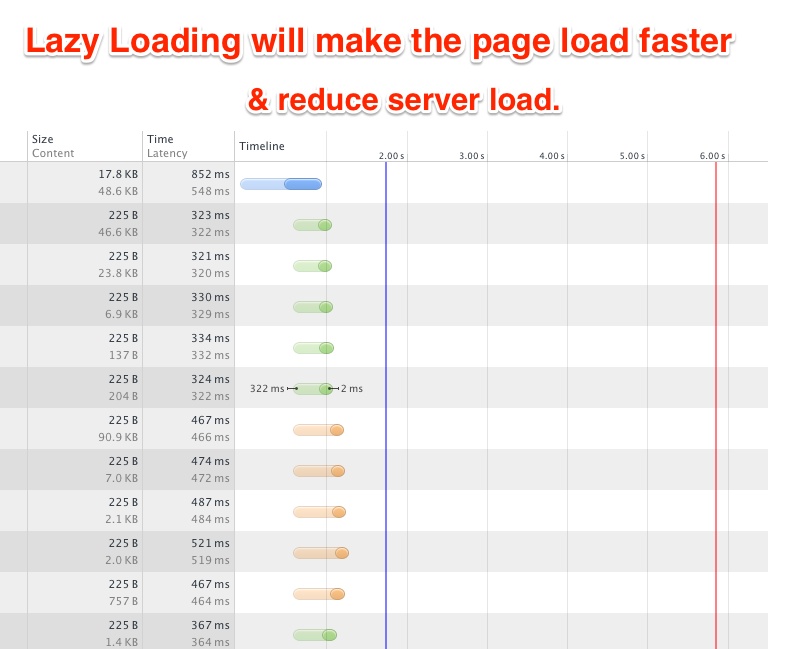
One solution is to simply delay loading images.
Let everything else load first and then only at the end start loading images.
This ensures that your site is functional long before you get to the bandwidth-chugging portions of the page.
As with everything else nowadays, there are lots of plugins that can help you.
On WordPress, you can try Advanced Lazy Load or Smush.
But if you need to do that, maybe the problem is simply that your images are too big and they slow down your site speed anyway.
So why not compress them, to begin with?
We used two techniques for image compression for our case study:
- lossless compression, which means the image quality remains largely the same.
- lossy compression, which means some loss of fidelity may occur, though in general, it may be imperceptible.
Brian Jackson, Director of Inbound Marketing of Kinsta, explained each compression method:
Lossy image compression refers to compression in which some of the data from the original file (JPEG) is lost.
The process is irreversible, once you convert to lossy, you can’t go back.
And the more you compress it, the more degradation occurs.
Lossless image compression refers to compression in which the image is reduced without any quality loss.
Usually, this is done by removing unnecessary metadata from JPEG and PNG files. RAW, BMP, GIF, and PNG are all lossless image formats.

BRIAN JACKSON
Dir. of Inbound Marketing Kinsta
You can see below the representation of both reduced files using these two techniques.
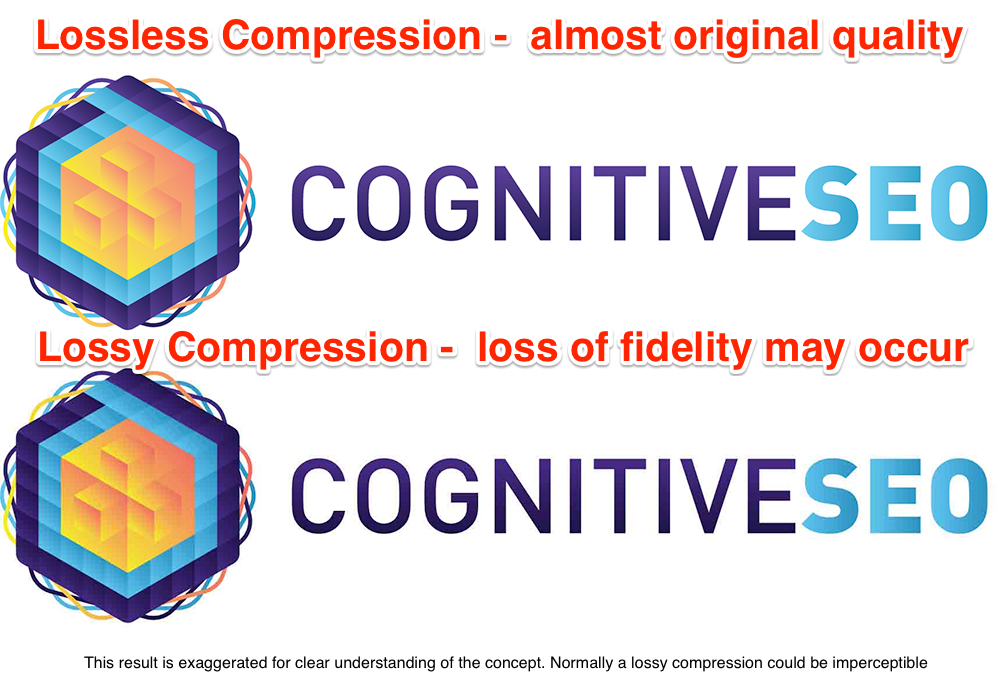
To be more exact on this, the correct term is perceptually lossless.
A human can’t tell between a JPEG optimized version and the Original photo.
JPEG is a lossy format.
PNG is lossless.
3. Case Study – Image Compression Tools Tested to the Limit
We went out and researched some of the best image compression tools out there which use the lossless and lossy techniques for image compression.
After we identified them, we made a list of the most relevant tools that would be up to the job:
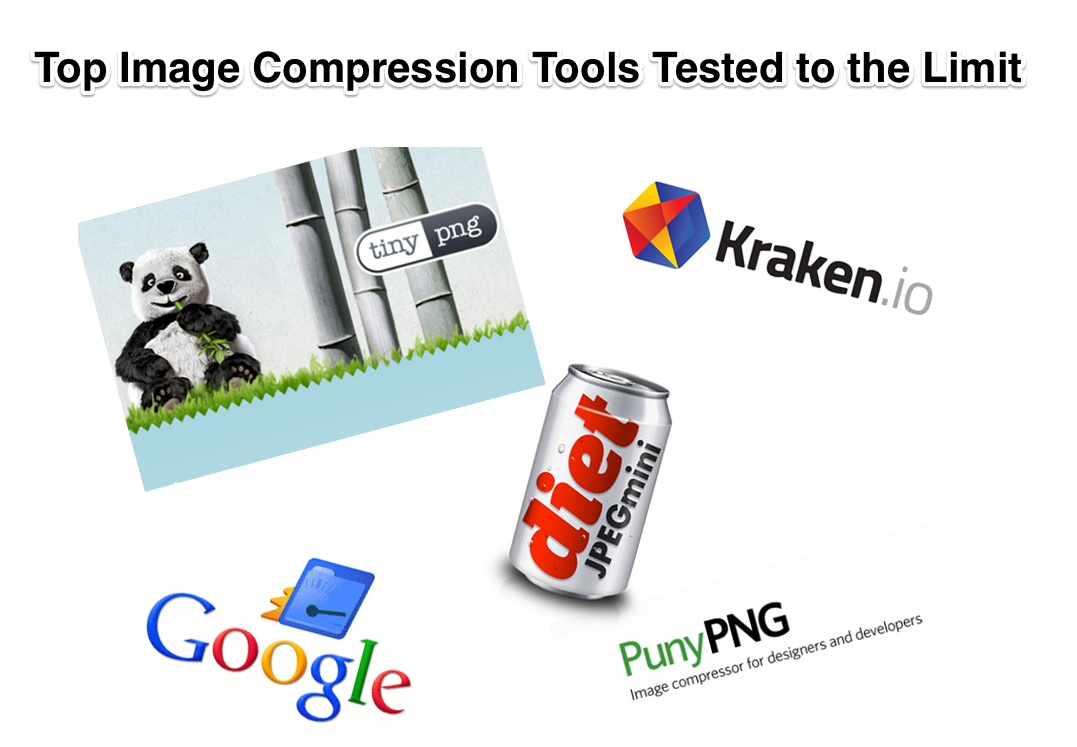
I hope it’s useless to mention that this analysis is unbiased and none of the mentioned tools offered to take us out for a beer or promised any goods in exchange.
So we are going to test those 4+1 tools on the same artifact and see if we can notice any difference in loading speed results.
To make the analysis more encompassing we added a 5th element to the comparison (a 5th dimension, if you will), which is slightly different from the other 4: Google’s PageSpeed.
Unlike the other image compression tools we have included in our research, Pagespeed isn’t really a compression tool as much as an optimization tool that works holistically through a series of custom filters that are executed when the HTTP server serves the website assets.
What gets it a spot in our test is the fact that it “dynamically optimizes images by removing unused meta-data from each file, resizing the images to specified dimensions, and re-encoding images to be served in the most efficient format available to the user.”
Sounds pretty nifty, right?
We’ll see if the boast stands at the end of the day.
3.1 How the Image Optimization Test Was Performed
The test had to be the same for all and give these tools a run for their money, so we decided on optimizing our blog’s entire image data (gallery), which rounded up at 3,824 images.
This was done on a test version of the site and it has not gone live yet.
It was designed for testing purposes only.
Most of the services we used to compress the images have their own API and some example scripts but for our test, we’ve built our own scripts which send a request for each image.
Some services have a “batch upload” feature, but for consistency, we’ve sent a single image per request since we cannot do a “batch upload” on all servers.
We don’t want to lade you with too many technical details.
Yet, a few comments on the process are in order.
Where an API was not available, the images were processed with the service provided by that particular software.
The first comment is that JPEGmini was the only tool that was a downloadable software, the rest being hosted online.
The second is that all of the tools have APIs, except for JPEG Mini.
Last but not least, for Pagespeed we used the Nginx module.
3.2 Top 6 Metrics Tested for Finding the Best Image Compression Tool
We measured several metrics, which we could split into two categories:
- Image compression-related metrics.
- Page load speed-related metrics.
For the first category, we only had results for the 4 image compression tools, since Pagespeed is a bit of a different type of tool, as discussed earlier.
It is worth noticing that not all tools had the same workload:
- TinyPNG only compressed both PNG and JPEG format files.
- JPEGmini only compressed the JPEG format files.
- Kraken compresses both PNG and JPEG format files.
- Puny PNG compresses both PNG, JPEG, and GIF format files.
The metrics in both categories, however, were calculated relative to the actual work and not to absolute standards. And here they are:
Metric 1 – Conversion Time
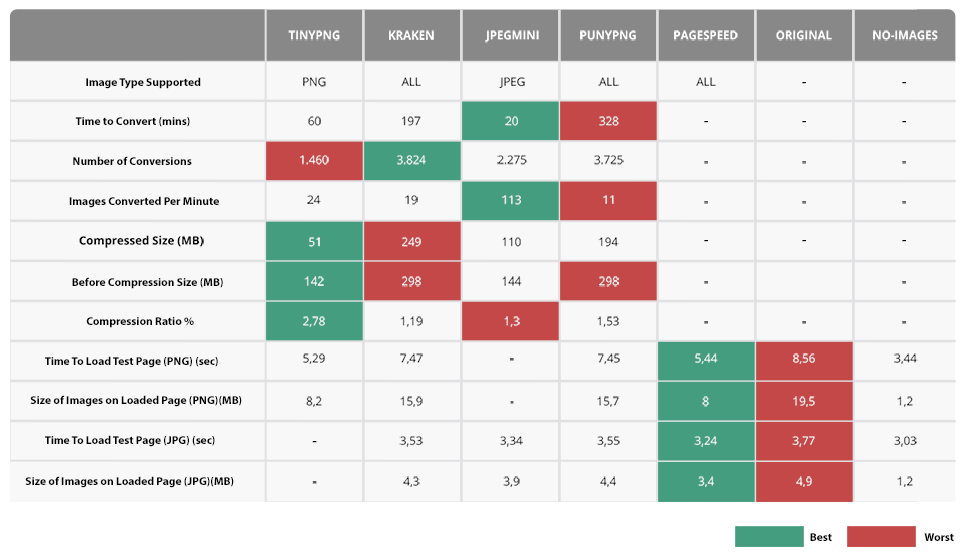
We ran tests for each tool to see which one of them manages to convert the image faster and our winner was JPEGmini.

Let’s start with the conversion time, measured in minutes.
Since the number of conversions wasn’t the same for all tools (in fact, it was slightly different in each case), it makes more sense to look at the number of conversions per minute.
The detached leader is JPEGmini, with roughly 113 conversions per minute, or close to 2 conversions per second.
The other 3 tools trail significantly behind, with little difference between them, by comparison.
TinyPNG and Kraken are at 30, respectively 21 conversions per minute, while PunyPNG is utterly unimpressive at merely 11 compressions per minute.
Metric 2 – Compression Power
Next, let’s look at compression power.
This, again, is a metric resulting from the relation between two different measurements: the compressed size of the output relative to the original size of the input.
The winner, by a margin, is TinyPNG, with a 2.78 compression ratio, with the other three being at less than half the rate (1.19 for Kraken and 1.3 for JPEGmini), or at best, just slightly better than half the rate (1.53 for PunyPNG).
So far the format-specific tools seem to fare much better than the format general ones.
Metric 3 – Pages with Mainly PNG Images
And now for the real test: does any of this impact the time to load the page?
For PNG-related pages, the time after compression is best improved with TinyPNG (5.29 seconds) or Pagespeed (5.44 seconds).
The difference between the two is by and large negligible.
Kraken and PunyPNG, however, are significantly lower (with basically no difference at all between them, however: 7.47 and 7.45 seconds respectively).
The latter loading times are more than double than if the web pages used no images and closer to the load speed if there were no compression at all (8.56 seconds).
The sizes of images loaded on the web pages are, as expected, in line with the loading times.
The average size is 8 MB for Pagespeed and 8.2 MB for TinyPNG, practically half the size of images obtained from Kraken (15.9 MB) or PunyPNG (15.7 MB).
For comparison, the average size of the PNG images on a loaded page is 19.5 MB, not much bigger than for the compressed results for Kraken or PunyPNG.
Metric 4 – Pages with Mainly JPEG Images
What about JPEG image format?
It’s another win for Pagespeed and the format-specific tool.
This time, however, the result variable is nowhere near as dramatic as in the case of the PNG files.
In fact, the times to load the page are really close:
- 3.24 seconds for Pagespeed
- 3.45 seconds for JPEGmini
- 3.53 seconds for Kraken
- 3.55 seconds for PunyPNG.
- 3.77 seconds for the Original Images
- 3.03 seconds with No Images
Hardly noticeable, isn’t it?
Add to that the fact that all of these values are still not that much different from the page load time when there are no images on the page (3.03 seconds) or even when all the images on the page are at their original size (3.77 seconds).
As you would expect, the difference in the average size of images loaded on-page is similarly unremarkable.
- Pagespeed gets the best compression, at 3.4 MB,
- with JPEGmini following closely at 3.9 MB.
- Kraken and PunyPNG are both above the 4 MB mark, with 4.3 MB and 4.4 MB respectively.
While the first two values are significantly different than the average size of the page with uncompressed JPEG images on it (4.9 MB), they are nowhere near the size of the page with no JPEGs on it (1.2 MB).
Let’s do a quick recap on the JPEG and PNG compression.
Best JPEG Compression (Best is First)
- PageSpeed
- JPEGMini
- Kraken
- PunyPNG
Best PNG compression (Best is First)
- PageSpeed
- TinyPNG
- PunyPNG
- Kraken
The best JPEG compression is done by PageSpeed, then JPEGmini, followed by Kraken and PunyPNG.
When it comes to PNG files, Pagespeed leads the way, tied with Tiny PNG, followed by PunyPNG and Kraken.
Barring Pagespeed, the better tools seemed to be the ones that are geared for specific image formats (JPEGmini and TinyPNG), with the all-around tools doing poorer in terms of results.
Metric 5 – Bulk Conversion Speed
Total Conversion Times by Tool
- JPEGmini – 20 minutes / 2275 images converted
- TinyPNG – 60 minutes / 1460 images converted
- Kraken – 197 minutes / 3824 images converted
- PunyPNG – 328 minutes / 3722 images converted
- Pagespeed – On the Fly Conversion / no initial conversion time
Images Converted per Minute by Tool
- JPEGmini – 113 images/minute
- TinyPNG – 24 images/minute
- Kraken – 19 images/minute
- PunnyPNG 11 images/minute
- Pagespeed – On the Fly Conversion
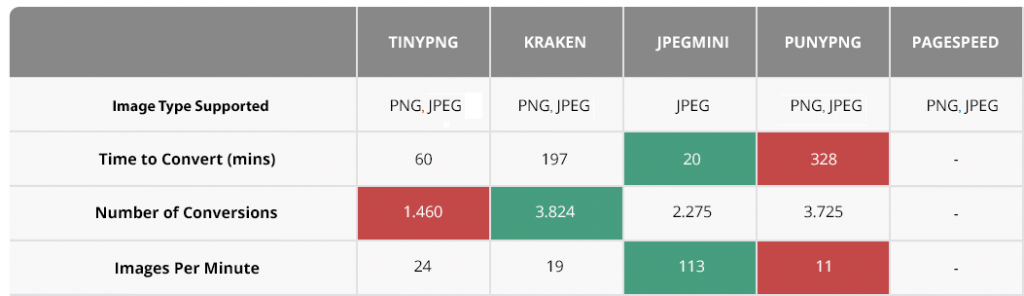
In terms of bulk conversion speed, there are some aspects that need to be mentioned.
First of all, PageSpeed executes the conversion instantly, on the fly, and JPEGmini is downloadable software.
So, there are some technical differences between these two tools and the others, which might make the comparison between them a bit harder.
At the same time, JPEGmini and PageSpeed’s way of functioning regarding this matter is their competitive advantage so we need to give the credits to Pagespeed and JPEGmini for being the fastest.
PageSpeed seems to be the best as it makes the conversion instantaneously and JPEGmini is the next best thing, but it is limited to JPEG files.
TinyPNG and Kraken are tied up in terms of speed (both not very impressive), with the former only being useful for PNG files.
PunyPNG, while good for all image file formats, has the least impressive bulk compression speed of all five tools.
The conversion speed indicator is important to take into account when deciding on the tool if you want to use it on web pages that rely extensively on images.
If your website’s total count of images is comparable or higher than ours, it might be worth going for PageSpeed or JPEGmini as they have the best results in terms of total conversion times and images converted per minute.
Metric 6 – Conversion Process Easiness
Figures and numbers are highly important but we all know that is not all about them.
Software must provide great results but must also be easy to use, intuitive and simple to understand.
After all, a software’s success is given by the end-user.
For instance, PageSpeed is a great product and can be the detached leader in many chapters but is definitely not the most user-friendly product.
If you are not computer literate and you don’t know how to install and configure the requested Apache or Nginx modules, then no matter how good the results are, PageSpeed might not be for you.
In addition, you will need to have the right to alter webserver configurations in order to install the PageSpeed module (it won’t work for shared hosting).
Unless you want to turn to a tech expert, the use of this tool will make you feel inadequate and will, paradoxically, make things look harder.
JPEGmini, Punny PNG, Kraken, or TinyPNG, on the other hand, have an easy-to-use interface and don’t require high technical skills.
From the easiness of conversion point of view, these tools are made simple, helpful, and really meet the user’s needs.
Deciding on the Winner
Deciding on a winner is hard, yet necessary in order to conclude our in-depth query.
Before doing so, let’s take a look at the tools’ overall presentation and take a sneak peek at what they have to offer.
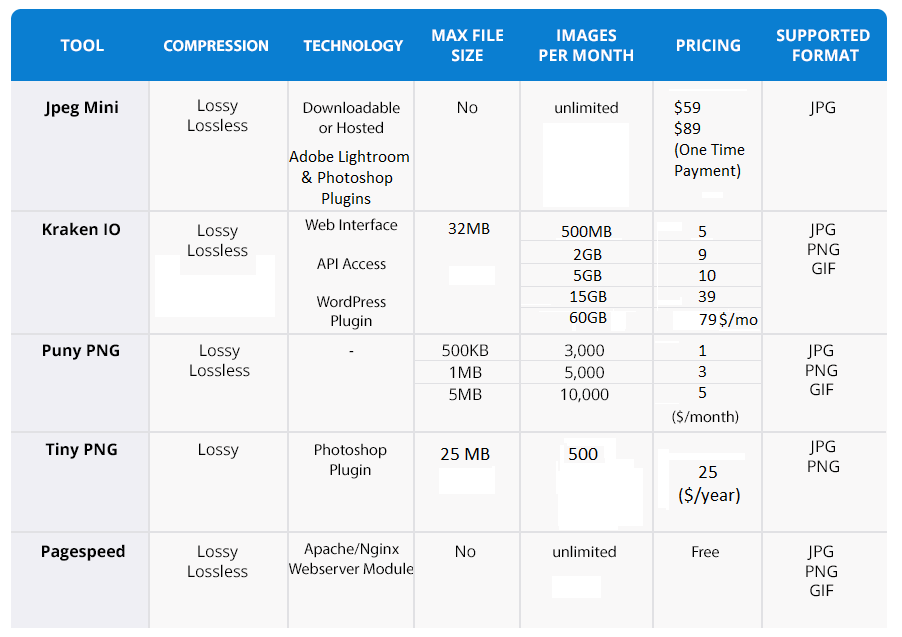
The distinction of the best all-around image compression tool when taking into account all the results goes to PageSpeed: it’s either tied for the lead or the leading tool in terms of both file size and time it takes to load the page for both JPEG and PNG image file formats and none of the other four tools manage to do so consistently (it shares the distinction with two separate tools: TinyPNG for PNG files and JPEGmini for JPEG files).
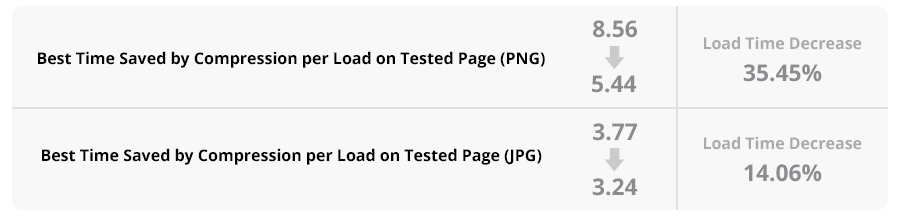
So how much does PageSpeed actually help you?
Well, the best way to measure this is by looking at the time you save by compression per load on the tested page.
For PNG, you get from 8.56 seconds (with the uncompressed files) to 5.44 seconds for a page to load.
This means the page loads at a 36.45% faster rate.
For JPEG files, we got from a loading time of 3.77 seconds (for uncompressed images) to 3.24 seconds loading time, meaning pages load at a 14.06% faster rate.
Less impressive than for PNGs, but still noteworthy.
Think of it this way: every time a user lands on one of your pages, their experience is up to 36.45% faster and better.
After all, the life of the web surfer is improved with every second one is looking at relevant information rather than at a blinking hourglass.
The one thing to keep in mind with Pagespeed is that there is some loss of image quality with its compression, but it is so small that it shouldn’t be a serious drawback for most websites (i.e. unless high image quality is what you’re actually going for, in which case maybe image compression is not really the best way to optimize speed on your website).
This is the fully complete metrics table data compared.
And the Winner is …

Looking back at all the graphs and figures it is not hard to say that PageSpeed stands out from the rest of the tools.
In a world where the user doesn’t have the patience to wait more than 10 seconds before page loads,
Page Speed can be seen as one of the webmaster’s best friends.
PageSpeed Modules are open-source server modules that optimize your site automatically.
It is definitely not the average webmaster’s tool as it requires high technical skills in order to use it.
All in all, from our research results that PageSpeed gives the best-added value to a website optimization process overall being, maybe, the best option in what concerns a page’s loading time.
Conclusion
A site’s speed clearly plays an important role in user experience and in the Google Algorithm.
People from the SEO industry are making a big investment in content and that is great.
Yet, what’s the point of all the struggle if it takes too long to load?
Knowing the tools that can help you optimize your site’s speed and make your life as a webmaster a bit better might really come at hand.
To summarize the result of our research, we can say that PageSpeed seems like a very helpful tool.
PageSpeed is a free-to-use tool that can be used on Apache and Nginx Servers and allows you do to all of your changes on the fly.
It also has a cache so it won’t put too much burden on the server.
If you do not have access to a server configuration, we would recommend using the JPEGmini for JPEG compression and TinyPng for PNGs.
You could simply decide on only one format to use and go with the one you choose since that would make things simpler for you and allow you to use the most efficient tool.
And don’t forget the Lazy Loading technique ;). All these together will make your site “lighter” and “faster”!
Note: This blog post is an improved version of an older one we had.
The post Image Compression Techniques That Will Help You Rank Higher appeared first on SEO Blog | cognitiveSEO Blog on SEO Tactics & Strategies.
Source: cognitiveseo.com

How To Use Google Images to Drive E-commerce Sales Before Your Competitors Catch On
What if the biggest source of your SEO traffic wasn’t from the front page of Google? At least, not the front page exactly. Imagine that there was a backdoor of sorts that could lead to a healthy amount of organic traffic. It’s a completely legal, whitehat SEO backdoor too, so there’s no chance you’ll be penalized.

And if you leverage yourself correctly, that organic traffic can naturally turn into a sale for your e-commerce site.
If that situation were to exist, it could change the SEO landscape for quite some time.
It may surprise you then to learn that our imaginary backdoor example already exists.
Because with some of the recent changes in how Google allows image searches, the front page has gotten a little bit bigger.
I want to show you what’s changed, and then give you some quick hacks that can help you drive more e-commerce sales by focusing on optimizing for Google image searches.
The new and improved Google image search
Google’s image search has been a stalwart feature of the search engine since 2001 when searches for Jennifer Lopez’s green Versace dress broke the Internet.
Since then, the service has been improved upon in stages and built into a massive image library.
Best guesses estimate that Google has indexed around one trillion images to date, and that’s probably on the conservative side.
So in February of 2018 when Google and Getty Images announced that they would be partnering up, it turned some heads.
The reason given in the press release was that this change was meant to provide a better experience for both Google users and visual content creators.
And according to a tweet from Google’s Danny Sullivan, this was also part of a broader effort by Google to help connect search users with helpful websites.
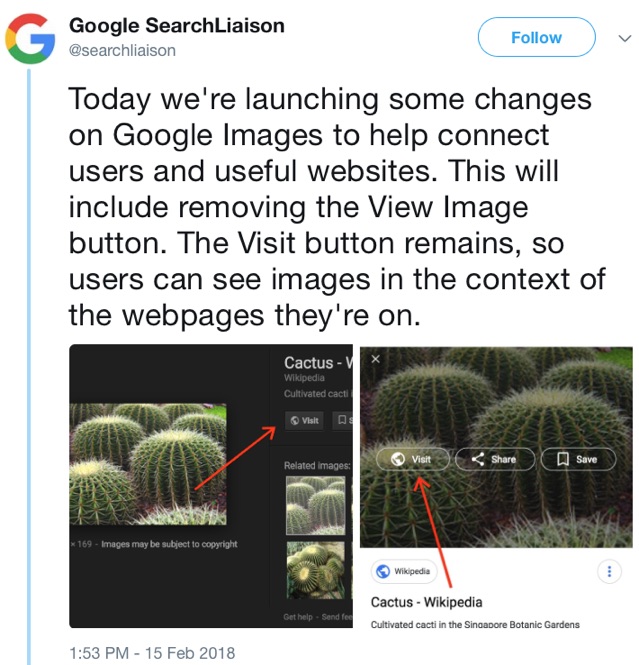
That sounds a lot like normal, run-of-the-mill SEO talk on the surface.
And since most of the media coverage of this change centered around the fact that Google had removed the “View Image” option with this update, it was easy to miss the real change here.
To make the waters even muddier, Danny later tweeted that this particular change was part of a settlement with Getty Images.
Thus, it further cemented the idea that this change was just another ordinary Thursday for Google.
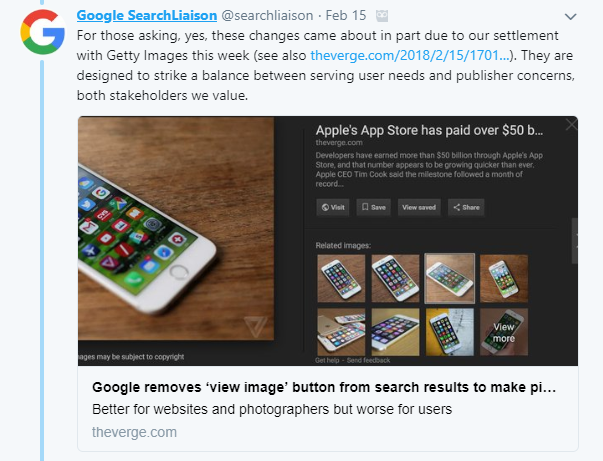
But when you look a little deeper at what actually changed, this transition has a more significant impact than what you may believe at first glance.
Because while it seems that removing the “View Image” option and replacing it with “Visit” is just meant to annoy desperate college students, it’s actually a shift in the way we search via images.
Or, to put it more plainly, it means you can now try to rank for the front page of Google image search to get organic traffic.
One of the less-heralded statistics from the last few years is that 72% of search engine users search for images before making a purchase.
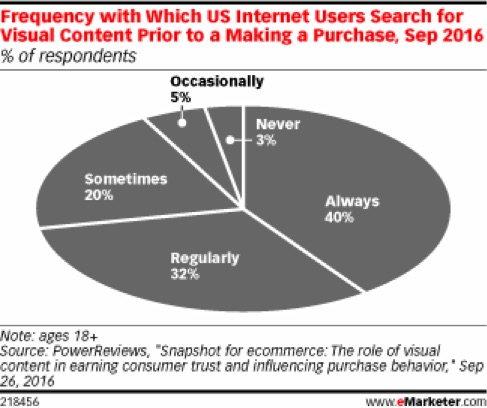
That means that when someone comes to your site via a search engine, there’s a good chance their search started with Google images.
Before these changes, websites weren’t typically in the limelight.
The uproar that surrounded the removal of the View Image option seems to indicate that most users searched for images to use for another purpose.
But now, if someone wants to download or save an image, they have to click through to the website.
That means you have an opportunity to sell to them now, where before they would never see your brand.
So in a way, Google has created a new and improved channel for customer acquisition that flew completely under the radar.
Let me show you an example of how this could work.
Say you search for a pair of binoculars to take hiking this summer.
You search for binoculars and then decide you’d rather find a set that looks more compact.
Here’s the “front page” of your search in Google.
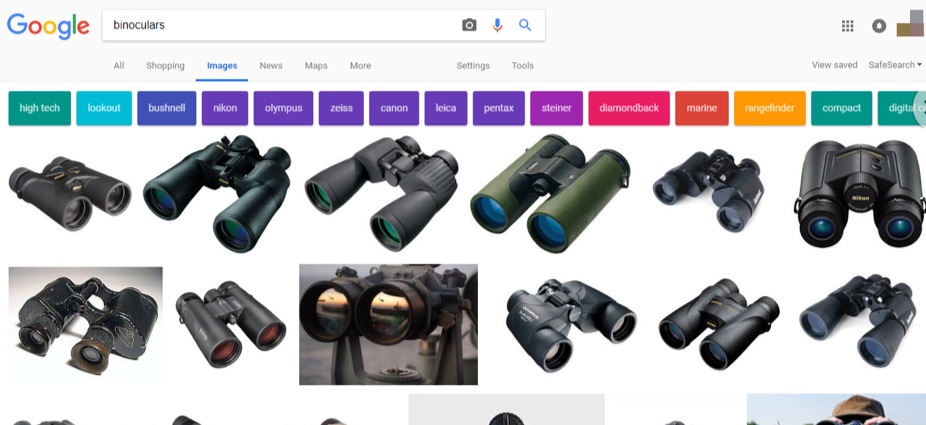
None of this is branded, there aren’t any ads, and it’s fairly simple to browse through and find a set of binoculars that meets your needs.
If you click on an image, a window will expand and display a larger version of the image.
You’ll also see an option to Visit, Save, View Saved, or Share.
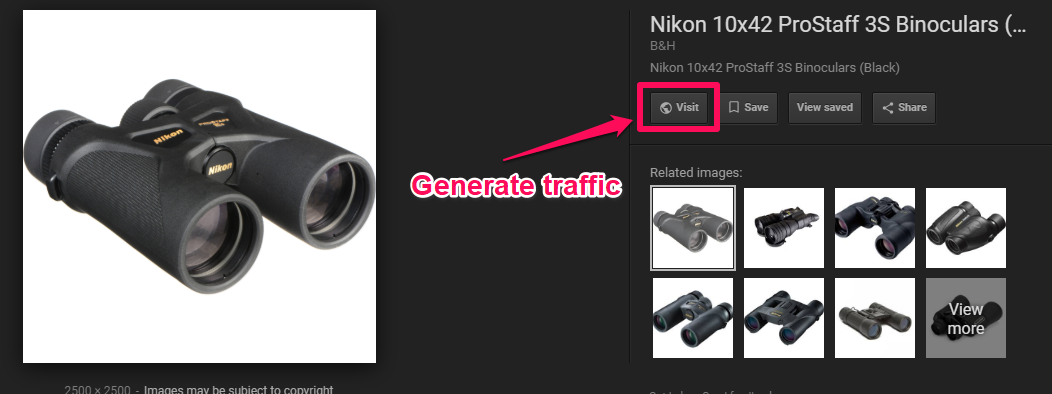
If a user decides to visit this site, they’ll have generated traffic via a Google image search.
And since they’re in the mood to potentially buy, your best bet is to have these images attached to a product page like this one.
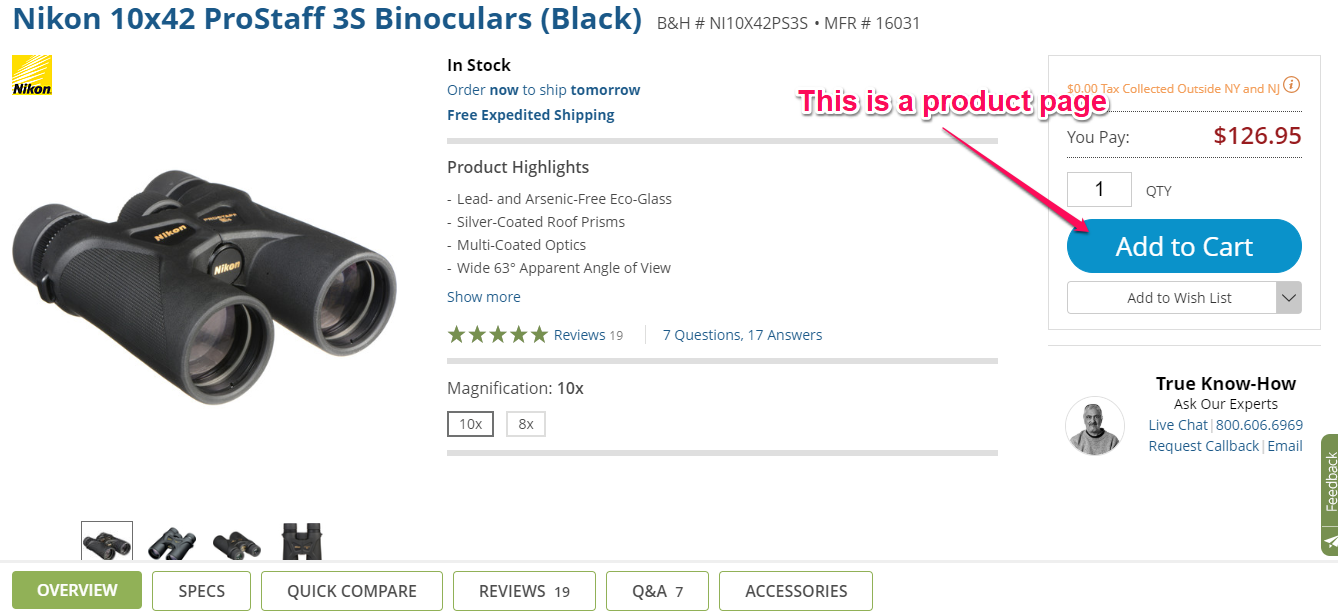
At this juncture, I want to point out that this is technically the “top ranked” image on Google.
It’s on a site for the brand B&H Photo Video, and very clearly linked to a product page.
So without knowing the actual stats of this site and page, I would say that there’s a good chance that more than a few sales have closed through the exact path I’ve shown you.
But the interesting aspect here is that this page is not on the actual front page of Google.
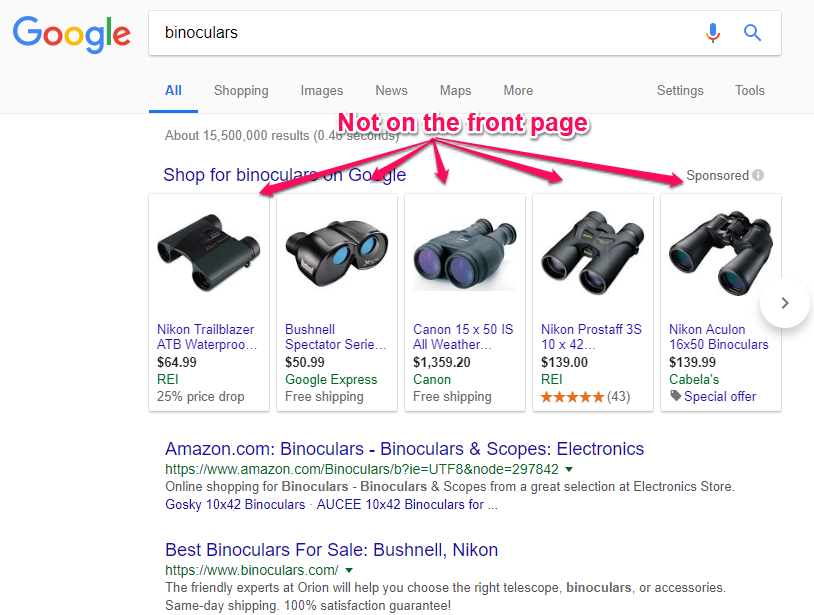
It’s not in the sponsored ads, nor is it competing with Amazon or Binoculars.com in the rankings below.
In fact, I scrolled through and didn’t even find this website in the top 10 pages on Google’s search results.
So it’s even more incredible that this image is at the very top of an image search, and it clearly displays an opportunity for more brands to do the same thing.
Especially considering that it wasn’t until my second visit that Google put sponsored ads into my image results:
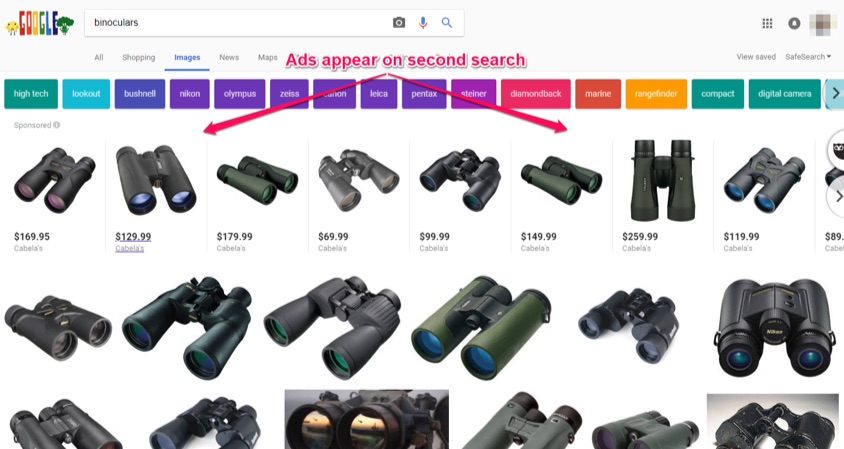
With this new visit-oriented searching system, Google has created a backdoor for small brands to sell with organic traffic despite otherwise strong search results.
E-commerce marketing professionals now have a viable window to create a new and improved channel for generating sales.
By focusing on the SEO of the images on your product pages, you can now rank on an image search that can result in more revenue for your business.
So for the rest of this article, I want to share some quick hacks that you can start to implement on your images in order to capitalize on this development.
Hack #1: Optimize file names and alt tags
As Google crawls your site, it relies on your site’s code to tell you if there are any images on your pages that contribute to the overall value of the page.
So when optimizing your images for SEO, the very first place you should start is by ensuring that the products on your site have descriptive file names and alt tags.
Here’s a relatively simple example of a descriptive vs. non-descriptive file name.
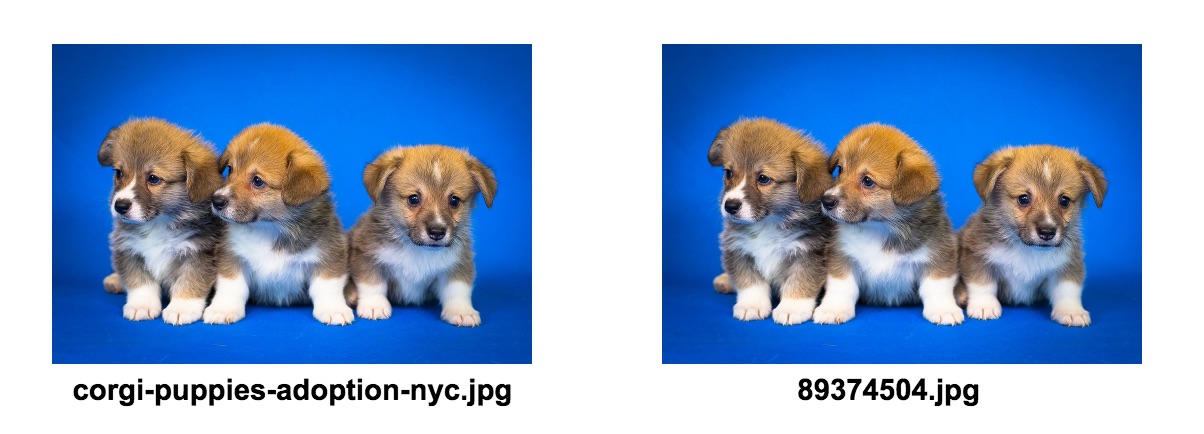
If Google were to crawl your site and see a series of numbers followed by .jpg, all it can tell is that there is an image.
But with the keywords of corgi, puppies, adoption, and NYC added, Google can accurately assess the contents of the image and rank accordingly.
This is also part of what ensures that your image will appear in a Google image search to begin with.
From there, the next part of your image that you’ll need to optimize is your alt tag.
Much like your file name, alt tags signal to Google what your image contains.
Each alt text is embedded in the HTML of your website so that when Google crawls your site, it can “see” the image.
Here’s an example from the earlier binoculars page:
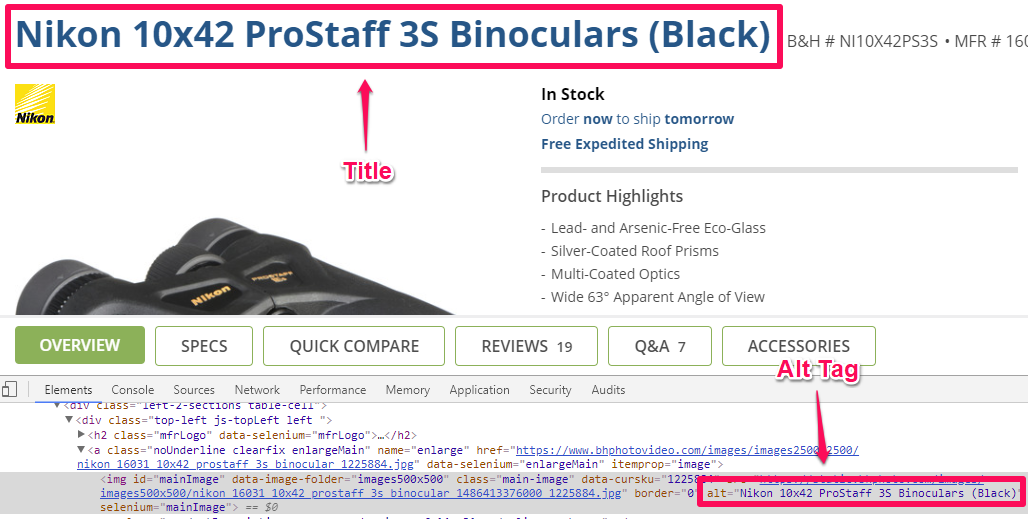
Notice that the alt tag, in this case, is the same as the product’s title.
It contains the keyword “binoculars,” and is an accurate description of the true contents of the image.
It’s a fairly straightforward bit of text that once again will make all the difference on a search engine results page.
And thankfully, it’s incredibly easy to set both your alt tags and change your file name if you’ve built your site on WordPress.
When you upload an image, all you have to do is select that image to see this menu:
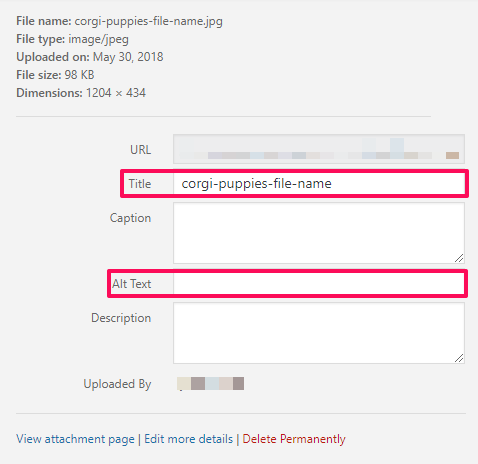
From here, you can change your file name and alt text appropriately.
This will position your images so that when Google crawls your site, it can potentially rank you on its image search.
Without these simple elements, you’ll struggle to rank at all.
But image-based SEO that will help you truly stand out requires investing in some more complex techniques, like leveraging user-submitted images.
Hack #2: Use unique images
You may think that this point goes without saying, but the vast and repetitive use of stock photography online would seem to say otherwise.
Creating and using relevant imagery will ultimately help you draw a Google image search user in and convince them to click through to your site.
For example, if you were to search online for a lawyer in your area only to see something like this:
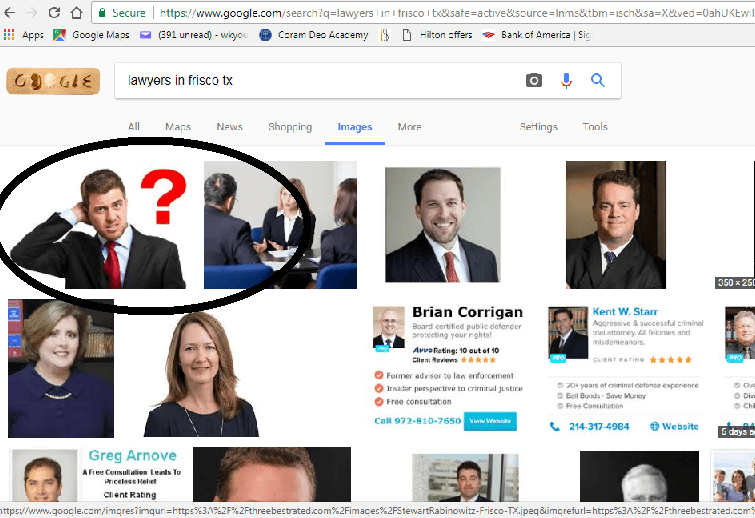
Chances are you wouldn’t click on that image.
So when in doubt, use a relevant and interesting image for every page on your site, and especially for your product pages.
Even if you have to invest in a professional photographer, the effort and money can be worth it.
The last thing you want is for someone to pass up your site because your image isn’t the most relevant to their search.
Hack #3: Leverage user-submitted images
The average Internet user is pretty skeptical, myself included.
That’s why so many brands now turn to social proof as a means to improve audience engagement and drive sales on their e-commerce sites.
But how can social proof help you get to the top of Google’s image search?
The answer lies in utilizing user-generated social proof image content strategically across your site.
Social proof is one of the best ways to increase trust in your brand and improve conversions.
Typically, this type of proof comes in the form of testimonials or case studies that brands leverage in various ways across their site.
But with how image-oriented our current social media lives are, we now see a vast amount of user-generated social proof content in the form of pictures.
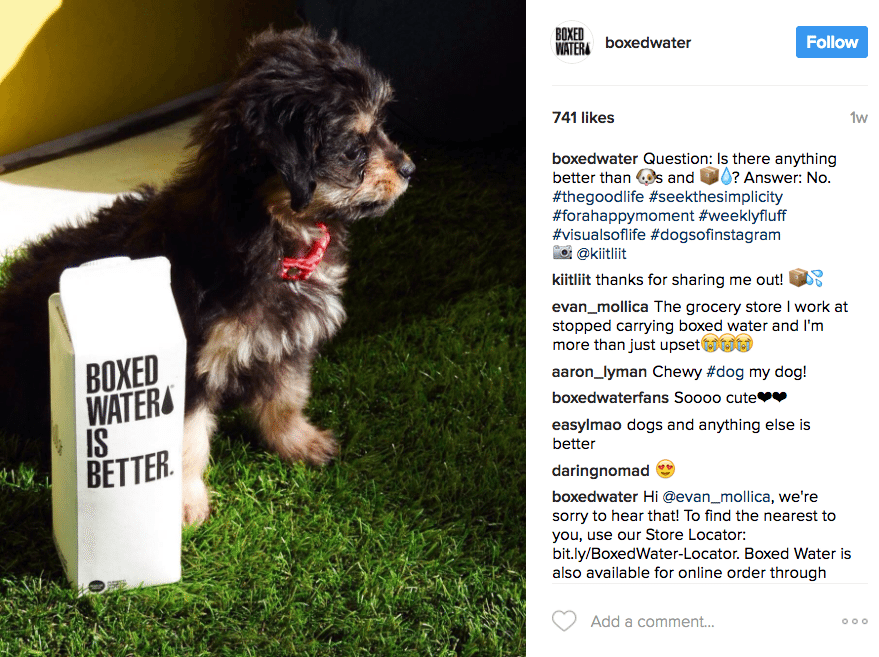
Sites like Instagram and Snapchat have changed the way we interact with images, and can now further improve the way you optimize your images’ SEO.
The result means that you can start finding user-generated content by merely interacting with and incentivizing your social media audience.
The key to these images is that they have to be sincere and truly user-generated.
You also need to ensure that you integrate your user-generated images on the right page.
And of course, you need to ensure that you’re legally using the images you end up placing on your site.
But once you have all your ducks in a row, a great idea is to implement your user-generated images on your product pages.
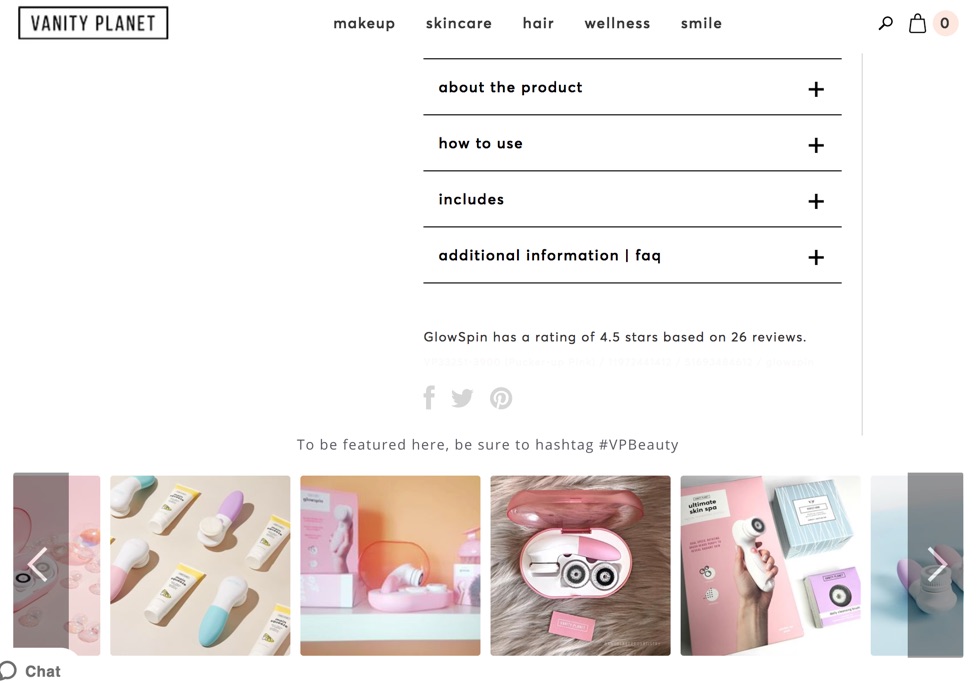
As you can see, the bottom image scroll is comprised of user-generated images that used the #VPBeauty when posting on social media.
The company browsed these images for the highest quality options that it felt showed the best side of their brand.
Then, it embedded these images on their product pages to provide immediate social proof when a visitor sees them.
And since these images are on your website and can be optimized accordingly, they can rank on a Google image search and potentially bring more traffic to your site.
Hack #4: Reduce your load time
Fast-loading images are one of the cornerstones of SEO.
If a user can come to your site and quickly load an image that contributes to their overall experience, Google has ways of noticing.
Recent studies have shown that images on websites are typically the largest elements that need to be loaded by a user.
In fact, images on average comprise more than half the data of most web pages.
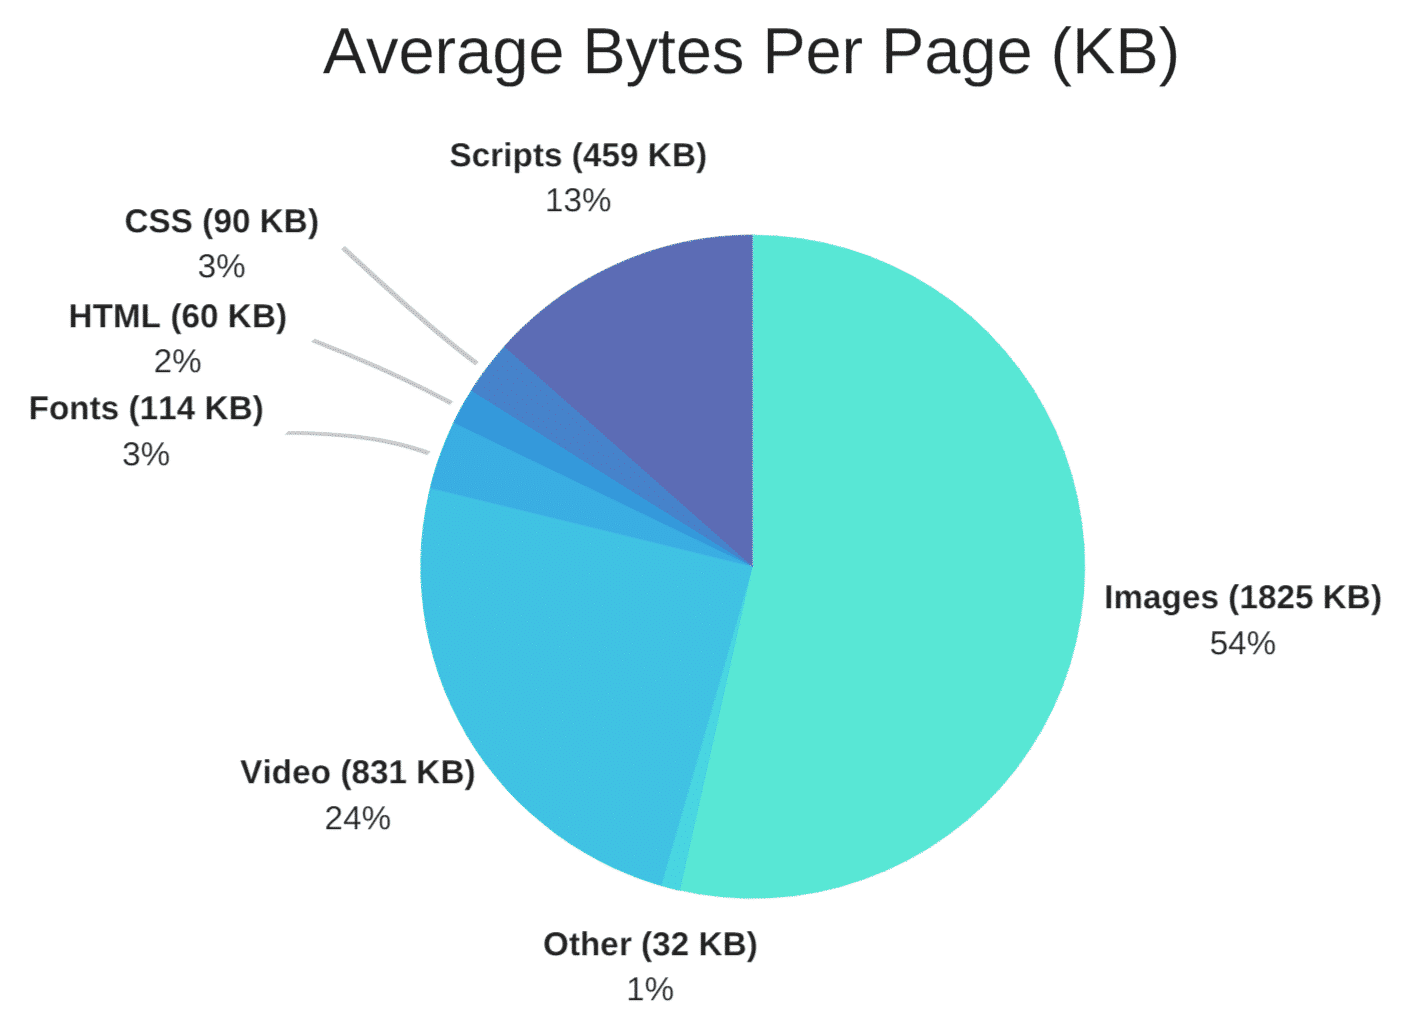
So when you’re optimizing your product page, there’s a good chance that the image you use is slowing down your site.
And since bounce rates tend to grow rapidly with longer load times, Google sees image size as a significant SEO factor.
That means in order to rank your images on either the front page or an image search, you need to find a way to create a smaller image.
That is where image compression comes in.
Image compression is the practice of taking a large, bulky image file and effectively shrinking it to a fraction of its size.
When there’s less to load, your site loads faster.
Generally speaking, image compression can yield results like this:

This image is clear, sharp, and pleasant to look at.
If I weren’t telling you it was a compressed image, you probably never would have guessed.
But look at what happens when you take this same image and compress it even more:

The colors go all wrong, the lighting is poor, and it makes the image hard to look at.
This is the darker side of what can happen if you compress too much.
There isn’t too much difference in size between these two photos.
The first is about 350 KB, and the second is about 70 KB.
And when you compare that to a photo that may contain thousands of KB, then you begin to see how much this helps improve your load time.
So compressing images is a balancing act.
Go too far, and you get a bad image.
Don’t go far enough, and you’re undermining your SEO efforts altogether.
But how can you easily optimize your photos to ensure that they load faster and rank higher?
To start with, I recommend testing the speed of your site using Google’s PageSpeed Insights.
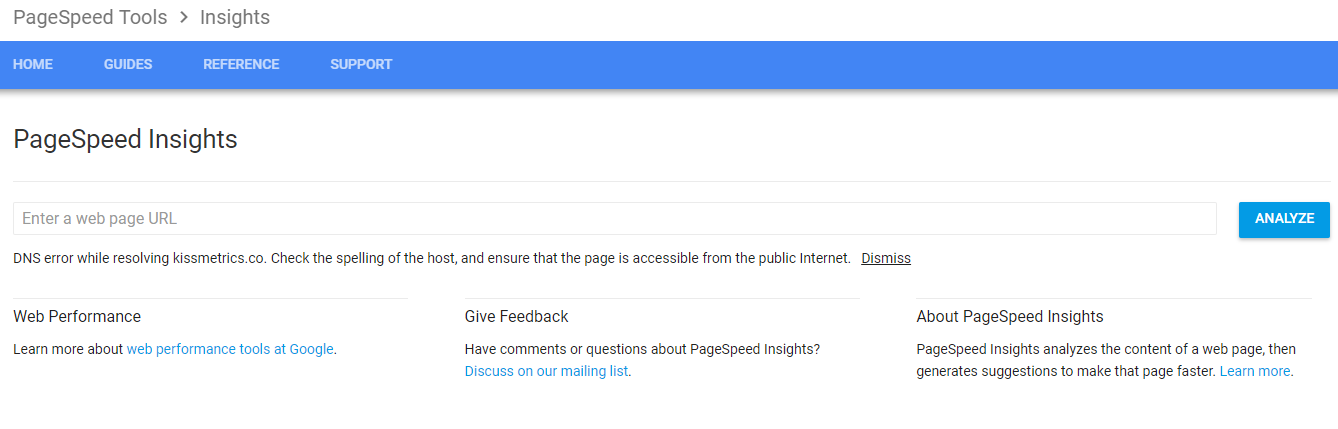
This will let you methodically insert the URLs of your product pages to test how quickly they load.
If you see less than optimal results, PageSpeed Insights will give you a breakdown of which elements will improve your site’s load speed.
If you see the option to Optimize images, you can click the drop-down menu below to see what needs to be fixed.
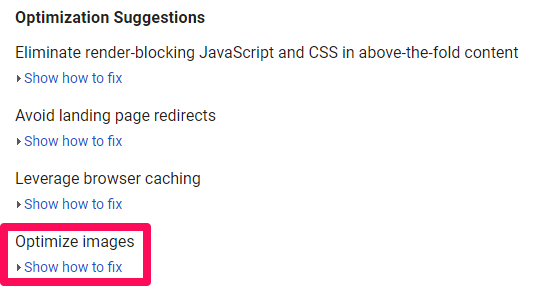
PageSpeed Insights will tell you the exact file or files that need to be compressed, as well as how big of a reduction it needs.

Once you find out which files need to be compressed, I recommend using a site like JPEGMini to help you complete the task with just a few clicks.
Other options are TinyJPG or ImageOptim (Mac only). Choose lossless compression so you don’t lose image quality.
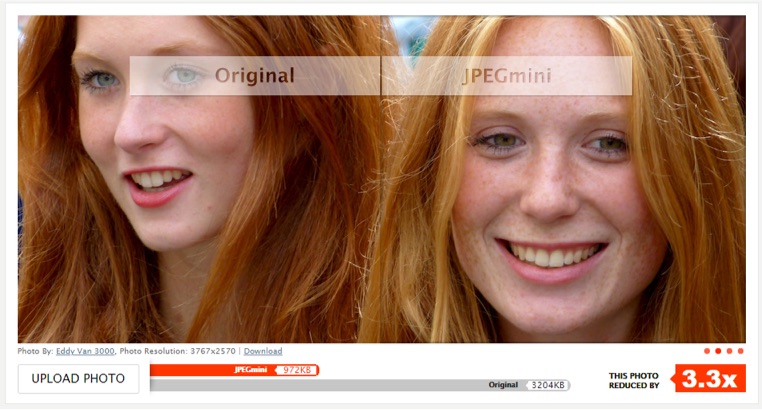
As you can see, there’s arguably no noticeable difference in the quality of these images to the naked eye.
But in Google’s case, it would notice a clear difference between the original file and the resulting compression that’s more than three times smaller.
This can drastically increase your load time, and even put you under the bar recommended by PageSpeed Insights.
All you have to do is upload your photo with a few clicks.
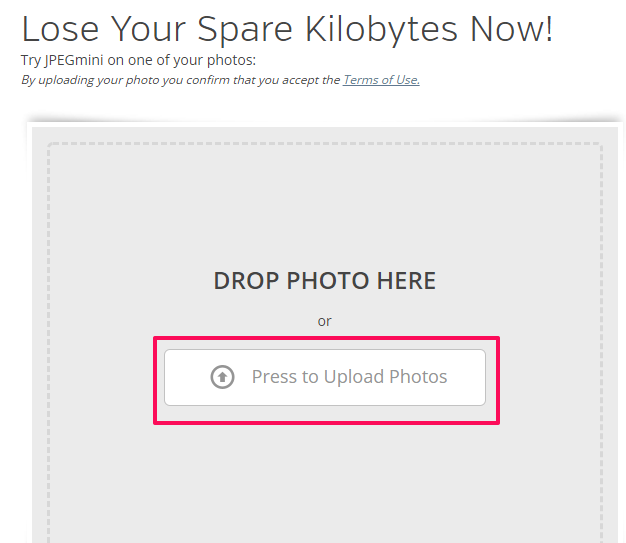
Then let their system work its magic.
You’ll have a compressed file that’s indistinguishable from the original that’s much, much smaller.
In one case, a brand had let its site load speed drop to abysmal levels in a way that started tanking its traffic.
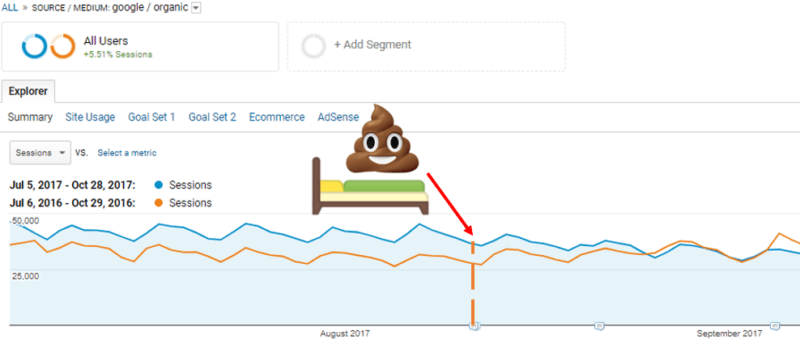
It even got to the point where PageSpeed Insights showed a zero score for their optimization.
In a large-scale effort to combat this, it overhauled its image sizes and compressed the size of its web pages as much as possible.
As a result, it saw a return to “normal” traffic levels.
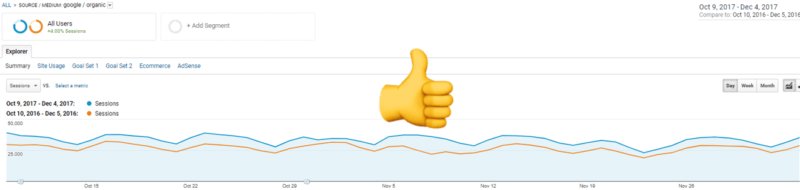
This is a clear signal that image size matters when it comes to your SEO.
If you let your images slow down your site, then you run the risk of turning away your users and decreasing the chance of a sale.
And if your image is too big, it’s very likely that Google will rank another image over it in its image search.
So if you want to drive your e-commerce sales with image search, it’s highly recommended to start implementing crisp, compressed images on your product pages.
This will increase the chances of organic traffic, and could ultimately help you edge out your competition.
Conclusion
Google image search has come a long way since 2001, and it seems the ride isn’t over.
With its new partnership with Getty Images, the way we search and use images on Google seems to have changed in favor of the brand that gets there first.
Sites that don’t even rank on the top few pages of Google can still have a fighting chance if its images are optimized and rank well.
And since the majority of e-commerce shoppers browse images before they buy, this development has clear implications for online sellers.
So to help set your brand apart, you need to optimize your images for SEO before your competitors catch on.
Start by ensuring that your alt tags and file names are optimized so that Google can “read” your images appropriately.
And of course, make sure that the images you use are both relevant to your search and interesting enough to make a user want to click.
Then, start leveraging your social media presence to build a pool of user-generated content.
These images will provide social proof and allow you to optimize even more images for SEO.
And finally, take steps to ensure that large image files aren’t negatively impacting your site’s load time.
If you approach your images correctly, you will have further optimized your site for Google’s image search and put your SEO in a better position altogether.
Has your brand seen traffic from Google image search? What worked for you?
About the Author: Neil Patel is the cofounder of Neil Patel Digital.
Source: feedproxy.google.com