
Tag Archives for " content strategy "

How to Create an Editorial Calendar That Will Streamline Your Content Strategy
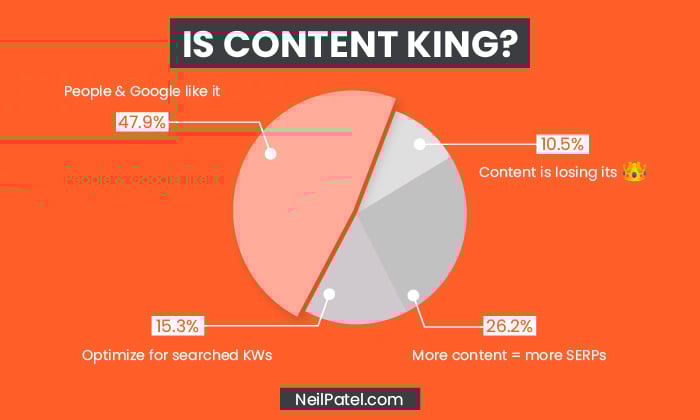
According to Bill Gates, “Content is King.” That was true in 1996, and it continues to be true today.
As consumers become savvier, content continues to play a vital role in educating and converting consumers.
However, not all marketers understand how to implement a content strategy correctly.
When you don’t start with the basics, you could be making content production more complicated than necessary.
To be successful, your content plan must be actionable, and you need to publish content consistently.
That’s where an editorial calendar comes in.
We’re going to cover the basics, including how to create and manage your editorial calendar, and how it can help your content strategy grow.
4 Reasons to Use an Editorial Calendar
An editorial calendar enables content publishers to plan, create, publish, and promote their content in an organized manner.
Many bloggers and businesses use editorial or content calendars to streamline content production.
In many ways, an editorial calendar is a lifesaver for creatives and business owners.
Whether you’re a blogger, freelance writer, business owner, or creative director at a marketing firm, an editorial content calendar can help you stay on track and keep you sane—while ensuring a consistent flow of content.
Others use an editorial calendar to improve focus because an organized approach can also limit writer’s block and keep content evergreen.
There are other ways you can benefit from an editorial content calendar, including:

1. Better Organization and Delegation
With an editorial calendar, you can see articles that need writing at a glance.
From there, you can delegate the articles to your writing team, ready for them to get to work.
No more scrambling to send writers topics at the last minute or wondering if you’ll even get around to writing this month.
With a calendar, it’s all right in front of you.
Ultimately, this level of organization saves time, keeps the content coming, and ensures every member of your content creation team knows what they’re doing.
2. Improved Planning
The better you plan your articles, the better the writing tends to be.
When you know what you want to write, you don’t waste time with last-minute research or trying to find the sources you need to support your article.
In fact, some consider planning to be more important than the content production itself.
Planning content is essential for:
- Creating the kind of content most suited to your audience.
- Writing the in-depth content your audience wants—and needs Publishing exactly when and where your customers hang out.
3. Helps Achieve Your Goals

Your editorial calendar is part of your content strategy.
Ideally, you’ve developed your content strategy around the goals you’re trying to achieve with your product, your blog, or your company overall.
An editorial content calendar assists in goal achievement by:
- Allowing you to meet critical milestones.
- Helping with promotional activities.
- Reaching new leads and making fresh conversions.
- Getting more newsletter sign-ups.Building awareness of your brand.
Whatever your goals are for your business, your editorial calendar has a vital role in allowing you to achieve them.
4. Sticking to Deadlines
According to Mark Twain, “deadlines are the greatest source of inspiration.”
However, that doesn’t mean you want to do a rush job.
To avoid rushing content creation, every team member needs to be clear on their deadlines to keep reaching your goals and your audience engaged.
Further, keeping up with these deadlines is especially important when you’re publishing new content that’s a part of your business strategy.
For example, if you are publishing blogs to support a new launch or annual sale.

How to Create an Editorial Calendar
Don’t let the thought of creating an editorial calendar stress you out—I promise it’s not that complicated once you create a plan.
This next section takes you through how to create an effective calendar, step-by-step.
This is just an outline, so feel free to adjust these steps to meet the needs of your business.
1. Determine Which Tools to Use
Your first step is deciding which tools to use.
This varies from team to team, and content managers may need a combination of tools for best results.
If you want free options for getting started, Google Docs, Excel, or Trello are popular choices.
For paid tools, there are several worth considering, including:
- Airtable
- Asana
- Monday
- BrightPod
Airtable, Asana, and HubSpot offer free content calendar templates to get you started, and there are plenty of others available, too.
Whichever tool you use, make sure it meets everyone’s needs.
As Buffer’s editorial director, Ash Read, told HubSpot:
“[your] editorial calendar should be a resource for your whole team, not just content creators.”
2. Create a Content Backlog
Next, you need to create a content backlog.
This is just a list of content ideas for easy viewing and lets you track your ideas for posts.
You could use Google Sheets or Excel for this, or one of the free templates mentioned, like Asana.
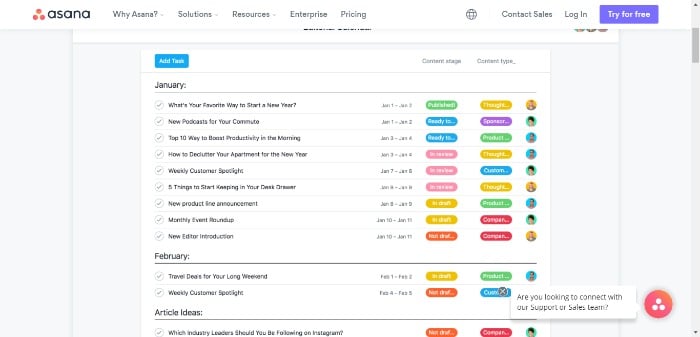
Whichever you go with, your chosen tool should allow you to create a clear, organized list.
Just remember, it’s OK to stray from your list.
Not every idea will end up as an entire post, and sometimes changing your content strategy is essential for keeping up with new trends or thinking of a new angle.
Create your sheet, then start adding a few headings like:
- title
- assigned author
- project status
- publication date
Other headings you could use are:
- Special dates and anniversaries.
- Themes and distribution channels.
- Trending topics/new launches relevant to your niche.
- Seasonal content and key sales dates.
For instance, Black Friday, where you may want to ramp up content production.
3. Develop Your Content Strategy
Don’t overthink your content strategy.
There’s a simple way of making sure your content strategy covers all the bases, and as long as you keep these parts in mind, you won’t go wrong.
First, outline steps such as how much content you want to produce a month, what topics you want to cover, and your ideal customers.
Then add strategic steps, such as managing your existing content and goal tracking.
These might include:
Define your goals:
For example, growing your mailing list or attracting new customers.
Understand your customers:
Which social media sites do your audience use?
Which content types do they prefer/respond to?
What are their pain points, and how can your products/services solve them?
Analyze your competition:
You can use a tool like Ubersuggest, which has a free and paid version to see which keywords competitors are targeting.
Positioning:
What makes your business unique, and how do you stand out in your marketplace?
You could do this in a few ways, like specializing in a targeted niche or telling your brand’s story.
Ask yourself how the content you’re creating can achieve this.
Estimate your budget:
How much is your content strategy going to cost you, and how can you maximize your ROI?
Measure your KPIs so you know your content is getting results:

For example, if you’re aiming to build brand awareness, an increase in shares and views will show you’re heading in the right direction.
4. Schedule the First Month
Many of us produce content at the last minute or create it whenever we have spare time.
If you’re looking for a less stressful (and more effective) approach, schedule your content in advance.
A month is usually enough, but you could schedule up to six weeks.
You can use Google Calendar for this.
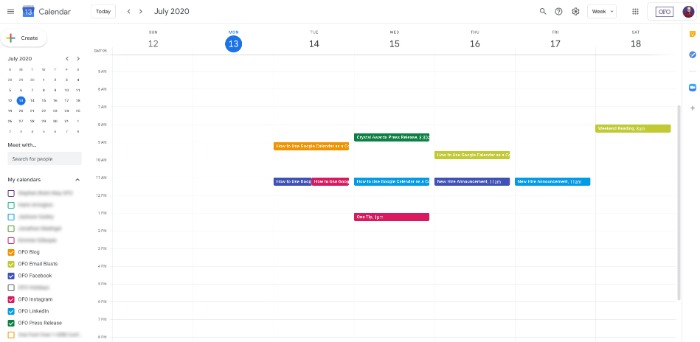
Add each step of your process, and make sure to give yourself plenty of time.
So, you might create a due date on the first Monday to write your outlines, then schedule one article a week to be written, two days for editing, set a publish date, then schedule it into your social media sharing calendar.
The process will vary based on how much content you produce and how many people are on your team, but I strongly recommend breaking each piece of content into more manageable steps.
5. Move Articles Into Production
When you’re in the full swing of producing content, it’s easy to let pieces slip through the cracks, especially if you have multiple people working on the project.
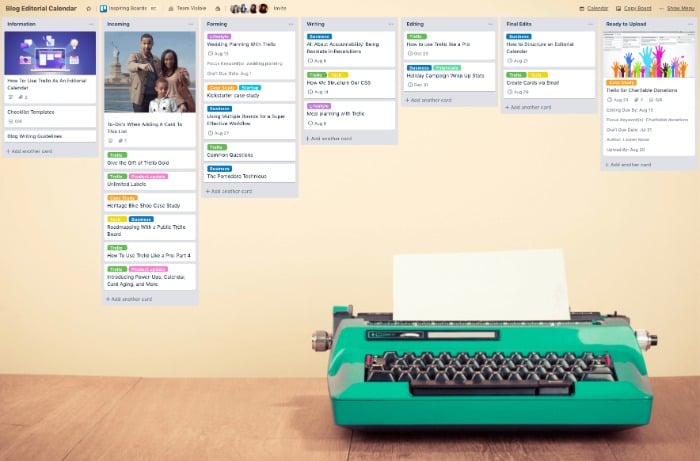
Creating a Trello account can keep you on track.
The first step in using your Trello account for content production is to decide what stages each article will need to go through.
What you need is up to you, but here are some suggestions for your Trello cards:
- assign to writer
- writing in progress ready for edits
- ready for uploading and scheduling
Alternatively, you could make it more complex and add additional steps like:
- final edits
- SEO audits
- published
Then your Trello cards might look something like this:
6. Build Your Content Queue
If you’re just starting with an editorial calendar, you need to get a few articles ready for publication.
Choose a schedule that suits you, but a forward-looking schedule of 4-6 weeks works well for most teams.
That sounds like a lot of work, but you can approach the task in two ways.
First, you could spend a few weeks writing content until you have a volume of work to publish.
However, this method isn’t suitable for everyone, unless you’ve got a team of writers to help you.
Another way is to spend a few months creating extra content every day, which is doable for most content producers.

7. Continually Optimize Your Process
So far, we’ve covered how to get your content production off the ground.
However, you can’t set it and forget it.
Over time, you might find there are bottlenecks in your processes or that certain tools don’t fit your needs.
Make sure to check in with your team regularly to ensure the editorial process you’ve created is working for everyone.
Common areas to review include:
- your schedule and the tools you’re using
- the volume of content you’re storing
- the time between stages the metrics you track
Over time, you’ll get a better understanding of whether the tools you’re working at are suitable for your team and whether the amount of articles you’re publishing is helping your business grow.
FAQs About Editorial Calendars
Why do I need an editorial calendar?
An organized approach to content production reduces time and helps you publish better quality content.
From ideation and writing to publishing and promotion, an editorial calendar helps streamline every part of the process.
Do I need paid tools to create an editorial calendar?
Not unless you want to. Free tools like Trello and Google Docs are fine, but there are also paid options like Asana available.
What headings should I include on an editorial calendar?
Not everyone’s calendar looks the same, but most marketers include titles, publication dates, and the article writer’s name.
Once you’ve added in the most obvious headings, write in the titles that work for your specific needs.
What’s the difference between an editorial calendar and a content calendar?
These terms are often used interchangeably.
However, an editorial calendar generally outlines each step of the process, while a content calendar usually covers one aspect—such as when posts are published or shared to social media.
Summary of Editorial Calendar Guide
An editorial content calendar is a must-have for any content marketer or small business looking to make the most of content production.
It helps you stay focused on your goals and produce high-quality content consistently.

Although it sounds like a lot of work, setting up a calendar isn’t difficult and allows you to seamlessly produce evergreen content while making the most of seasonal trends.
How do you use an editorial calendar?
Tell us below.
Source: neilpatel.com

How Salesbloom Builds Excellent Traffic Without Backlinks
This is a TRUE & SUCCESSFUL story from Jim Miller – Founder of Salesbloom and one of our long-time customers.
Jim Miller is an e-commerce consultant, and founder of Salesbloom, who collaborates with world-renowned marketing gurus.
Enjoy his story, written and documented by himself, and see how we hit Google’s top SERP spots with no backlinks but with good content optimization.

Over a six to nine-month period using the content assistant optimization tool, I have seen numerous pages swiftly develop and rank to the highest pages of Google.
So getting traffic without building backlinks can be achieved with the right content strategy.
This case study was composed to help share the success I had for my client.
Why This Ought to Work For You?
Working behind the scenes with some of the fastest developing agencies in marketing, you encounter conflicting strategies both internally and externally, which promise to improve your client’s rankings.
I’m a firm believer in testing everything before foolishly trusting any information from whoever it may be, whether an influencer, agency or otherwise, so I work behind the scenes to know what actually works.
Years ago, I cracked an algorithm on eBay’s search engine with one of my first career positions, taking a small (and I do mean small) local footwear retailer from £10k online sales per month to £250k (£450,000 Christmas Peak).
All in just under six months!
Yes, it’s true – and this included outselling retail giants like ‘Barretts’, ‘Office’ and ‘Schuh’- and all without a penny of a marketing budget!
I’ve never had the luxury of limitless budgets (and I prefer not to either as the constraints bring out the best in me).
Having a typically micro-budget (maybe being a tad frugal as well), I’m always hesitant to pick something like ‘Marketmuse’ and put my house on the market for a taste!
Being overworked (and a little disorganized if I’m honest at the time) necessitated a search for a timesaving tool for obtaining the broader metrics or overarching topics and keywords which help others rank more highly.
It was then that I came across Cognitive’s Content Assistant tool – though at that time it took a little digging as the software was so new.
Cognitive’s content assistant tool allowed me the opportunity to see correlated topics and missing keywords that enable the content to shine through.
I’m not a natural writer, I rely on others to help me edit my thoughts as many e-commerce consultants do.
I might add that my thoughts are not always that easy to convey, so this tool was an immense help.
I found the experience when using the Cognitive SEO to be intuitive in the main, simple to use, and then ideal to communicate to others.

Jim Miller
Founder of Salesbloom | @salesbloomuk
Now at Salesbloom, we constantly develop existing content using Cognitive and produce new articles within the same content writing process.
Here’s how we did it (as I’m honest enough to say I have great colleagues too!) …
How We Hit the Google’s Top SERP Spots
If you’ve never used Cognitive or unless you’re comfortable enough to drop into the Google Search Console, it’s worth tracking your existing content’s keyword positions with Rank Tracker before you start.
The first things to do are:
- Find existing content you determine needs to be improved upon.
- Search for the main keyword with the ‘Cognitive Keyword Tool’.
- Optimize your content with ‘Content Assistant’.
- Fetch URL within Google Search Console
Step 1: Find Existing Content to Improve
One of the best positions to start from is by finding pages with keywords or queries that currently rank outside the top five spots on Google.
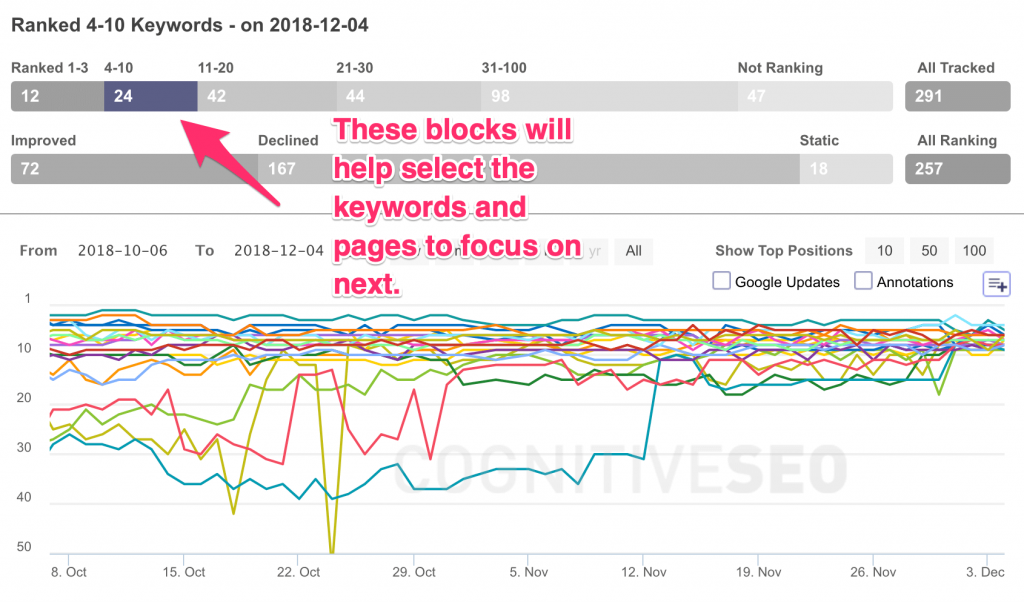
The ‘sweet spot’ is choosing keywords that sit in position 4 up to 30.
As you can see, the blue line above did brilliantly!
Step 2: Search for the Main Keyword with Cognitive’s Keyword Tool
Pick your head term or the keyword you want to rank for and search with the keyword tool.
In the example below, I chose “SEO agency” as my keyword phrase.
Feel free to pick any keyword and page you like as I’ve had success with category pages on e-commerce websites, homepages, and blog articles.
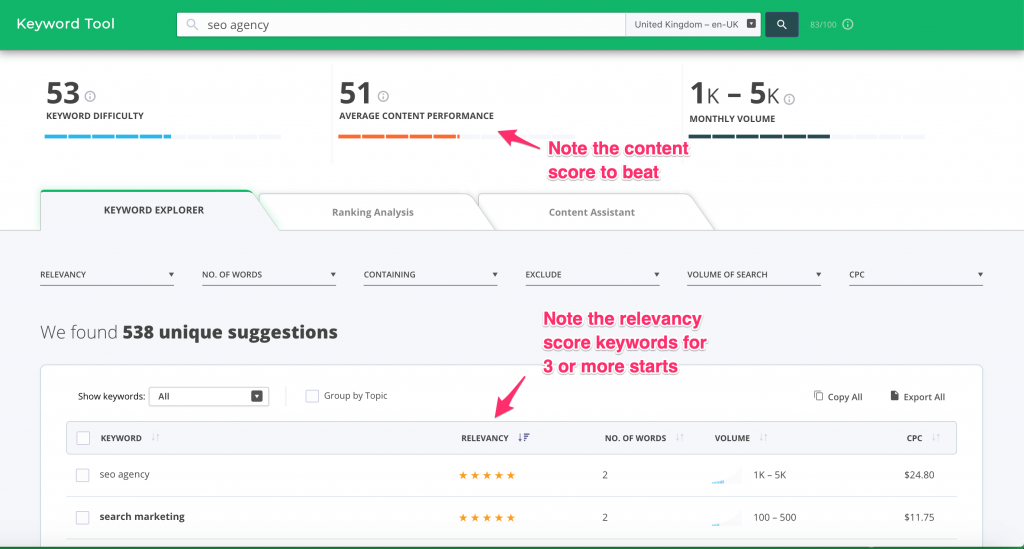
Make note of the average content performance score.
The goal is to beat that on your optimization round. (I suggest you open a new Google doc and add it at the top to remind you of your target)
It’s good to pull out the relevancy scores and consider any that score higher than 3 stars.
Create your new content so it reads well, and without worrying about key phrases initially.
Once you’ve done that, copy the list of keywords that Cognitive suggests and work out a structure for your article based upon the 3-5 star terms.
GO FOR GOLD.
Never strive to be average at anything.
Jim Miller
Founder of Salesbloom | @salesbloomuk
Take a peek at the ranking analysis tab next to see how you are performing before you continue.
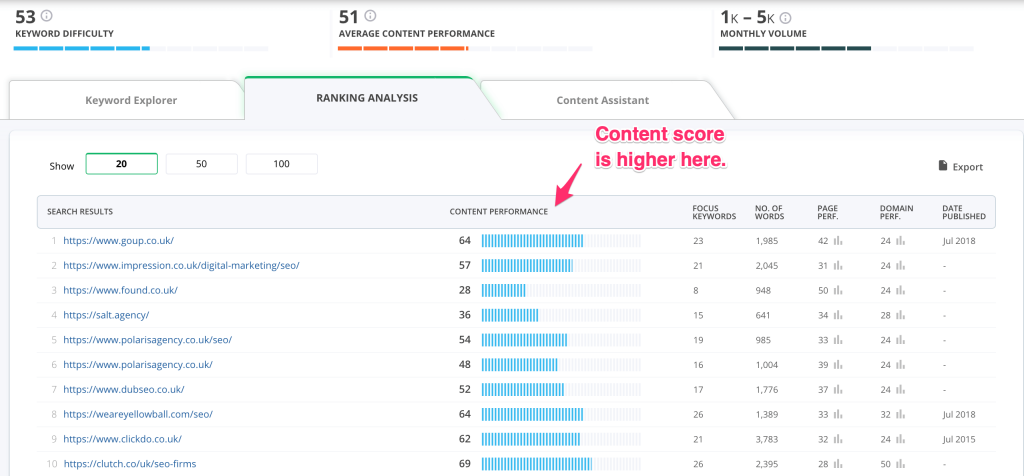
It’s a good idea to see what competitor pages do on the look and feel of the page for content flow.
Google ‘likes’ these sites for a reason so it’s a ‘no-brainer. (Ultimately, it’s because the visitors do as well!)
The action to take for this example is: Write a 700-4000 word content piece that beats 69.
Step 3: Optimise with Content Assistant
Once you’ve gone into the Content Assistant, press the top right, ‘Import link’ if it’s an existing page (and yes, it can even score raw code).
Otherwise, copy and paste your content into the relevant sections and hit ‘Check Score’.
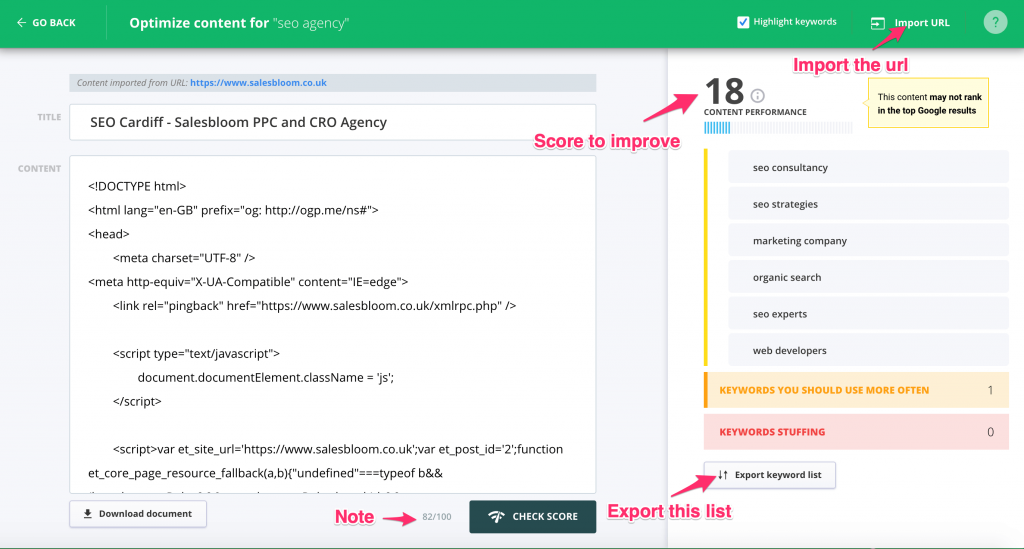
This site is new so typically it’s not going to score well yet, but if you export the list and scroll down on the right-hand side you now have keywords to export and use.
You do have the option to amend the copy on the left-hand side in real-time, but each check of the score reduces your overall monthly allowance.
I prefer to optimize outside in a Google document file so as to not squeeze keywords in when they are not needed, and to ensure your article or post still reads well.
Repeat each process, and once you feel you’ve done a good job hopefully, you’ve beaten your competition’s score. If not, take a step back and see where your content can be improved.
Step 4: Fetch URL within Google Search Console
Login to Google Search Console and retrieve the revised URL.
(I’ve not convinced this speeds it up, but it’s a habit I now do every time).
Results
Results can be manipulated but these graphs illustrate this type of content is not reliant upon seasonal wins or easy pickings.
That alone should encourage you to test this for yourself, based on my findings.
The first piece of content below was devised for a SAAS company that has grown from zero to almost 7,000 clicks in a year.
This, with no backlinks or promotion: Pure organic traffic gain.

Some keywords can take longer to develop (as below) but site traffic appears when you produce good content via the ‘Content Assistant’.

Here’s another blog article created and developing nicely below. Perfect for a revisit within a year turnaround.

Here’s a comparison (below) for much older content.


To reiterate, I’m not going for easy choices on keywords.
To my mind, there aren’t many anyway, but the example above is recently optimized and shows positive progress in a short period.
Disclaimer
This is not a paid post. cognitiveSEO made no agreement with the author.
This is Salesbloom’s and Jim’s success story, written and documented by himself.
Please feel free to share your thoughts on this story with us.
About the author

Jim Miller is an e-commerce consultant, and founder of Salesbloom, who collaborates with world-renowned marketing gurus such as Neil Patel and Eric Siu on internal projects.
The post How Salesbloom Builds Excellent Traffic Without Backlinks appeared first on SEO Blog | cognitiveSEO Blog on SEO Tactics & Strategies.
Source: cognitiveseo.com

3 Simple Steps to Creating A “Pillar Blog Post” That Generates Organic Traffic for Years to Come
You know content is important… right?
I hope so.
After all, back in 2014, when DigitalMarketer was a young company that nobody had ever heard of, it was content that helped cement our authority and launch us into the international brand we are today.
And do you know how many pieces of content it took to begin that dramatic transformation?
10.
That’s what it took to launch the DM brand.
Just 10 amazing pieces of content.
And if you don’t believe me, check out this recent post from Ryan:

Now when we say all you need is 10 pieces of content, these aren’t just any old blog posts you can put together in 45 minutes. These are big, meaty, strategically positioned pieces of content that we call “pillar posts.”
And in this article, I’m going to show you how to create your own pillar content so you, too, can build your authority, your brand, and your business through better content marketing.
When you’re done reading this article, you’ll have a simple 3-step system you can follow to create a pillar blog post that continues to bring new website traffic and leads to your website—and pre-sells them on the value of your product or service—for years to come.
But before we get started, there’s one question you need to ask yourself.
Are You a Publisher?
Many people have the mistaken belief that in order to succeed with content marketing, they have to post a new piece of content every single day.
Luckily, that’s not true. At least… not for most of us.
Most companies out there do NOT need to create a ton of new content on a hyper-regular basis. The only exception is publishing companies.
Publishers are companies whose business model is “publishing.” These companies make their money by serving ads on their content. And in order to maximize their revenue, they also have to maximize the amount of content they produce each day.
Classic examples include The New York Times and The Wall Street Journal.
That said, this post isn’t for publishers.
Now if you’re a publisher, volume is the name of the game… which means you DO need to publish a lot of content. Because that’s how you make your revenue.
Gizmodo, for instance, publishes 6-8 pieces of content per day. theCHIVE produces 40 a day!
That said, this post isn’t for publishers.
Because the strategy I’m about to teach you doesn’t really apply to companies like Gizmodo or The New York Times.
If you are a publisher, you may find our “Ultimate List of Blog Post Ideas” helpful.
But if you’re a company that sells a product or service—whether it’s a physical product, a service, a SaaS product, whatever—then this process of creating pillar blog posts WILL work for you.
At this point, you might be wondering…
What the Heck is a Pillar Blog Post, Anyway?
Think of a pillar blog post like the columns in the ancient Greek temples. The pillar is what holds up the building. It supports the weight.
A pillar post does the same thing. It’s the foundation that supports the rest of your content marketing.
Pillar posts are big, meaty posts. They’re useful, actionable, well-written, and engaging. They’re filled with relevant images and audio/video files to support the points you’re making in the text.
As a result, pillar posts have something that 99% of other blog posts don’t have: longevity.
The average blog post gets a spike of traffic when it’s first posted… then it quickly dies down. After 48 hours, most blog posts are basically dead.
They never again bring in more than a trickle of traffic.
Pillar posts, on the other hand, provide long-lasting ROI. They’ll continue generating new visitors to your website day after day, week after week, even year after year.
Some of our pillar posts at DigitalMarketer are still generating massive organic traffic, even 5 years after they were initially published, like our “101 Best Email Subject Lines.”

Finally, the last thing that separates a pillar post is that they pre-sell your product or service.
It’s not enough to simply publish a blog post that’s somewhat relevant to your product or service.
Your content should actively pre-sell your audience on the value of whatever it is you offer by providing them with the education they need to fully understand why your product or service is so incredibly valuable.
It might sound complicated, but I promise it’s really not. In fact, the whole process can be boiled down into 3 simple steps…
3 Simple Steps to Creating A “Pillar Blog Post”
These are three simple steps to create a pillar blog post to generate traffic for years.
Step 1: Choose Your Topic
The first and most important step is to simply decide what you’re going to talk about.
Don’t rush this step. In order for this process to work, you need to spend a little time here and really come up with a topic that is going to resonate with your audience.
A pillar post is designed to help pre-sell your product or service to the reader.
Remember, I said that a pillar post is designed to help pre-sell your product or service to the reader.
Well, in order for that to happen you need to really think about your audience, what their problem is, what they want, and what kind of content would be most helpful to them.
Here are the 3 questions you should ask yourself about your ideal customer to help come up with great topics for your content.
Trust me—the topic for your pillar post is hiding in those answers.
1) What does your prospect need to believe in order to buy the product or service you’re selling?
For example, if you’re selling a marathon training course, maybe your prospect needs to believe that they can run a marathon—even if they work full-time and can only train on nights and weekends.
Or maybe they need to believe that they can run a marathon, even if they’re over 40 or 50 or even if they’re currently overweight.
Because if your prospect doesn’t believe they can run a marathon because of their job, weight, age, etc., then they aren’t going to buy your marathon training course.
So it’s your job to educate them and answer their most common objections with a post like:
“How to Run a Marathon, Even if You Work 40 Hours a Week”
Here’s another example of an article that does a good job of this. It’s called, “5 Reasons Why Small Businesses Should use A CRM”:

Clearly, this company has identified some of the beliefs that their customers have (particularly the small business owners) need to be overcome.
Then they turned that into a blog post that helps to overcome those common objections.
2) What do your prospects research before they buy your product or service?
So the marathon company that we mentioned earlier needs to figure out the kind of things that marathon runners research before they run a marathon, and thus, buy your product.
- Are they searching for marathon training tips?
- Best marathon shoes?
- Marathon motivation?
Here’s another example from REI. They’ve put together a checklist of mountain biking equipment:

This is a great post for new mountain bikers who are researching what kind of gear they need to get started.
And, of course, the list has plenty of hyperlinks to products you can buy right on the REI website.
3) What conversations are going on in the mind of your customer before they buy your product or service?
Now you have to really dig deep into the minds of your customers.
When people are thinking about running a marathon, what kinds of things are they thinking about?
Maybe they’re wondering if marathons are good for you or not.
Maybe they’re wondering if running long-distance will hurt their knees, or cause muscle wasting, or 100 other similar questions.
Here’s a great example from Glassdoor. Clearly, they’ve identified some of the doubts that tend to run through people’s minds right before an interview:

Here’s another from Charles Schwab. It’s a timely topic for parents (like myself) who are just starting to think about paying for their kid’s college and so on.

Become the Answer to These Questions
These questions are super important because they help you to identify all the hot-button topics that are on your customers’ minds during the buying process.
And once you know the questions your prospects are asking, you can start being the answer to those questions. This will be the foundation for your pillar blog post.
Once you know the questions your prospects are asking, you can start being the answer to those questions.
Are you having trouble figuring out what kinds of questions your prospects have? If so, here’s a little hint.
Get out there and ask them!
Check out forums dedicated to your niche. Attend a local meetup.
Or just see if you can interview some of your company’s previous customers to find out what sort of things they researched and thought about before they purchased your product.
HINT: Think About the Way Your Audience Self-Identifies
People often go through a process where they suddenly decide to self-identify a certain way.
As a guitar player. A chef. A photographer. Someone who’s fit. Etc.
For instance, maybe you have been mountain biking off and on for a while. But one day, you find yourself biking more and more often, and you realize you really enjoy it.
And then you stop thinking of yourself as a guy who goes mountain biking… and starts thinking of yourself as an actual mountain biker.
And just like that, the way you identify yourself in your mind has changed.
People do this all the time, and when they do, it’s a great thing for savvy marketers who know how to take advantage of it.
Why?
Because anytime a person decides to self-identify as something, they have a tendency to buy a lot of stuff.
When you start to think of yourself as a mountain biker, you’re going to want to own all the things that mountain bikers generally have—like a hardcore mountain bike, protective gear, mountain biking shoes, and so on.
Those possessions are a way of reinforcing your new self-image.
And the trick, when you’re coming up with a topic for your pillar blog post, is to figure out what is going to speak to that person who has just now started to self-identify as a customer who uses the same type of product or service that you provide.
Now, this isn’t necessarily an exact science. There’s always a little guesswork involved. This is why 1 blog topic idea isn’t enough. Instead, I recommend coming up with a list of at least 10.
Create a List of 10 Content Ideas
When you find the perfect topic for a blog post—I mean that 1 blog post topic that absolutely hits your target prospect right where they live and makes them hungry to read more—
However, 1 piece of content might be all you need to connect with your audience and launch your content marketing success.
That’s what you’re looking for: that 1 idea that will truly resonate with your audience.
And if you take a closer look at Ryan’s post, he says the same thing:

For DigitalMarketer, it was a post called “Customer Value Optimization: How to Build an Unstoppable Business.”
The bad news is that you probably won’t pick the perfect topic right off the bat (ask me how I know). It will probably take a few tries until you hit on a content topic that really works for you.
So, start with a list of at least 10 great content topic ideas.
Then follow the rest of this process for each of those 10 ideas, one at a time, until you hit that home run.
Step 2: Pick a Type of Post
Now that you know what your content is going to be about, the next step is to choose how you’re going to present it.
And there are 2 post types that I recommend you start with here.
These aren’t the only way to format a pillar blog post, certainly, but in most cases, these are the 2 best formats to use if you’re writing a pillar post.
And the 2 perfect pillar post types are…
1) The “How To” Post:
Describe how to execute a process, and use images, video, or audio to enrich the post
This type of article teaches the reader how to do something—whether it’s how to lose weight, how to change a flat tire, or even how to create a pillar blog post. (Woah, meta.)
If you choose to write a how-to post, make sure to go into detail on every step so that the process you’re explaining is super clear to the reader.
The awesome thing about how-to articles is that they have the natural side-effect of positioning you as an authority in your niche.
As a company that offers training programs, DigitalMarketer would want its prospects to view them as an authority in the digital marketing niche.
So creating how-to posts is a natural fit for them, which is why DigitalMarketer writes a lot of them.
An example would be DM’s pillar post on customer value optimization:

This post goes into great detail in explaining how to nurture leads into customers and then how to maximize the value of those customers using a marketing funnel that runs largely on autopilot.
2) The Listicle:
Create a list of books, tools, resources, or literally anything else your audience will find useful
The other type of post I recommend is a listicle. This is a big old honkin’ list of things that will be useful for your reader.
It’s a good choice when there are many different ways to accomplish whatever it is your reader is trying to do.
It’s also a great choice for a lot of B2C companies who want to give their customers new ideas about different ways to use their products.
For example, here’s a listicle post from an essential oil company showing people all the different ways they can use essential oils:

If Those 2 Post Types Don’t Fit…
Chances are pretty good that your pillar post idea will work best as a how-to article or a listicle. So try those 2 post types first.
But if those don’t seem to fit, then check out our blog post called The Ultimate List of Blog Post Ideas.
And appropriately enough, this is actually a listicle that contains over 50 (and counting) types of blog posts you can use to deliver your content online.
Then, the last thing you’ll need to do is…
Step 3: Find Your Angle
At this point, you have your topic, and you know what format you’re going to present it in. So now you just need to start writing… right?
Wrong.
I can almost guarantee that your post is going to need some kind of angle. Some way of presenting your topic that grabs your reader’s attention and makes them want to click and read that post.
Because here’s the thing. Just about every topic under the sun has been covered before. So it’s not enough to simply write about your topic in a straightforward way.
Instead, you first have to find a way to differentiate your post by adding an angle to it. Something that makes it more interesting, more attention-grabbing. Something that makes it stand out from the pack.
Don’t Skip This Step!
Choosing an angle for your post is the step that most people skip.
And that’s a shame because there are a lot of really great posts out there—super helpful posts written about topics people are interested in—that never got the traction they deserved…
All because the creator didn’t write the post in a way that made it stand out from the competition and grab people’s attention.
Here are the 5 main post angles that I recommend for your pillar post:
1) Benefit:
A direct angle that speaks to the reader’s self-interest
In this angle, you present your topic as something that will benefit the reader. And everything about that post—from the title to the way you layout and write the text itself—needs to focus on that benefit.
Because this angle is pretty straightforward, it needs to make a big, bold promise. It needs to tell the reader what they’ll gain or learn.
Here’s an example of a “benefit” angle…

…which promises to show the reader how to be a good leader.
2) New:
Use this angle when you are revealing something novel or previously unknown to the reader
People love things that are new and exciting.
New developments, new technology, new announcements—if there’s anything about your topic that you can portray as being new and exciting… something people haven’t seen before… then this is probably the angle you’ll want to use.
The great thing about this angle is that it will appeal to people who are already well-read in your niche.
Take this example from our friends at Social Media Examiner:

If someone has already read 100 articles on how to monetize blogs, they probably won’t want to read a blog that looks like it covers the same thing they’ve already read 100 times.
But you just might grab their attention when you mention “New Research” in your headline, promising them something NEW that they’ve never read before.
3) Threat:
A form of the “benefit” angle, this post speaks to the avoidance of pain
This is basically the inverse of Angle #1. Only this time, instead of focusing on how taking action can benefit the reader… you’re focusing on the ways in which NOT taking action could harm them.
Here’s an example of a post with a “threat” angle:

4) Piggyback:
Leverages the authority or popularity of someone or something outside of your company
A piggyback is when you leverage something else that’s well-known to lend extra interest and credibility to your topic.
Here’s an example from Inc.com that piggybacks off of the authority, credibility, and success of Richard Branson:

Richard Branson didn’t write this article.
But the author can take advantage of his popularity by writing a post that talks about some of the principles that Richard Branson has talked about or written about in some of his books.
5) Curiosity:
Piques interest without providing direct information
The last angle, curiosity, is when you write a post that makes people curious to read more.
You’re not necessarily promising a benefit, or something new, or piggybacking on something else… you’re just piquing the reader’s interest as a way to draw as many people into your content as possible.
Here’s a great example of a “curiosity” post:

This was a super shocking headline, but it made perfect sense for this post because most people (including myself) didn’t know that James Chartrand is actually a woman.
Note: You have to be a little careful with curiosity angles. Don’t try to get too cute or too clever with your angles until you know what you’re doing. Otherwise, you’ll end up writing a post headline that doesn’t really speak to anyone.
You Can Combine These Angles Together
Now that you know the 5 most common angles for pillar posts, keep in mind you can also Frankenstein these things together to create an even more enticing post angle.
For example, you might combine a benefit angle with a new angle to create a post like:
“Research Shows This New Face Cream Reduces Wrinkles by 90%…”
Or you could combine a threat angle with a piggyback angle to make this post:
“Warren Buffet Warns Investors: Do NOT Invest in the Stock Market Unless You Do This First!”
3 Tips to Help Extend the Lifespan of Your Post
Remember, the goal of this process is to create a post that will live for a long time, bringing you more and more organic traffic even months or years after you publish it.
If you follow the 3-step process I outlined above, you’ll be well on your way to achieving that goal.
But just to make sure you’re armed with all the content firepower available, I’m also sharing these 3 tips to help make sure your posts live a long and healthy life.
1) Update Them Regularly
If you want your posts to continue bringing in traffic year after year, you need to update them and add to them on a regular basis. (Once a year is a good goal.)
This does a couple of things.
First, it lets Google know that your post is still up-to-date, still relevant. Google rewards pages are updated more often with better organic rankings, so this is a way to let them know your post hasn’t fallen behind the times.
“Hoping” isn’t a strategy.
It also makes the post itself more relevant, interesting, and useful for the end reader. Because no matter what topic you’re writing about, there’s bound to be some new information on that topic every year.
And by keeping your post-up-to-date, you’re making sure that it continues to be the go-to resource for people who are researching that topic.
2) Create Something 10x Better Than Anything Else Out There
Before you write your post, it’s a good idea to find some of the other pieces of content out there on the topic. Read through that content and see what your competitors have already done.
Then do 10x better than that.
If you aren’t willing to go way above and beyond what’s already out there, then this process isn’t worth your time.
If you want people to choose your blog post over someone else’s (especially a blog post that’s already out there and getting organic traffic), then you have to give them a good reason to do so—and you have to make sure that your content is the best, most helpful resource out there on your topic.
3) Buy Some Website Traffic
Once you publish your blog post, don’t be afraid to pay to send some web traffic to it.
There’s a lot of competition out there for people’s attention, and you can’t always just publish content and hope that people will notice it.
“Hoping” isn’t a strategy.
Instead, it’s your job to make sure that people notice you. And one way you can do that is by spending some money to get your content in front of the right kind of people.
How Many Pillar Posts Do You Need?
The last thing I’m going to talk about in this post is: how many times should you go through this process?
In step #1, I recommended coming up with 10 pillar post topics.
And that’s a good number to start with. When I first started at DM, that’s what I did: I started by creating 10 awesome pieces of content.
And that was enough.
Those 10 blog posts were enough to grab the attention of our market and really launch us into the brand we are today.
So come up with 10 post-topic ideas. Then complete the rest of this process for each of those ideas, 1 at a time, until you have 10 amazing pieces of content.
But don’t stop there!
Once you’re finished with your first 10 pieces of content, do it again. And again.
And again.
And watch your audience, your brand, and your business grow to new heights.
(NOTE: Struggling to create shareable content quickly? Get the Perfect Blog Post Template. You can use to it create viral blog posts fast, without ever having to “write” a single line of text. Check it out here.)

The post 3 Simple Steps to Creating A “Pillar Blog Post” That Generates Organic Traffic for Years to Come appeared first on DigitalMarketer.
Source: digitalmarketer.com